Networking on the Go – Creating a trusted wireless network in a sea of untrusted wireless
by firestorm_v1 on Aug.18, 2018, under Hardware, Networking, Security
 In this article, I’ll be going over my setup for being able to join my camper’s wireless network to a host wireless network (RV park wifi, state park wifi, etc..) with the purpose of maintaining security and convenience between switching wireless networks. Even though you’re on-the-go, you shouldn’t sacrifice security for convenience of park wifi, and at the same time, changing the wireless configuration on a slew of devices is inconvenient at best and maddening at worst. First I’ll cover why you want to consider this method versus other methods, then I’ll itemize a product list, then finally we’ll jump right into configuration. When we’re done, you’ll have your trusted wireless network all set up and ready for your devices.
1: Why?
First, let’s nip the “… but you’re camping!?” argument in the bud. Not everyone can completely disconnect from their job. Some jobs require on-call for weekend coverage, and some people are 100% remote, meaning their office is their camper. Either way, people that have a need to maintain connectivity while out in the trees shouldn’t be mocked for this because chances are their livelihood may very well depend on connectivity for work. Work to play or some inspirational quote like that… Anyways, now let’s talk the real why of why you’d want to do something like this.
As more and more people hit the road and need access for their jobs, more and more RV parks, state parks, campgrounds, etc.. have started installing wireless networks to provide Internet connectivity to their guests. It is increasingly important to understand what exactly you’re risking by connecting to an untrusted wireless network.
1a: Security
Every time you connect a phone, tablet, or a computer to a wireless network, your device becomes part of that wireless network and can send and receive data with other devices on that network whether or not you intend for that to happen. While sometimes this can be a desired action (like for controlling a chromecast or Fire TV), this can also open up the opportunity for some unexpected accesses by other people on the same network (say, someone else controlling your chromecast or Fire TV). By following this guide and building this wireless gateway system, you create a trusted network “bubble” where your devices can connect to each other freely, but outside people can’t see in nor can they control anything inside your network. This eliminates the possibility of someone trying to hijack your Fire-TV during family time and switching the TV to something less family appropriate or other nuisance acts.
1b: Convenience
So, let’s say you’re one of those lucky people that RV Full time (don’t mind me, just jealous…). Let’s also say that you have two phones, two laptops, a tablet, an Alexa, and a Fire-TV, all of which are wireless. That’s a total of seven devices. You arrive at Campsite A with wifi and now you have to reprogram all seven devices with the new information. Three days later, you have to move to another campsite across the city/state/country and now you have to do the same dance all over again. With this wireless gateway system, you only have to set the wireless config once for the client-side endpoint. Once connected, all seven of your devices will just work without you having to reprogram them.
In addition to the single wireless configuration to rule all your devices, there’s another issue with park wifi that presents itself from time to time. Most RV’s are built using steel and aluminum sheet metal in the roof and walls which is perfect for blocking wifi. Since we’re building a solution that has an outside component for the client (it connects to the park’s wifi) and an inside component that creates our trusted wifi (it is what your devices will connect to for access), the inside component being inside your camper will give you better coverage than an outdoor AP that has to go through your metal siding and roof.
1c: Wired and Wireless connectivity
Have a device that doesn’t have wireless (like a DVD/Blu-Ray player) but still need connectivity? This gateway system has a port for wired devices, expanded easily with an add-on switch.
1d: What this setup doesn’t do
First and foremost, it’s important to establish that this isn’t going to give you wifi in the middle of nowhere. If the camp you’re staying at doesn’t provide campground wifi, this isn’t going to magically make Internet happen. Additionally, if you’re at an overprovisioned campsite (too many people on the same network trying to watch Netflix), this setup won’t magically make bandwidth available for you. What it can do is turn weak campground signal into a stronger localized signal for your devices. The M2’s antenna in my observations is ten times more powerful than the antennas in my phone and laptop. You may want to keep a hotspot on standby if you find yourself running into bandwidth issues while you travel. (Of course, there’s nothing stopping you from pairing the M2’s wireless client to the hotspot either, so that way you still reap the benefits).
2: Parts List
As of this writing, the prices below are current from Amazon.
- Ubiquiti AirGateway – $27.53 – Amazon (Inside Part)
- Ubiquiti NanoStation Window/Wall Mount – $20.10 – Amazon (needed if mounting the Loco M2 to a window)
- Ubiquiti NanoStation locoM2 – $54.98 – Amazon (Outside Part)
- Length of Cat-5 cable (8 conductor)
- Beer – For when you’re done. (I’m not picky, as long as it’s cold)
2a: Some notes regarding selections
- This walkthrough will show screenshots from a Pico M2HP instead of the Loco M2 described above. Aside from physical differences, both devices run the exact same firmware and present the exact same options.
- The AirGateway LR (long range) has been discontinued in favor of the AirCube ($94.95 – Amazon) however I haven’t purchased one of these yet and can’t speculate on how to configure it. In theory it would work better than the AirGateway above as the AirCube does both 2.4Ghz and 5GHz whereas the AirGateway only does 2.4GHz frequencies. Based on this, the AirCube may also provide more significant signal power due to better antennas than the AirGateway.
- When I last shared instructions on how to do this, I was questioned as to why I used the Loco M2/Pico M2HP instead of any of the 5GHz products. This is because Ubiquiti’s CPE class devices (the Loco M2/M5 and the Pico M2HP) are singleband devices. In a lot of RV parks, the WiFi deployment will largely be 2.4GHz to cover as much ground as possible. 5GHz (while faster) signal degrades faster over distance than 2.4GHz. If you find that you need a 5GHz CPE device, look for the Loco M5 instead.
Mounting the M2 outside.
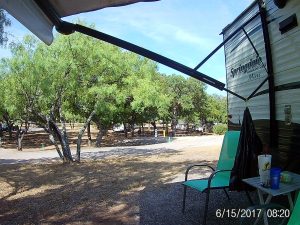
Assemble the Wall Mount kit as needed. On the back of the M2, there is a flange that sticks out. The wall mount kit has a mounting plate that this flange sticks into and is held in place by a small phillips screw. The suction cup part of the kit slides into two notches in the bottom of the mounting plate. An articulated arm allows you to adjust the tilt and pan of the mounted AP. As far as mounting the M2 to the arm, position it so that the M2 is vertically aligned with the cord coming out of the bottom of the mount and the LED strength bar at the top of the mount. You will want to ensure that the M2’s signal display is visible through the window during initial setup. The “face” of the M2 (where the UBNT logo is) should point towards the campground’s AP. The M2 contains a directional antenna so choose a mounting position that best gives the Loco a clear line of sight to the campground’s antenna. Below is the same wall mount kit with my Pico, angled so that the LED display is visible through the camper’s window. One of the differences I mentioned between the Loco and my Pico is that the Pico has an onmidirectional antenna, while the Loco has an integrated directional antenna.
Mounting for the Pico with suction cup mount.
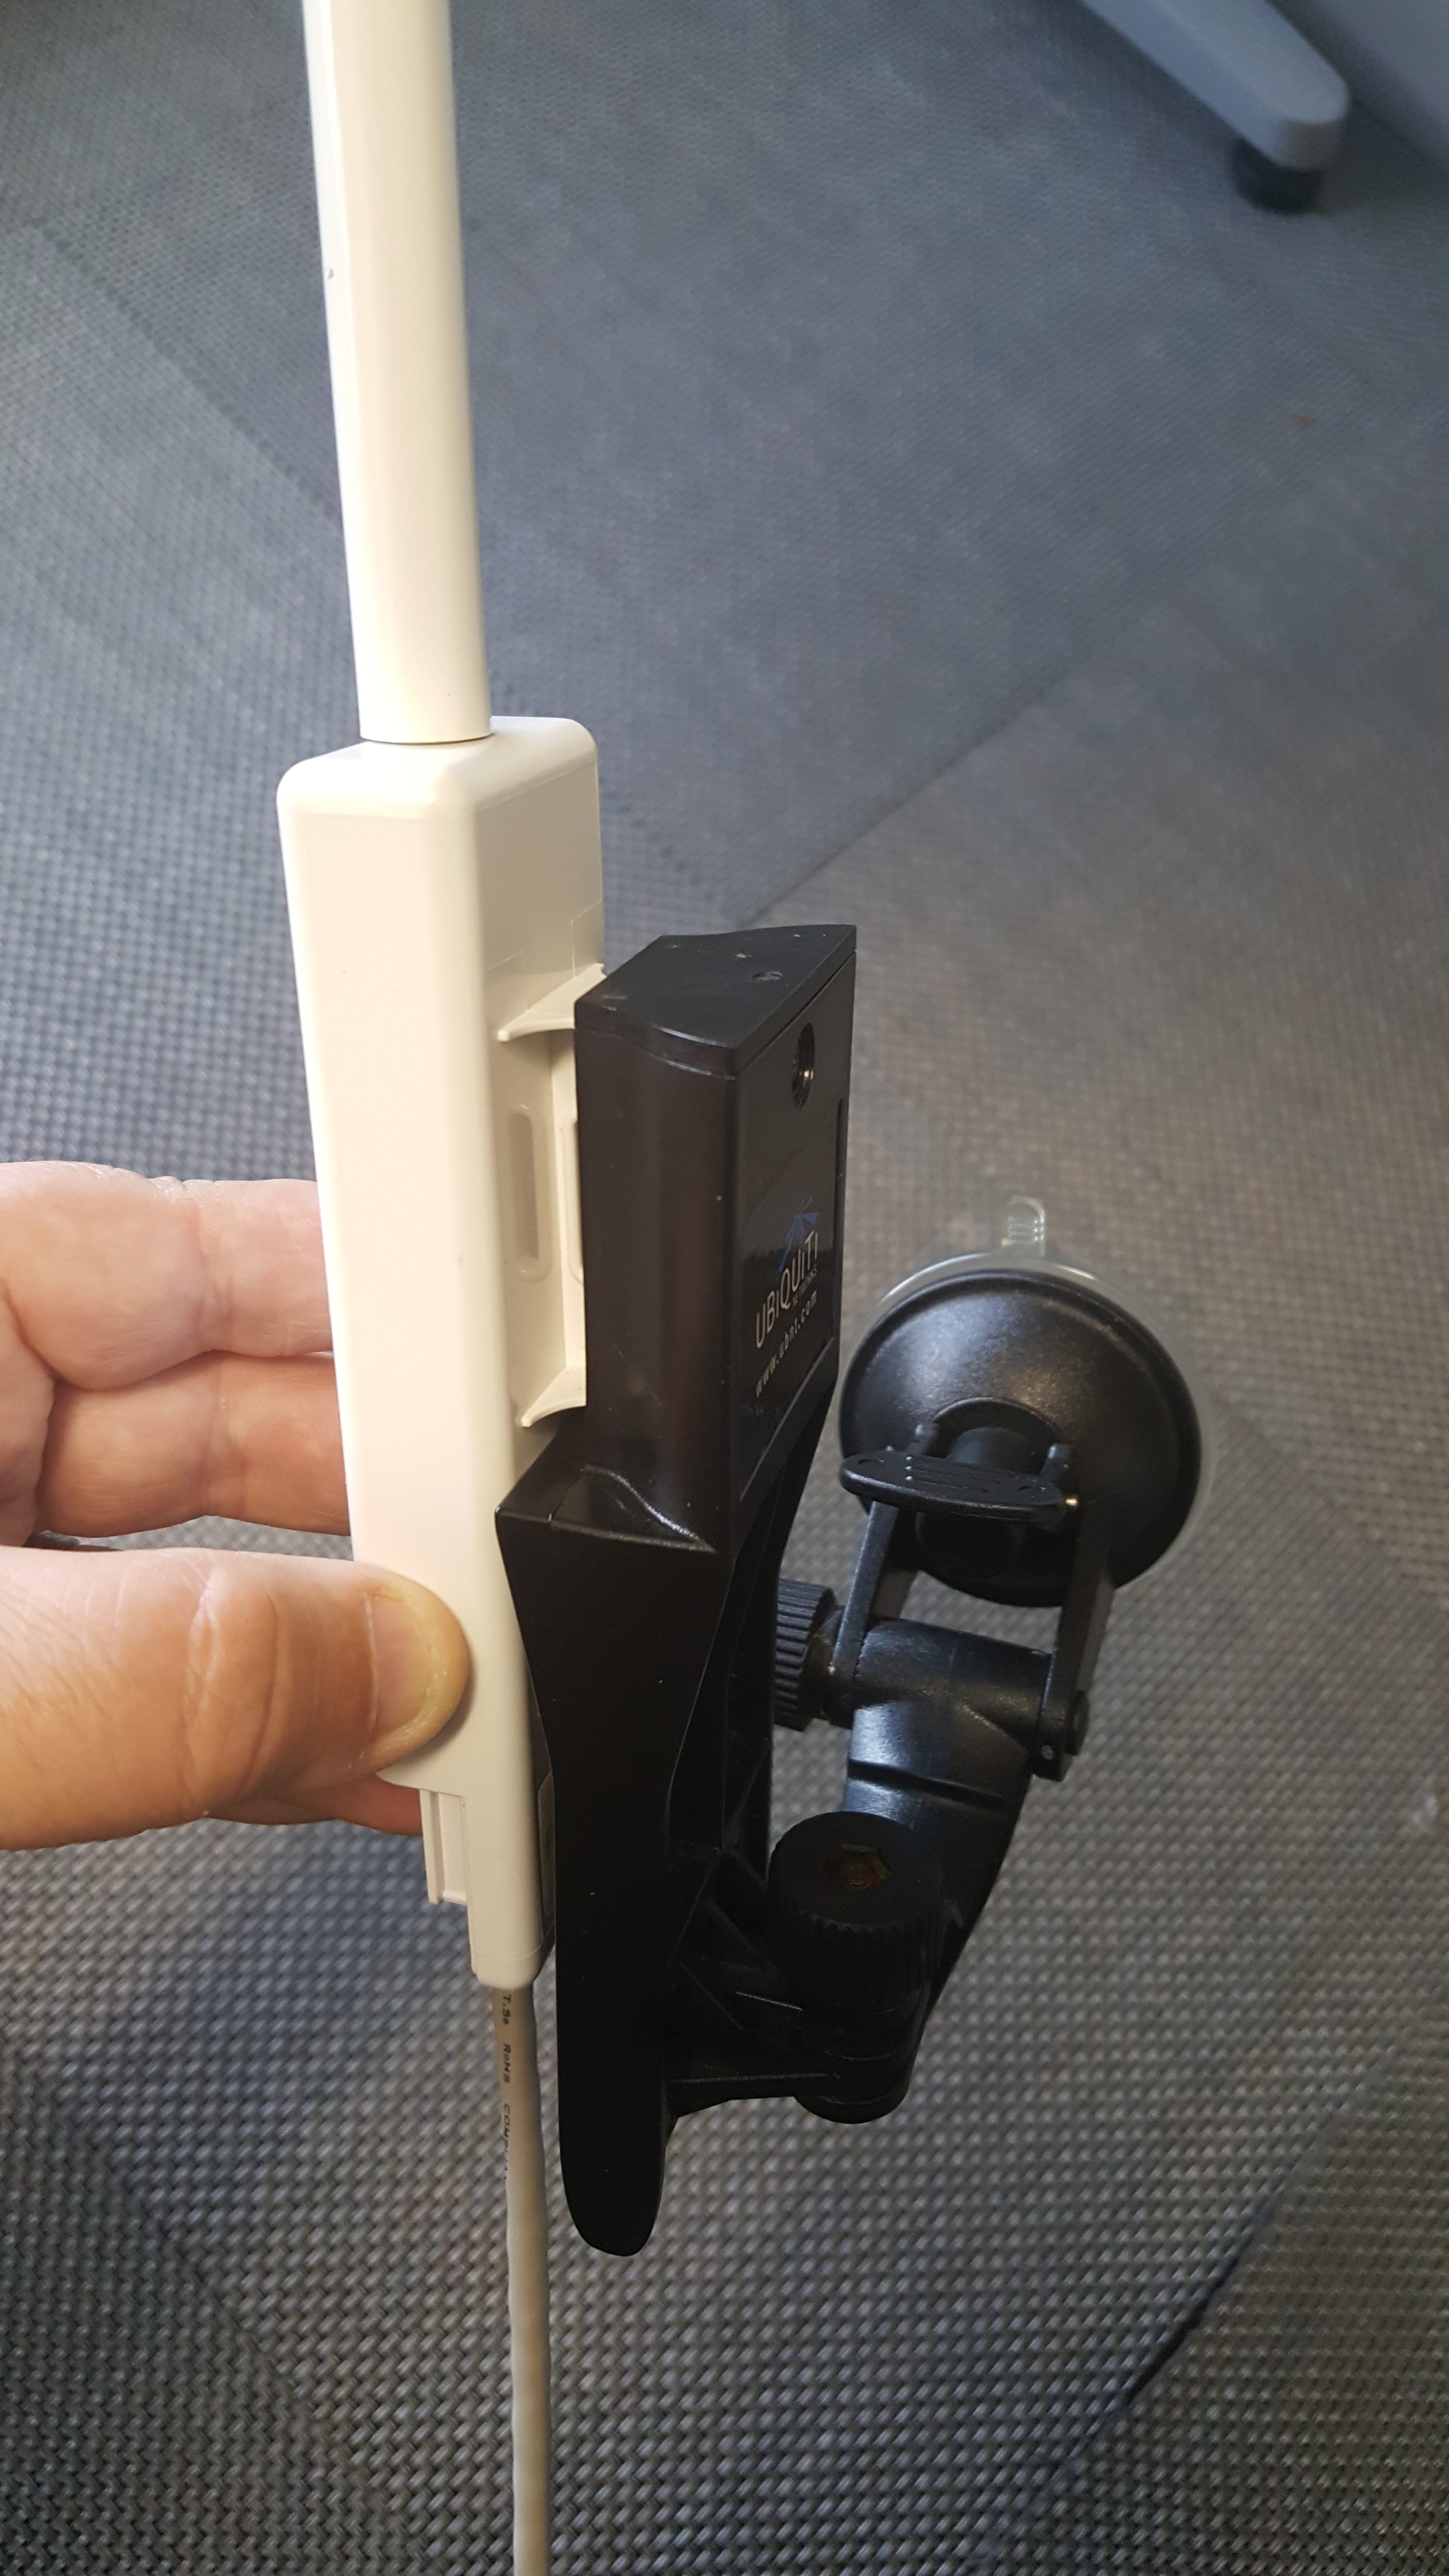
On the bottom of the M2, there’s a pushbutton that allows the bottom of the M2 to slide off, revealing the single Ethernet port. Attach one end of the Cat-5 cable there and close up the Loco.
Pico showing the open slide for the Ethernet cable.
Stick the device on the outside of your camper. We’ll get to configuring it in the next steps.

Pico mounted and powered up.
Configure the M2
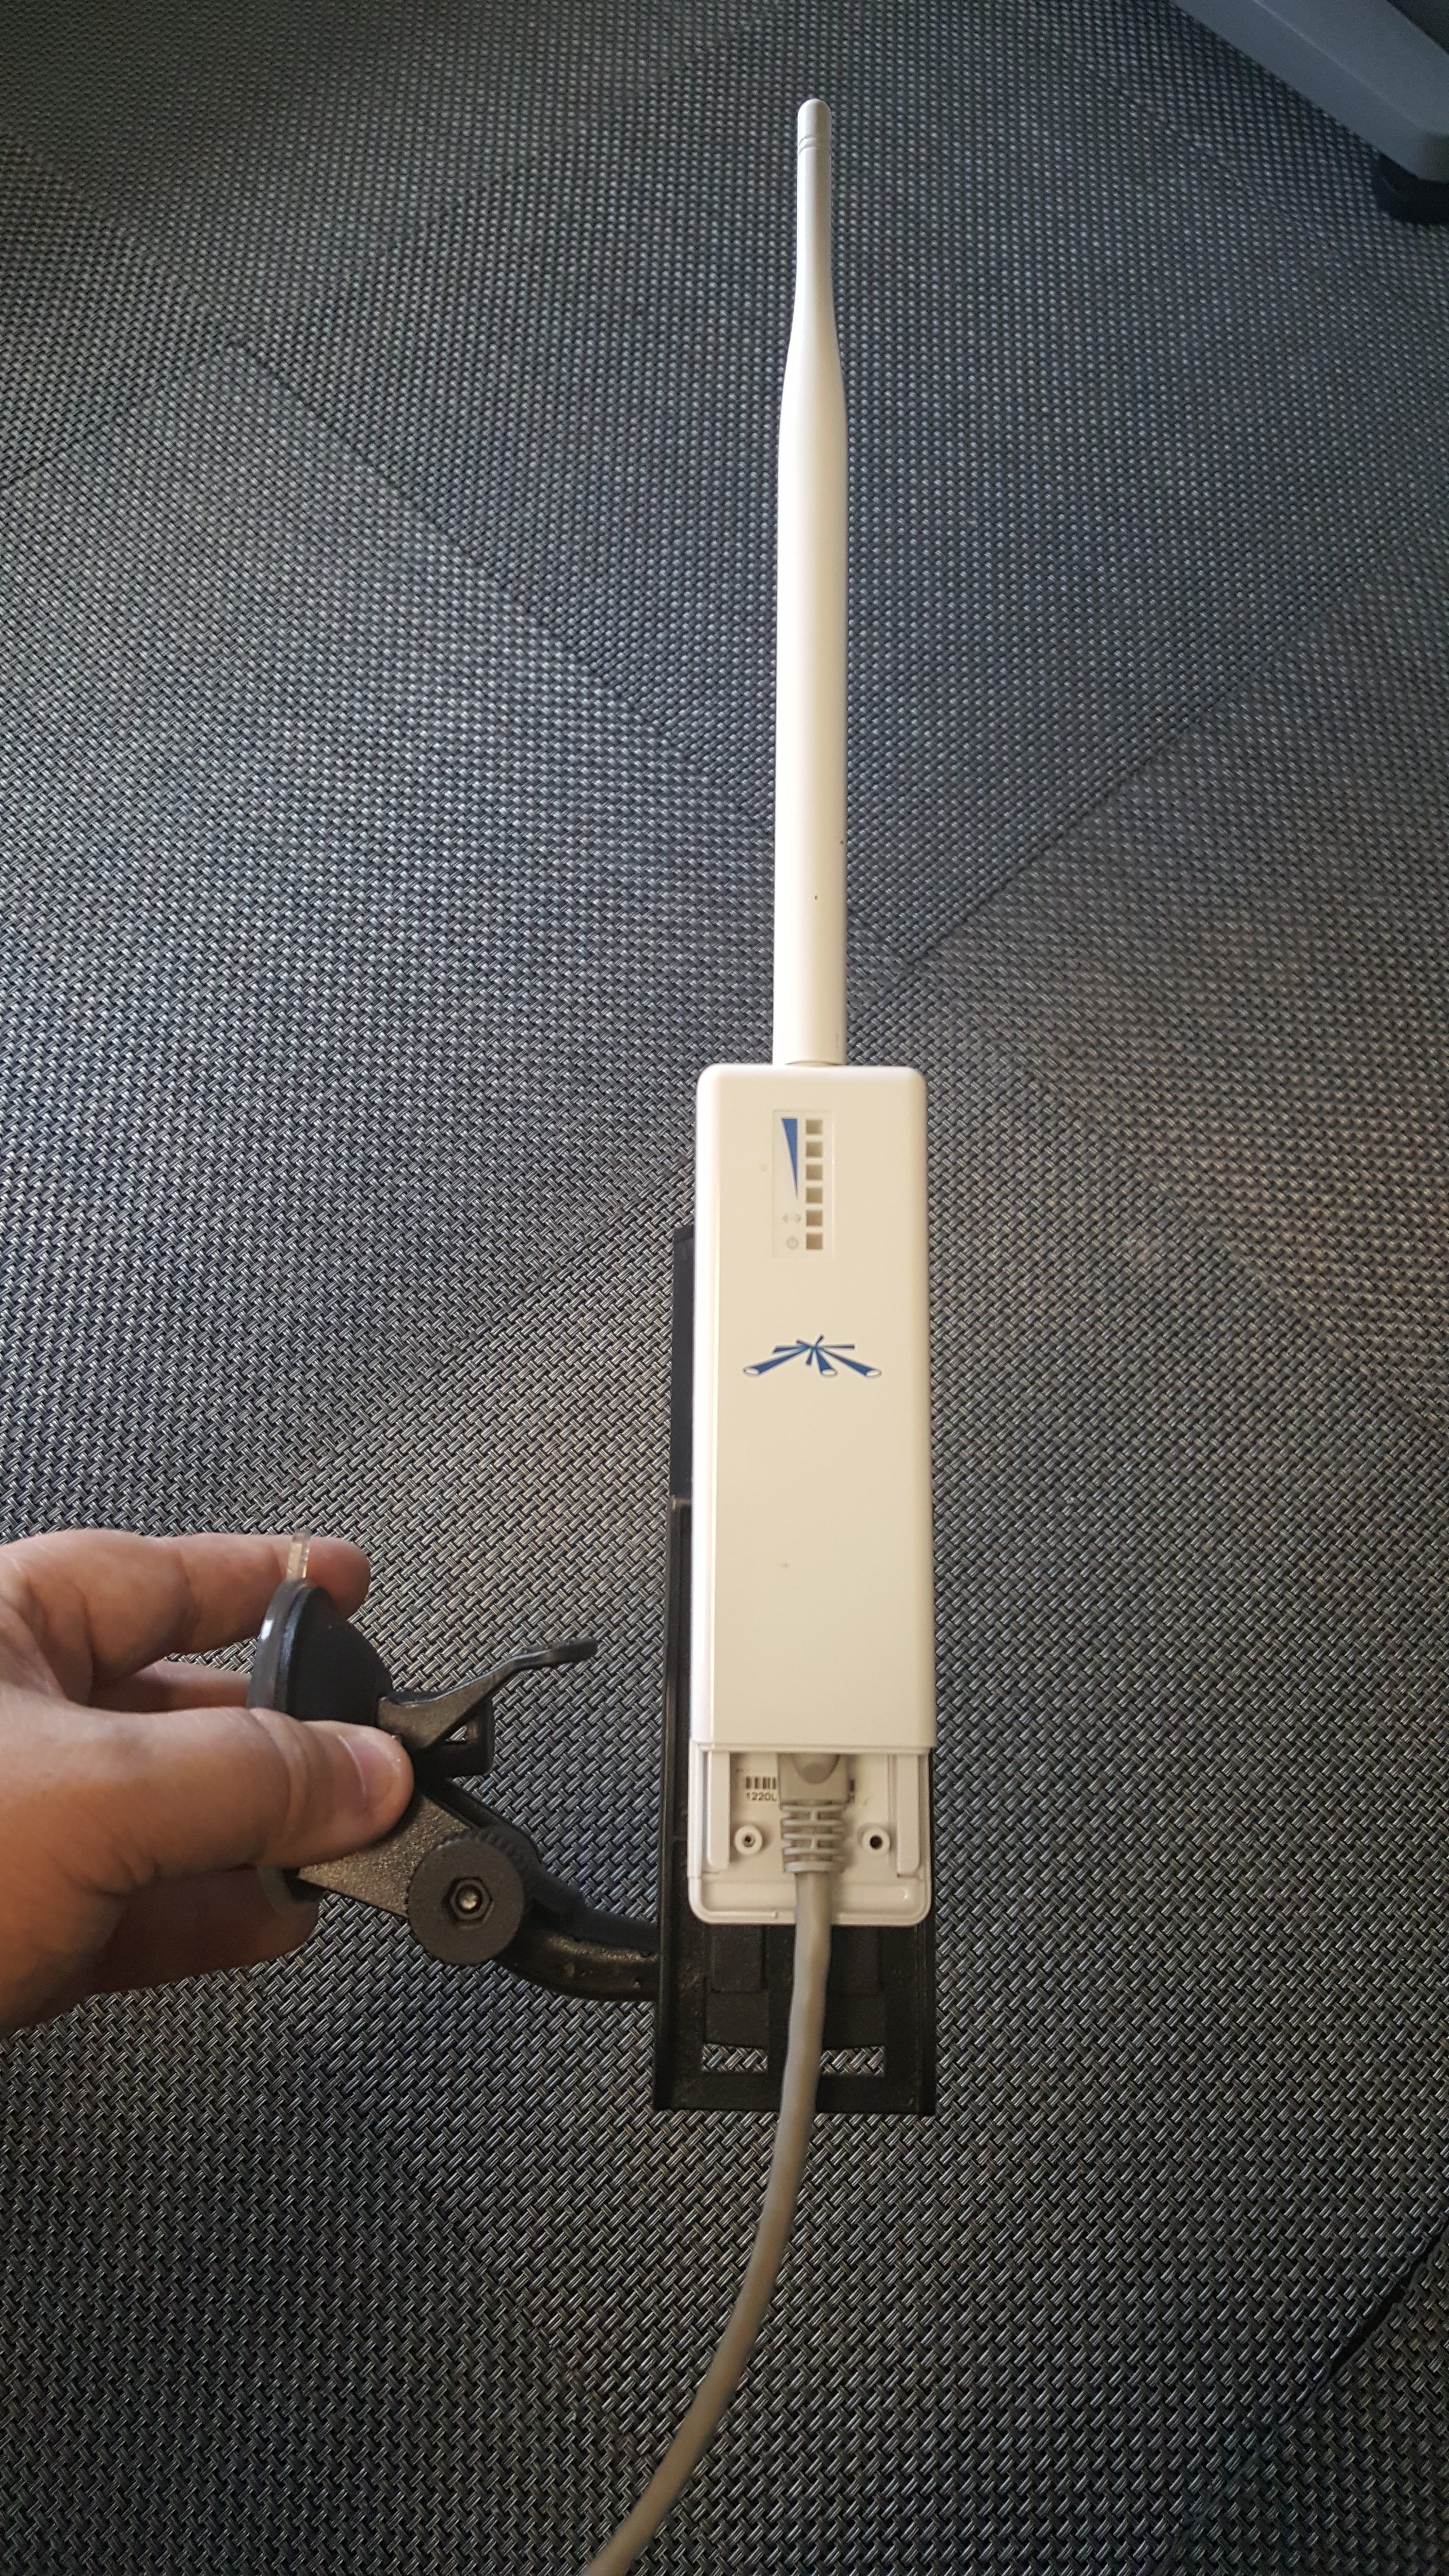
The power brick has two Ethernet ports on it, one marked “POE” and the other marked “LAN”. Plug the Ethernet cable from the M2 into the “POE” port and attach your computer’s ethernet port to the LAN side. Next, you will need to reconfigure your computer to be able to access the Pico. Pick an IP address in 192.168.1.x/24 network (I used 192.168.1.50) as shown in the screenshot below. Because we’re only talking to the M2, you don’t need a default gateway (or router).
 Open a browser and go to https://192.168.1.20 , this is the default IP of the M2.
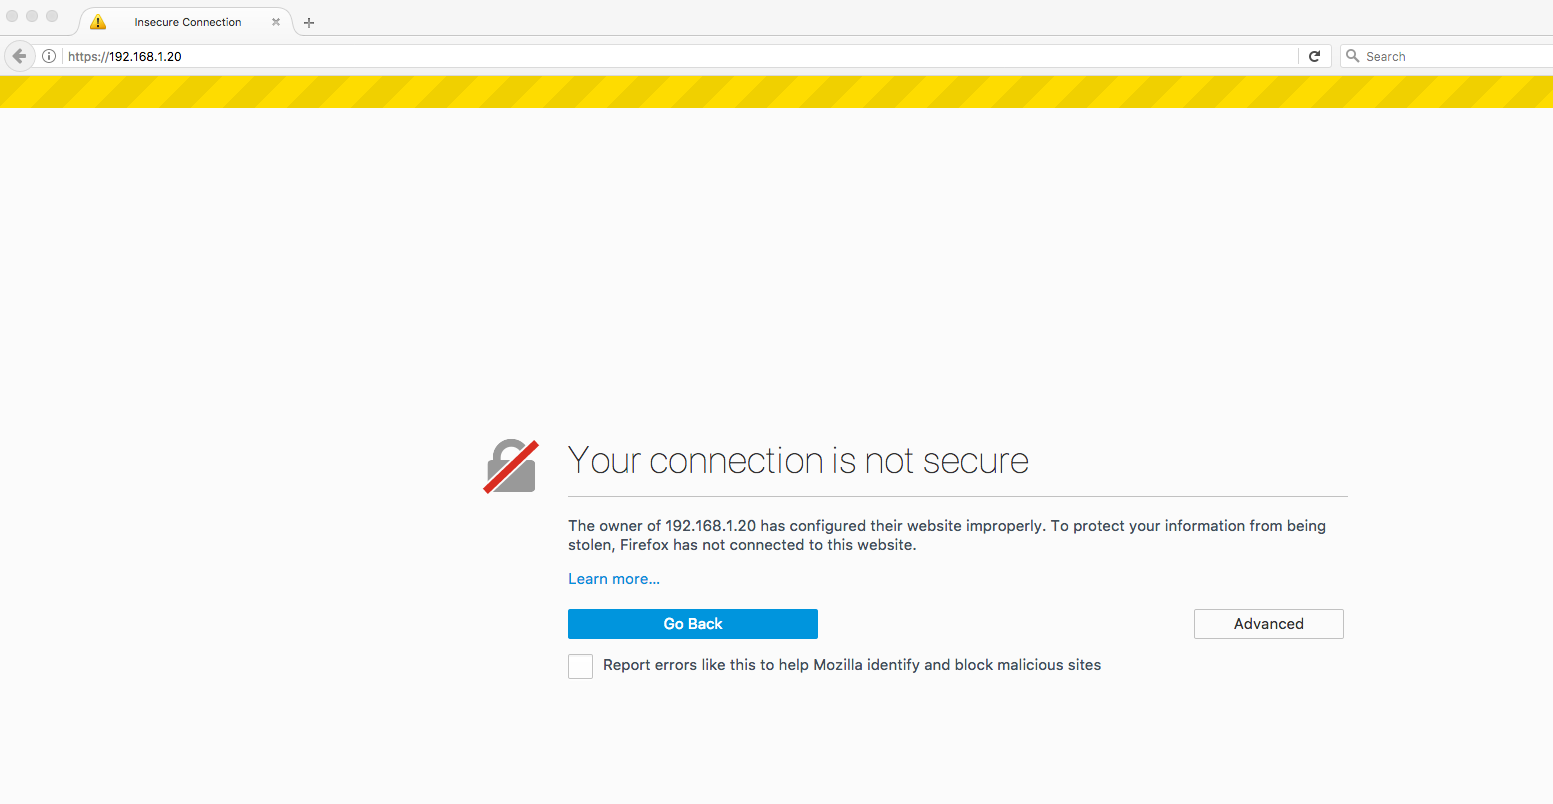
Click Advanced/Continue and add an exception if needed. Ultimately, you should get to the below screen. 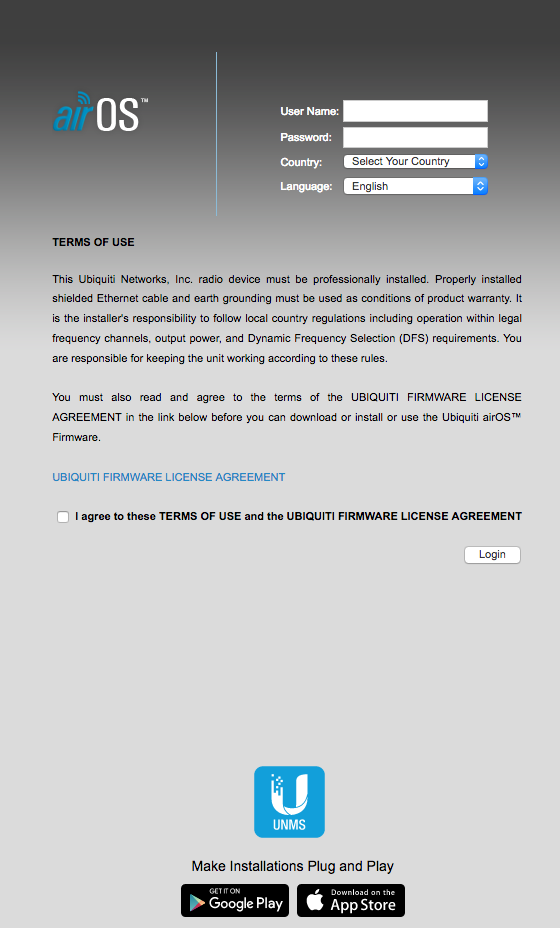 This page is asking for the default credentials (username is “ubnt” and password is “ubnt”). Set the country to your country (this sets the RF characteristics for the device to comply with your country’s laws) and then set the language for the UI. Finally, check the checkbox next to “I agree to the terms and conditions”. Once logged in, you’ll see the below “Main” view.
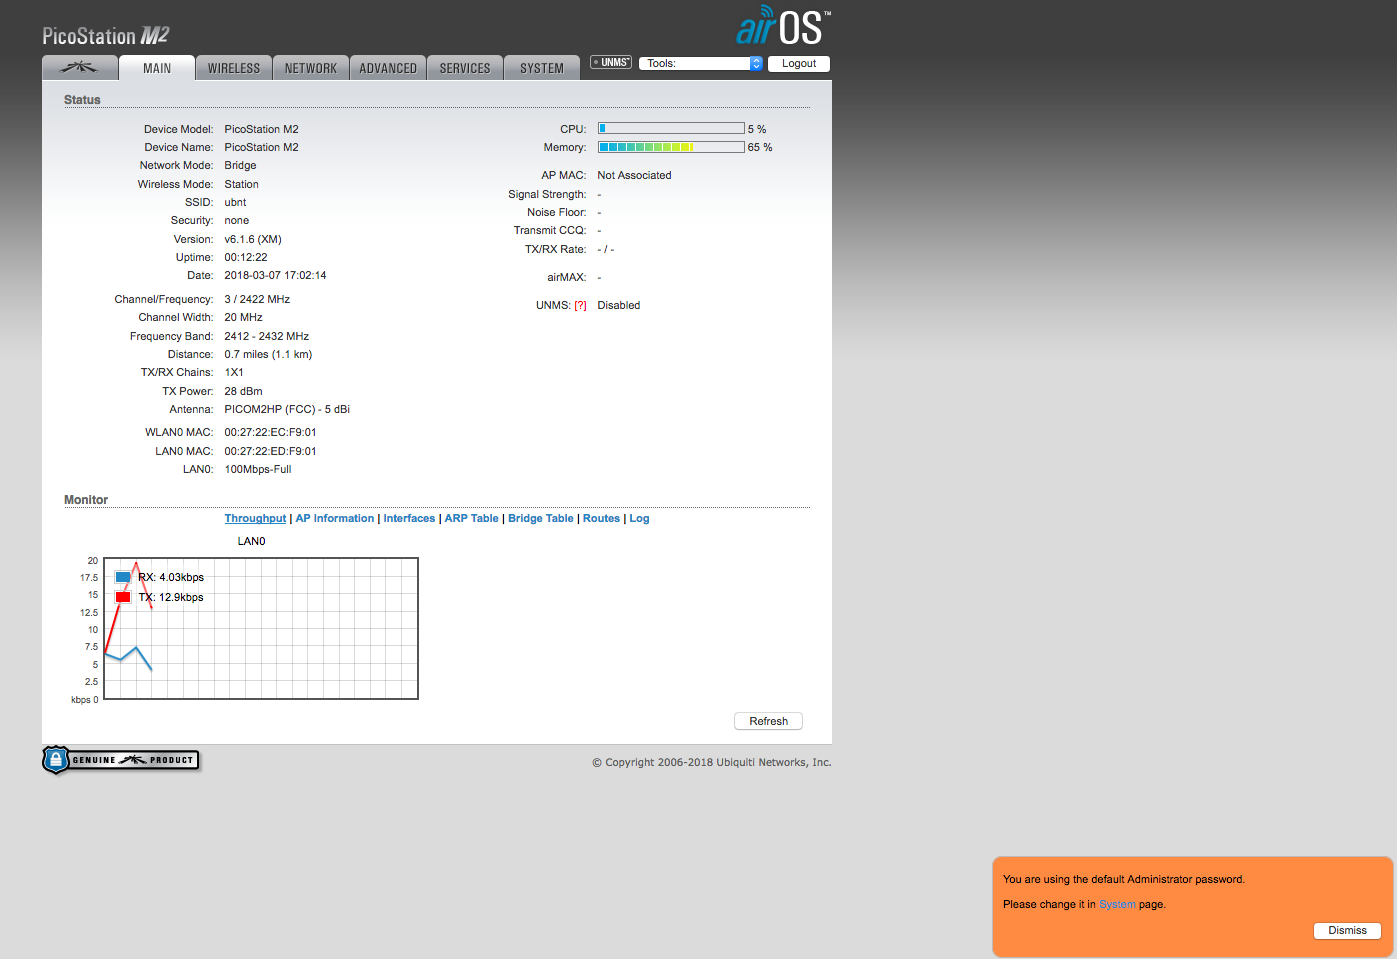
First thing’s first. Default credentials are bad from a security perspective, and the device is letting you know via the orange pop up. Click on the “System” tab or the “System” link in the notification to go to the system menu so we can fix this.
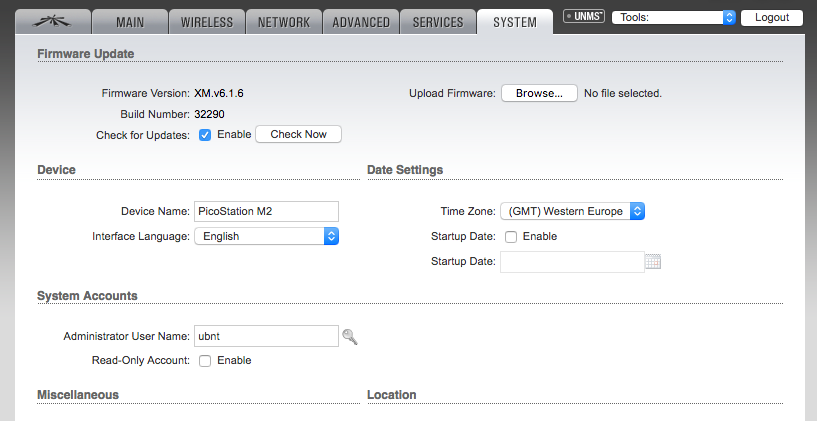
Click on the key icon next to the Administrator User Name field to reveal a “Current Password”, “New Password”, “Verify New Password” fields. Change the administrator username to something other than “ubnt” and provide the current password “ubnt” in the “Current Password” field. Provide a new password in the “New Password” and “Verify New Password fields. If you need help selecting a good password, I recommend correcthorsebatterystaple.net While on this page, also set the Time Zone for the device.
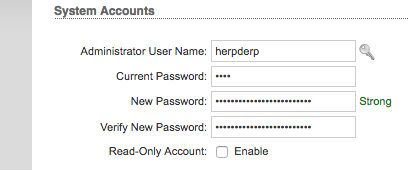
Once completed, click on the “Change” button to the lower right hand corner next to the Location section. You will get a blue banner across the top of the page with three buttons. Click “Apply” to apply the changes. This will cause the M2 to reboot.
![]()
After changing the password, click the “Logout” button in the upper right hand corner (right under the AirOS logo). We will now login with our new admin credentials.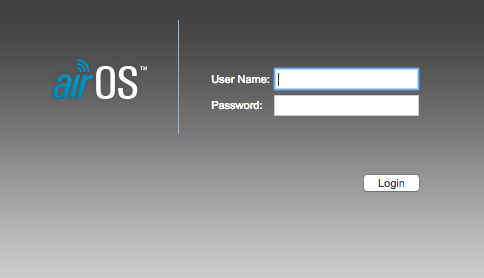 Now that we’re not using default credentials any more, we can start configuration. Keep in mind that if these changes are done incorrectly, you may lose connectivity to the Loco and may have to factory reset it and start over. Click on the “Network” tab across the top.
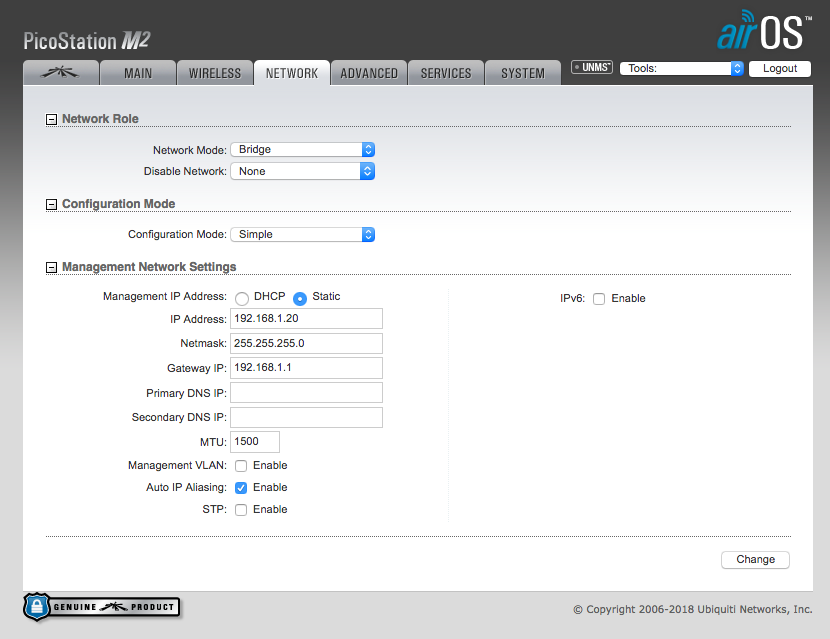
The first dropdown on this page lists “Network Mode” and is set to “Bridge”. Set it to “Router” and you’ll notice that the screen changes and presents more options.
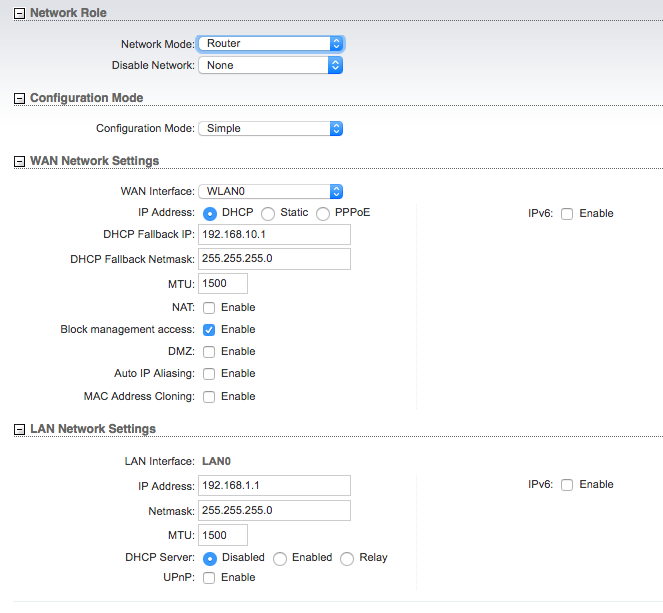
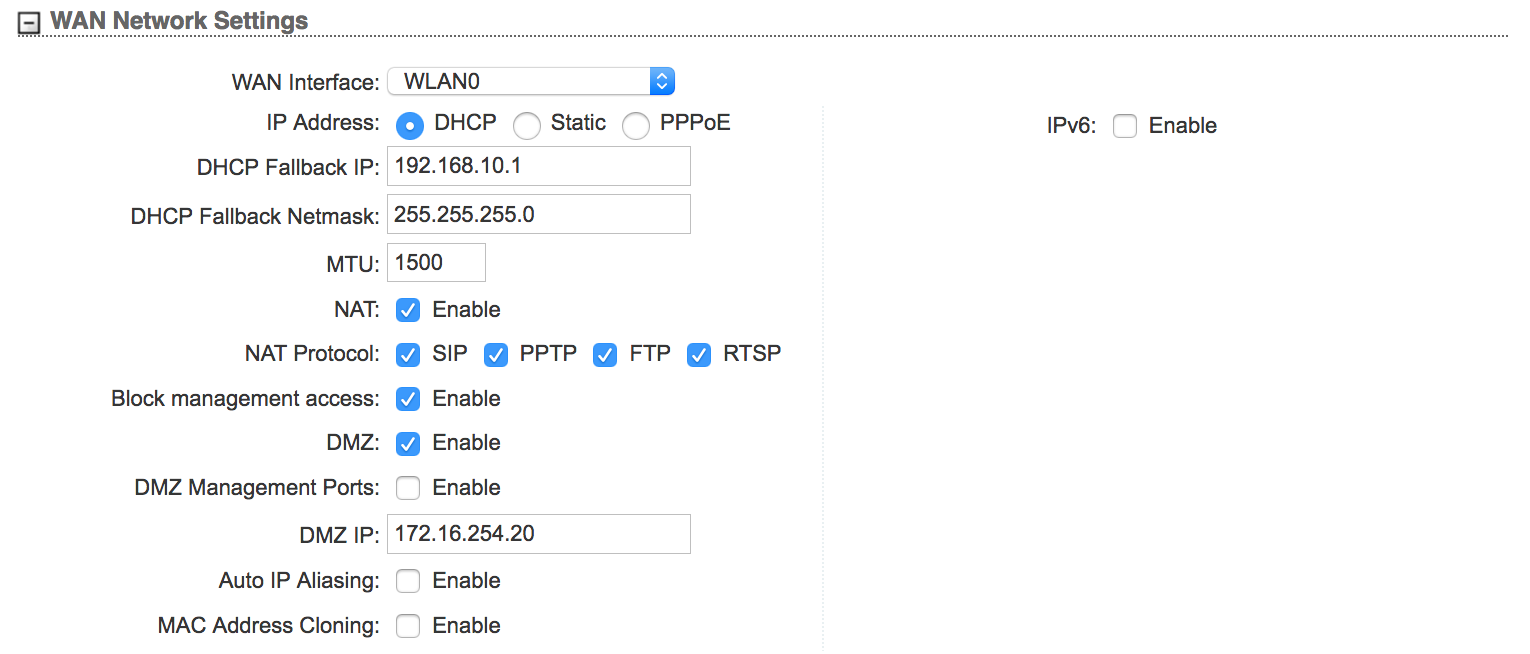
For the WAN Network side, we need to adjust some settings. Start off with turning on “NAT” by selecting the checkbox, then select the checkboxes for each service listed (SIP, PPTP, RTSP, FTP). Check the checkbox for DMZ and in the DMZ IP field, provide “172.16.254.2”. We’ll cover what this is for in a bit. When set, your options should look like the below:
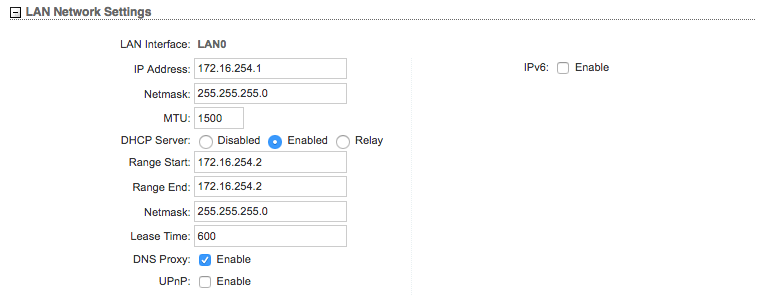
Your LAN settings are a bit more involved. First, we’re going to change the IP address to “172.16.254.1” with a Netmask of “255.255.255.0”. Next, set “DHCP Server” to “Enabled”. Set both “Range Start” and “Range End” to “172.16.254.2”. The reason is that when we get this device fully configured, the only thing pulling an IP address from the M2 should be the airGateway itself. When you’re done, your LAN settings should match these:
When saving, you’ll get a prompt “Please confirm Management access disabled on WAN, continue?” Click the OK button, then the “Apply” button. This will cause the M2 to reboot. While it reboots, change the network adapter on your computer to use DHCP again and you should get the 172.16.254.2 IP from the above steps.

If you successfully grabbed an IP address from the M2, you’re doing great so far. Now, we need to log back into the M2 using its new IP address and tell it how to connect to Wifi.
Teach it to WiFi
I put these instructions in a separate heading because when it comes time to change the WiFi settings, you’ll want to start here. The steps above were to get it configured into a “known” state that’s not likely to change. This block of instructions will need to be performed any time the wireless information that the M2 connects to changes. Remember, the M2 is not an access point, it’s now a client like your laptop or tablet and needs to be configured to connect to the park’s WiFi.
Open a browser window to https://172.16.254.1 and login with the credentials you created above. When you get to the main tab, click on “Wireless”.
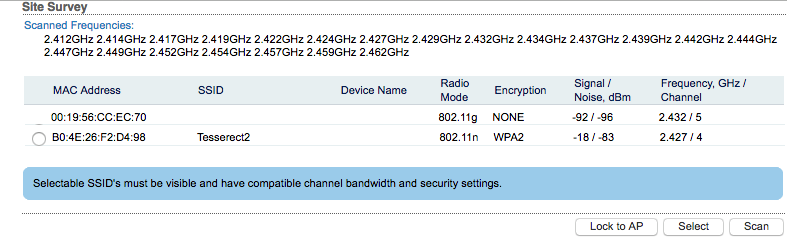
First, we need to tell the M2 what to connect to. Click the “Select” button next to the SSID text field and it will open a new window. Next, it will display all of the APs within range of the M2. Depending on the location of the APs and how close you are, may mean that you get a lot of APs to select from, even with the same SSID or network name. You will want to pick the AP with the lowest signal level but highest dBm level with the network name your provider gave you.
Click the radio button next to the desired SSID, then click on “Lock to AP”. This button will close the AP list window, then will autofill several important entries on the “Wireless” tab. Of note, you will want to make sure that the “Wireless Security” section is filled out correctly including the WPA Preshared Key (the Wifi password). If the campground said there’s no password required, set the “Security” dropdown to “None”.
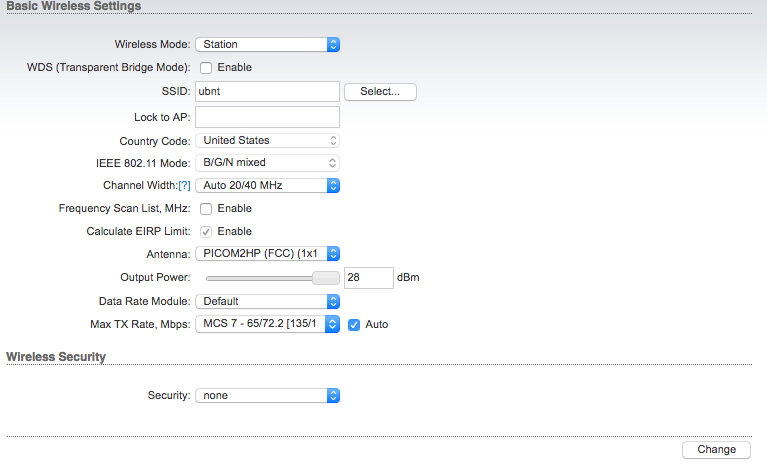
 For the sake of example, let’s say that I am at a campground that has WiFi available. Their network name is “Tesserect2” and their password is “NeatPassword”. I clicked on the Tesserect2 radio button in the Site Survey window and clicked “Lock to AP”. My Wireless tab was filled out and I put the password that the campground gave me into the “WPA Preshared Key” field. This is what my settings look like. Be aware that yours may vary slightly due to the campground you are at.
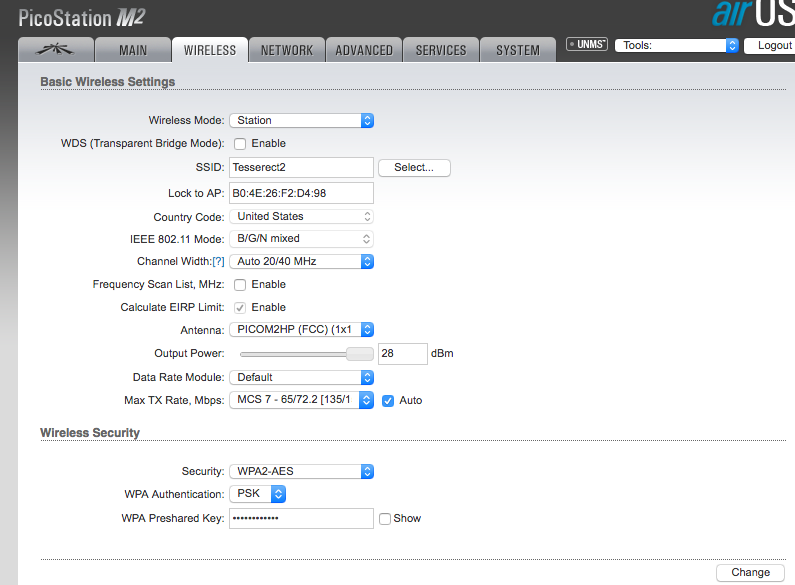
Click “Change” in the lower right hand corner, then “Apply” when the blue banner pops up. Just like before, this will cause the M2 to reboot however this time something else should happen. After a minute or so, you should see the LED bar graph light up indicating a successful connection.
Confirmations
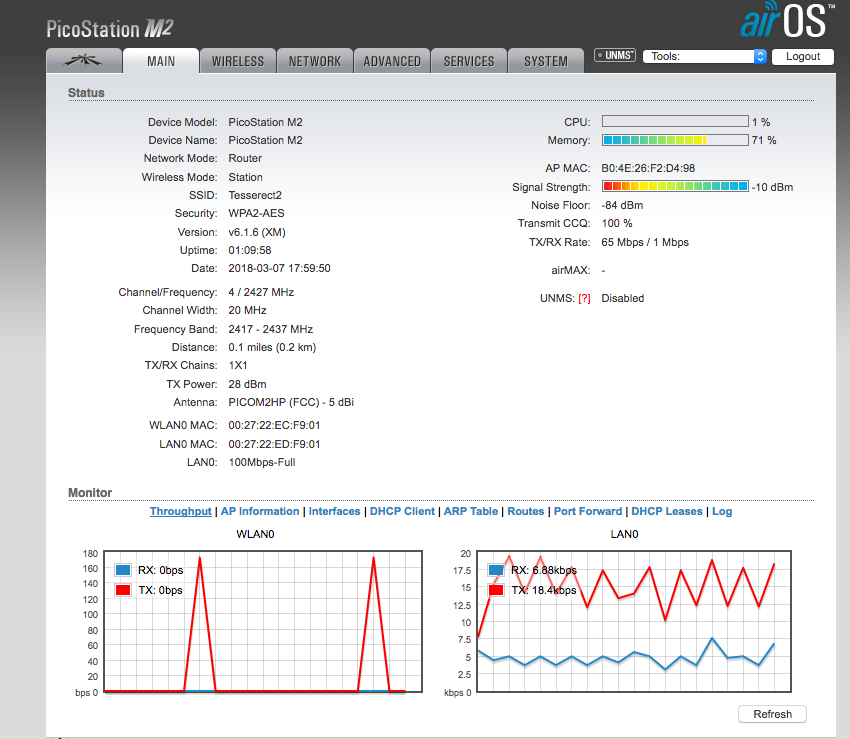
To confirm it’s associated and everything appears to be working as expected, click on the “Main” tab. You’ll notice that now you have two graphs on the bottom of the page, and now on the right hand side you have some additional information about the AP you’re connected to. Your signal strength is the graphical equivalent to the bunch of LEDs on the back of the M2. If you can’t see the M2 but want to check your signal strength, this is the place to do it.
In the “Monitor” section, click on “Interfaces”. Ensure that your WLAN0 interface has an IP address. This is the IP your M2 has on the campground’s network. Note: Your WLAN0 IP address will more than likely differ from the IP shown here.

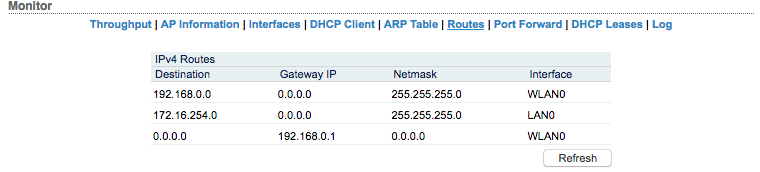
Click on “Routes” in the “Monitor” section and see that you have a default route (Destination for the default route will read 0.0.0.0, with a gateway IP address) for the M2. This is how your M2 will connect to the Internet through the campground’s network (via WLAN0). Note: Your default gateway IP will more than likely differ from the IP shown below.
Now, if you are following these instructions as a reference and have already performed the AirGateway setup, your camper should be online and you can stop right here. If you’re still doing the first time setup, then keep going because now it’s time to setup the AirGateway. Either way, you should be able to browse the Internet on your computer at this point.
AirGateway setup
Finally, the last piece of the puzzle. Fortunately, the AirGateway is easier to set up than the M2 for most configurations. Just like the power brick, the AirGateway has two Ethernet jacks on it. First disconnect the cables from the power brick and plug them into the AirGateway. The POE port should go to the M2 and the LAN port should go to your computer. When attaching the AirGateway to the power brick, make sure that both devices’s power LEDs and labels are facing up.
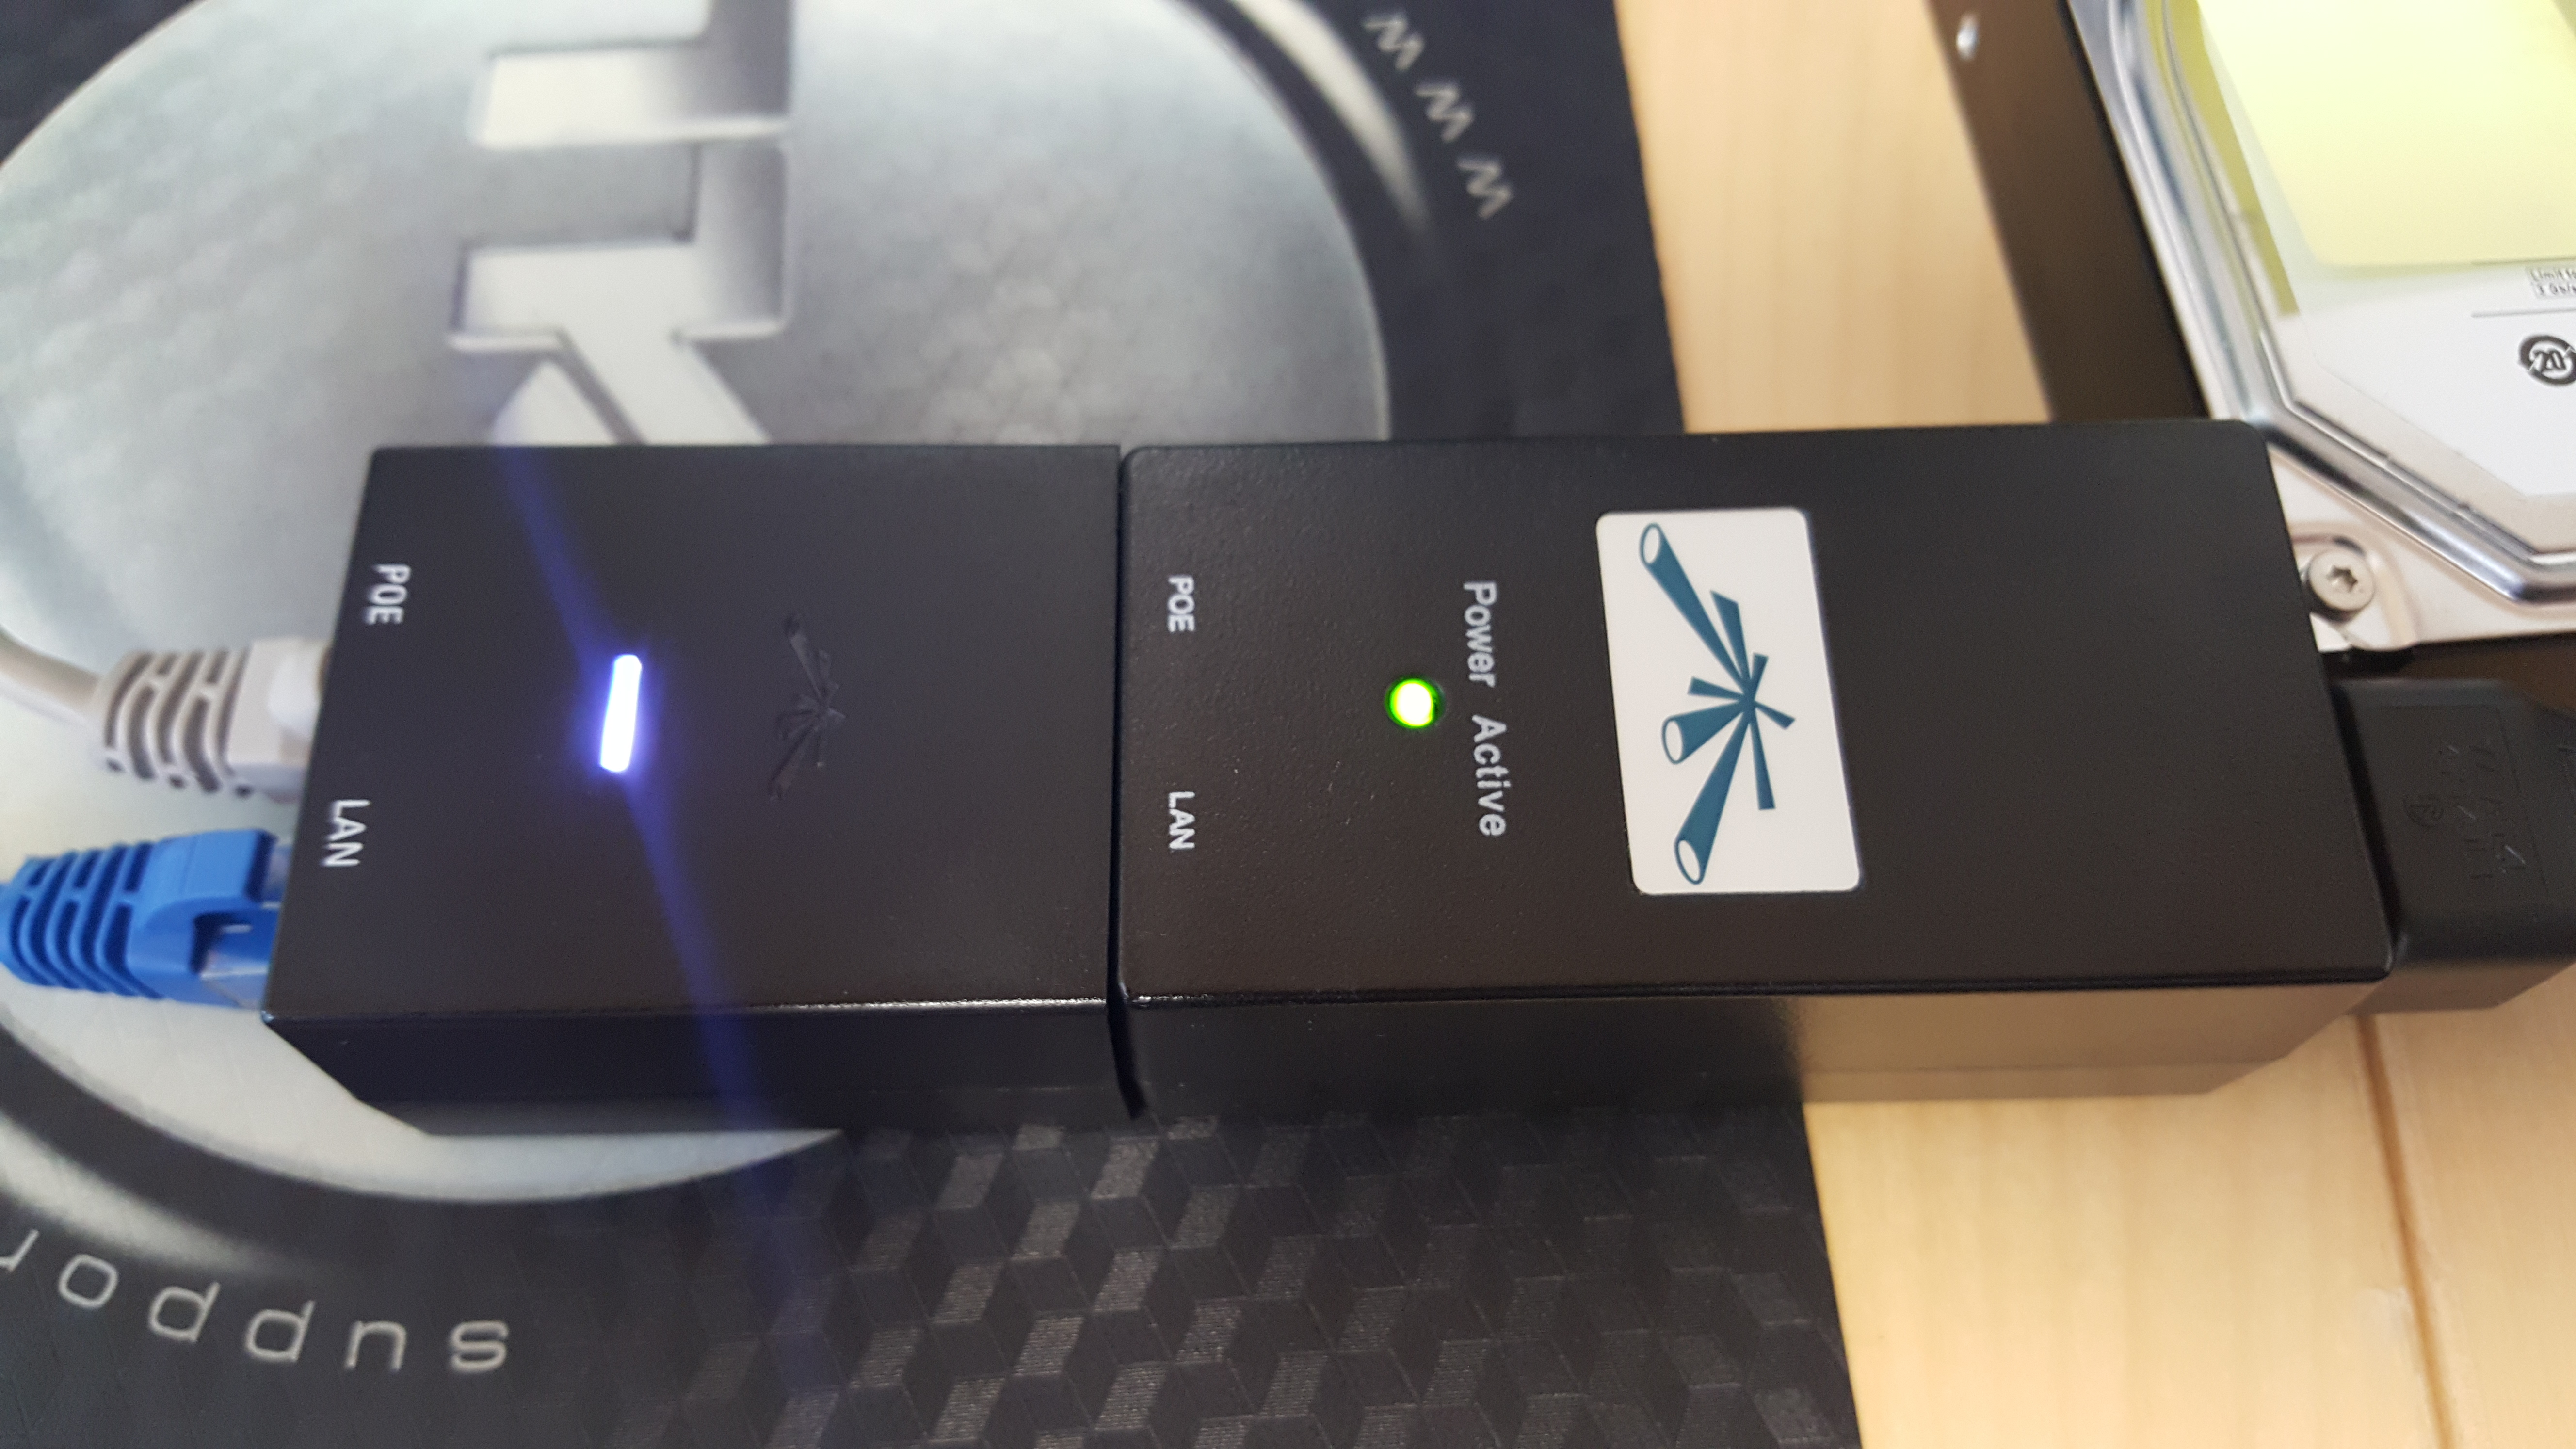
After a moment, the LED on the AirGateway should turn blue. When this happens, this means that the AirGateway has initialized itself and is ready for configuration. Browse to https://192.168.1.1 and dismiss the security warnings. Just like the M2, use the default username of “ubnt” and password of “ubnt” to log in. Set your country and language and accept the terms of use.
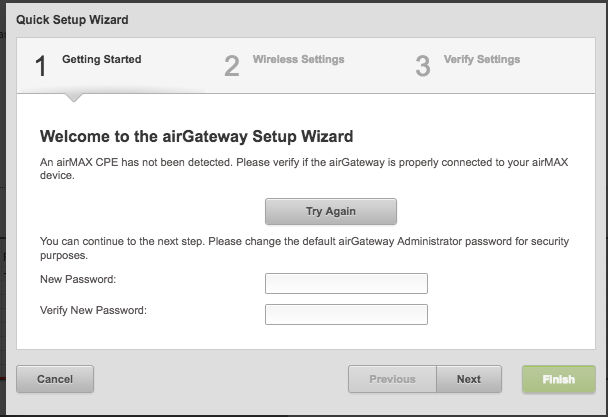
Unlike the M2 however, the airGateway gives us a pop-up window. Start off by setting a new admin password, we’ll change the username in a bit. Type in a new password into both text fields and click “Next”.
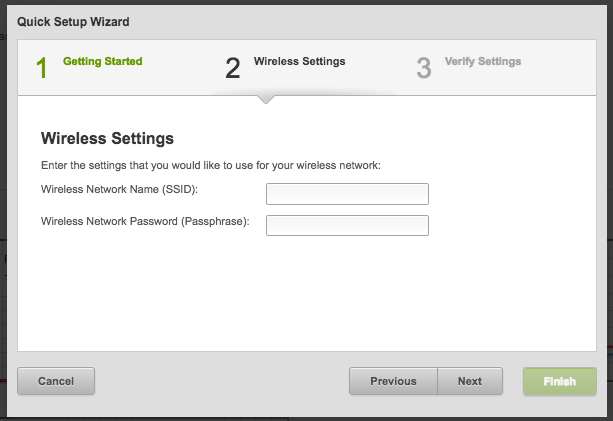
Next, supply the Wireless Network Name (SSID) that you want to use. This is the name you’ll use for your trusted network’s Wifi and will be the same network you will look for when configuring your phones, laptops, and other devices. Create a meaningful password for your network and put it into the Passphrase field.
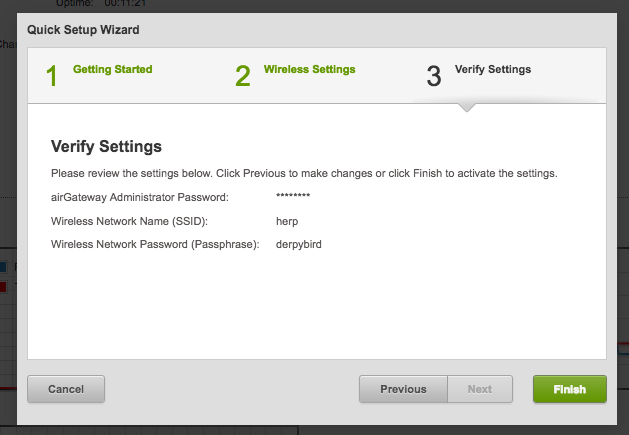
Finally, you’ll get a confirmation page with the wireless configuration settings. Retain the SSID and passphrase as you’ll need it to configure your devices.
When you click “Finish”, you’ll notice that the device reboots (the line LED on the airGateway goes white, then turns blue again). Now, it’s up to a couple of housekeeping tasks. First off, let’s change the administrator username since the password’s already set to what we want it to be set to. Click on the “System” tab, and change the “Administrator Username” to something other than “ubnt”. It’s OK to use the same username and password as you created on the M2. It is not necessary to change the admin password again to change the admin username. Just be sure to click on the “Change” button and “Apply” the settings for them to become active. 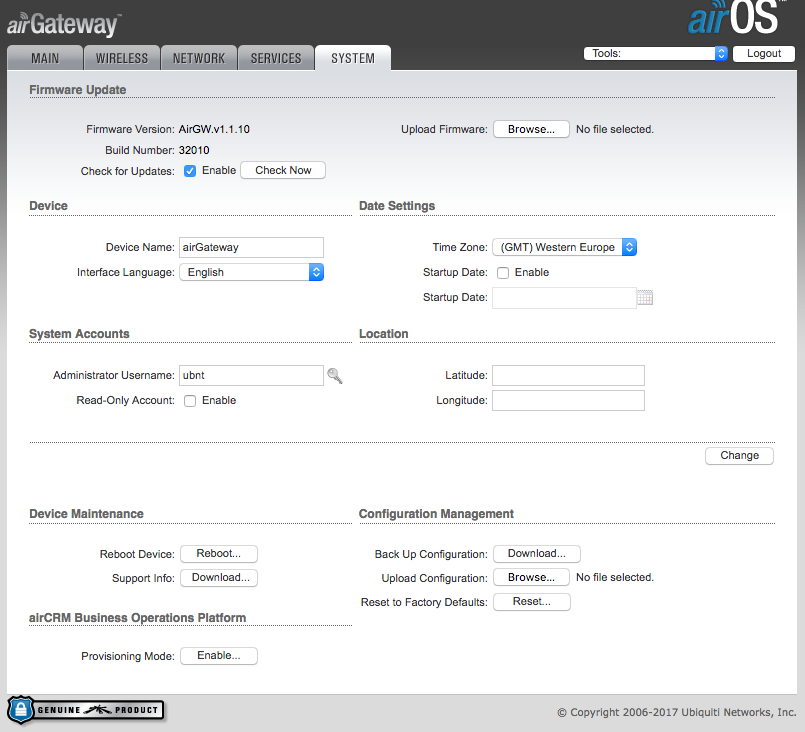
After all that, the setup is finally complete. You should be able to see your new trusted wireless network in the network list of your devices. Just specify your new wireless network name and passphrase to your devices and you’re all set.
Troubleshooting
Because things somethings get screwy, here’s some troubleshooting tips to help out.
- Issue: Power graph on M2 flashes, can’t connect to Internet.
Solution: The flashing Power graph means that the M2 is trying to connect and is getting de-authorized. More than likely, this means that the password you provided on the wireless setup is incorrect or the password configuration is incorrect. Try using the “Select” and “Lock to AP” functions on the Wireless tab of the M2 to properly populate it. Additionally, you can check the “Show” checkbox to view the password as configured to ensure it was typed in correctly. - Issue: Can’t connect to Internet but can see trusted wifi network. Light on AirGateway is white.
Solution: This means that the AirGateway can’t get an IP address from the M2. Try disconnecting the M2 from the POE port and plugging it back in. If it still doesn’t work, try removing the AirGateway from the power brick, and attach your computer and the M2 to the power brick. You should get an IP address from the M2. If it still doesn’t work, a factory reset may be needed. - Issue: Can’t connect to Internet, AirGateway light is blue, no lights on power meter on M2.
Solution: The M2 is not associated to a wireless network. Go through the steps in the “Teach It to Wifi” section above. - Issue: While trying to set up the Wireless side, no wireless networks show up in the SSID Selection window.
Solution: The M2 may not be in a position where it can receive wireless signal or there may be no wireless at the site. You may want to perform a site survey using one of many different tools available for your phone or tablet. I’m partially fond of Wifi Analyzer or Ubiquiti’s WifiMan on the Android Play store. - Issue: The AirGateway doesn’t stick to the power brick all that well.
Solution: Use a piece of tape to hold the halves together. Some designs of the power brick have a retaining clip that hold the AirGateway to the brick, while some versions of the brick are missing this important feature. I had to resort to duct tape. - Issue: I need to factory reset the M2 (or I forgot the admin password).
Solution: With the M2 powered on, use a pin or toothpick to hold down the reset button (next to the ethernet port on the M2 device itself). After a few seconds, all of the LEDs for the power bar should start blinking in unison. Give it a couple of minutes to finish resetting itself, then start at “Configuring the M2” above. - Issue: I need to factory reset the AirGateway (or I forgot the admin password).
Solution: With the airGateway powered on, press and hold down the reset button on the bottom of the unit with a toothpick or pin. When the blue LED goes white and starts flashing, let go and wait for it to go blue again. Give it a couple of minutes, ensure that you are able to get an IP address from the AirGateway, then login and configure it. - Issue: I forgot the IP address of the M2 and I didn’t use 172.16.254.1 like you told me to.
Solution: Login to the Air Gateway IP (it’s the default router IP of your devices) and click on “Routes” in the monitoring section of the “Main” tab (the first tab you see when you login to the AirGateway). The default route is the one that shows “0.0.0.0” as the destination. The gateway IP in the second column is the IP of the M2.


Finally!
Now that all the configuration is done, your M2 is linked to the camp’s wifi and your devices are linked to your AirGateway’s wifi, it’s time to crack open that beer. A good hardware firewall (in the M2 and the AirGateway) keeps the baddies out, and lets your devices talk to each other freely. Once setup for the site you’re at, you won’t have to keep checking on it, or babying it. Just let it do its thing and enjoy your campout. When you move, a quick five minute reconfiguration of the M2 covered in the “Teach it to wifi” section, and you’re all set!

Have fun!
FIRESTORM_v1