While the future of pfSenseCE and pfSense+ are still very much in the air, it at least brought us the option to use ZFS mirroring for hardware redundancy. Good news is that it works well, I didn’t even know the drive had failed for several months until I had to powercycle the router and heard the click of death. Bad news, it’s not really adequately documented anywhere how to do this and it’s not for the faint of heart!
Caution! This is not a no-risk process.
First thing’s first, usual warnings apply. Before attempting this process, make sure you have access to install media for the current version of pfSense you’re running, and make sure to download a copy of your configuration for backup! There is a possibility that you could completely hose your router so being able to perform a fast reinstallation while the house riots about no Internet access is an important fallback strategy!
A quick backstory
As luck would have it, pfSense with ZFS is wonderful with a seamless failover. So wonderful in fact that I didn’t know I had a failed disk until I was doing some power work in the server rack which required I take down the router. When I powered it back up, I was faced with a horrible clicking sound, a la the “click of death”. While the router wasn’t too happy about one of the hard drives being dead, it powered up and screeching aside, it booted up and the network came back online. Of course, I wanted to ensure my router stayed running so I had to replace the dead hard drive. What I was not prepared for was how much documentation was lacking on how to do this process! I had become accustomed to how easy that FreeNAS/TrueNAS makes it to swap drives, something that is sorely missed in pfSense.
My setup notes
My router is a Dell R210-II chassis with two Seagate 750GB hard drives. The two drives in the chassis and the spare drive were all the same model number, size, and therefore the same geometry. While it is possible to “grow” a ZFS system into larger drives by upgrading each drive and reslivering until all drives are upgraded, I am not fully convinced that pfSense does this and my research turned up little in this regard.
As it stood with my current issue, I was not interested in putting a 1TB hard drive in a very underutilized 750GB mirror, I just wanted to ensure drive redundancy.
For the purposes of this document, ada0 is the failed disk, ada1 is the healthy disk, and the name of the pool is ‘zroot’. Your environment may be different, be sure to use the right parameters for your installation.
This article’s going to be light on screenshots simply because the few screenshots I have are pages long and wouldn’t render very well.
Process overview
The process for repairing a ZFS mirror in pfSense is roughly like the below:
- Remove/detach the disk from the ZFS mirror
- Replace the failed disk
- Boot pfSense and wait a long time to boot.
- Partition the new disk so that it’s identical to the existing disk
- Reestablish the ZFS mirror and start reslivering
Well, get on with it!
Ejecting the bad drive
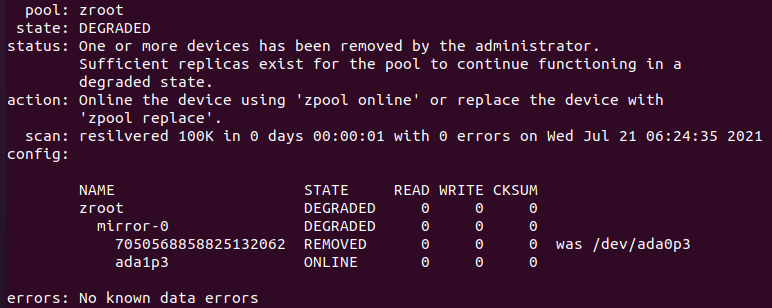
First thing’s first. Use zpool status to see what the status of the pool is. It will tell you the name of the pool (zroot) and the status of the two partitions that are mirrored. In the screenshot below, the pool is DEGRADED and one of the partitions reads as a long number and you can see on the right that it used to be /dev/ada0p3.

If your ZFS pool shows two devices (ada0p3 and ada1p3) and you’re going to replace ada0, you’ll need to remove it from the zfs array first. You can use zpool remove zroot /dev/ada0p3 to remove the failed disk/partition from the array. If the zpool status shows the drive is already REMOVED, you can go on to the next part.
Hardware swap
With the drive removed from the ZFS mirror, it’s time to replace the disk. If your hardware supports hotswap, you can just remove the disk ad insert the new disk in the chassis. If it doesn’t, then you’ll need to power down and swap the disk but be sure to swap the correct disk!
Be aware that the bootloader is VERY UNHAPPY about not having both members present. It will boot, but it will take much longer than normal.
Record the partition information
Before continuing, you want to examine the existing healthy disk and save it to a notepad so you can refer to it. Use gpart list ada1 to get the partition list. In my setup, there are three partitions, a 512K boot partition, a 2GB swap partition, and a 697G ZFS partition. We will want to refer to this layout when partitioning the new disk.
Partitioning the new disk
Note: The variables and some of the command line switches specified below are specific to my system. You will need to substitute your specific system’s variables where prompted.
- First, create the GPT partition table on ada0:
gpart create -s gpt ada0
– Replace ada0 with the new disk
– The command should return “ada0 created“ - Next, create the GPT boot partition. This skips the first 4K of the drive and then creates a 512K partition for the boot code:
gpart add -a 4k -s 512k -t freebsd-boot -l gptboot0 ada0
– Replace ada0 with the new disk
– The command should return “ada0p1 added“ - Next, create the 2G swap partition:
gpart add -b 2048 -s 2G -t freebsd-swap -l freebsd-swap0 ada0
– Replace ada0 with the new disk
– The command should return “ada0p2 added” - Finally, create the ZFS partition:
gpart add -b 4196352 -s MEDIASIZE -t freebsd-zfs -l zfs0 ada0
– Replace ada0 with the new disk
– Replace MEDIASIZE with the Mediasize from partition 3 of the partition table captured earlier.
– The -s parameter specifies the size of the partition however gpart requires that the unit be specified. Append a lower case ‘b’ to the end of the number, e.g. “Mediasize: 12345” turns into “-s 12345b“
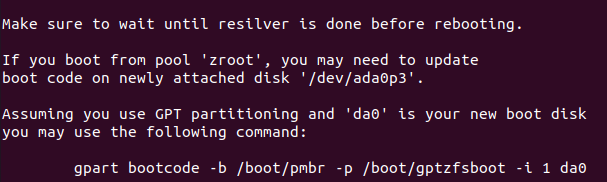
Write bootcode to the new mirror drive
The ZFS mirror may be good for data, but it doesn’t do squat with booting. If your new mirror doesn’t have the bootcode copied over, it will fail to boot if the currently healthy drive fails. To add the bootcode to the new drive, run the below command:gpart bootcode -b /boot/pmbr -p /boot/gptzfsboot -i 1 ada0
– Replace ada0 with the new disk
Add the newly built drive to the ZFS pool and start reslivering
With the new drive partitioned to match the existing drive, and the new drive is now populated with bootcode, now we can finally add the drive to the ZFS pool and let ZFS work its magic. Run the below command to add the disk to the pool:zpool replace zroot /dev/ada0p3
– Replace /dev/ada0p3 with the new disk and partition
You should get a message that advises to not reboot the machine while reslivering is being performed. Reslivering should only take a few minutes unless there is several hundred GB of information to copy over.
You can check on the zpool reslivering by running zpool status If all goes well, you should see this wonderful bit of news:
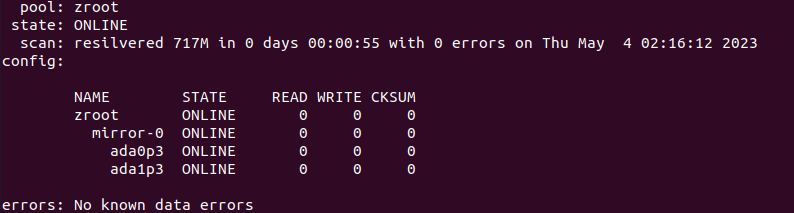
All done!
While I’m not a complete stranger to ZFS, I am very much new-ish to working with it on the CLI. I do know that ZFS is great for NAS storage (I’ve run FreeNAS for years, and have recently migrated to TrueNAS), but this was a first for me using ZFS for pfSense. It is definitely harder to get pfSense to provision a new disk and makes me miss TrueNAS’s UI-based approach. I hope that in time pfSense+ will get a similar update that will allow a user to replace a disk from the UI instead of having to fumble with disk partitioning and CLI work. For a software RAID solution, and seeing how TrueNAS handles it, there shouldn’t be much standing in the way of getting similar ease of use in pfSense. While it’s not often you’ll be swapping disks on a firewall, swapping a disk and learning a new set of commands is the least opportune time.
I decided to post this article due to the fact that no one had posted instructions on how to do this and it took me a maddening two hours to figure out on my own. Fortunately the family had gone to bed already so I didn’t have to deal with a large scale outage as well! I hope this helps someone!
Happy hacking!
FIRESTORM_v1