How to build a [better] Minecraft Server
by firestorm_v1 on Mar.10, 2013, under How-To's, Linux, Toys and Games
Quite some time ago, I posted an article on how to build a basic Minecraft Server which served to get you up and off the ground with multiplayer gameplay. It’s been two years since that article was posted and there have been so many advances in the Minecraft Server realm from administration changes (now you have a fancy GUI) to core game changes that allow for the modification for just about everything gameplay related. Popular alternative servers (Bukkit, Tekkit, Feed The Beast, etc..) allow for mods to be used which can drastically expand your Minecraft experience. This howto will detail the process going from a basic Debian server installation to a fully fledged vanilla Minecraft server with a browseable map. Read on for the full article, it’s pretty long but we have a lot to cover.
Foreword
In this How-To, we will cover all of the steps necessary to cover taking a stock Debiam server and transforming it into a Minecraft server, complete with a web based administration console that will allow you to administer and control your new server without having to login to it.
The steps in this document are for a medium to intermediate skillset. Although all commands are provided for you (with screenshots if applicable), there may be something that breaks unexpectedly and will need to be adjusted. I have taken into account some of the most common pitfalls that you may encounter but there are no guarantees. All commands like ls and apt-get update are bolded to indicate commands ran and a brief explanation is provided of each. This How-To assumes that you have a Debian server ready to go that is SSH reachable at a minimum. We will cover installing additional packages and software as well as the basic configuration required for the server to operate however additional steps beyond the scope of this server will not be covered, such as port forwarding or firewall rules simply due to the fact that there are millions of different types of routers on the market, and there are millions of ways the manufacturers have decided to implement their firewall rules.
For this How-To, you will need a Debian Squeeze server with SSH/SCP access at a minimum and an SSH/SCP client for your client OS. For Windows, I recommend PuTTY for SSH and WinSCP for SCP. Mac OSX and Linux both provide easy SSH and SCP commandline utilities.
This How-To is split into five parts:
- Hardware Requirements
- Installing Mono, Java, and a few other important things.
- Compiling and installing MCMyAdmin (the core Minecraft server and a Web based GUI made by Phoronic UK)
- Installing Minecraft Overviewer (a really cool map service that displays your world in a Google Maps environment)
- Now What? (Website, Plugins, and other things)
About the Software
Instead of just dumping the Minecraft Server java archive into a directory and running it, we’ll be installing a control panel called McMyAdmin made by Phonic UK, which is a management console that offers a great amount of features for the basic server. You can control virtually all aspects of the Minecraft server process in addition to switching out the core server application with an alternate version if desired. Another feature of the McMyAdmin management application is the ability to create backups and restore from backups with easy clicks of the mouse, no SSH needed. Please bear in mind that this is a commercial product however the “Free” edition comes with the ability to have up to 8 maximum players. The unlocked version is 10 GBP, which as of this writing comes out to about $15 and is well worth it for a large-scale deployment. If you are going to want more than 8 concurrent players and/or you like Phonic UK’s work, please consider buying a license and supporting this software!
To generate the maps necessary for our mapping service, we will be using the Minecraft Overviewer. This is a very powerful mapping application for Minecraft which we will be using to generate regular updated maps in a Google Maps style format. We can even set points of interest (POIs) and example code will be given. Using online resources, we can even set up a series of markers such as red pickaxes to indicate mines, or a train icon to indicate a rail station. There are unlimited possibilities for the points of interest and that’s only part of the awesomeness of the Overviewer.
WARNING!!! Although I have tried my best to ensure that the site’s formatting doesn’t insert any weird characters, sometimes the single and double quotes will be converted to “smart quotes” that aren’t properly received by Linux. Make sure to pay attention to the quotes and ensure that any commands copied and pasted are using standard quotes and not smart quotes.
With all of that out of the way, let’s review the hardware.
I: Hardware Requirements
The system requirements for a Minecraft Server depend greatly on your goal for the server once running. Are you going to host a massively large server with 48 user slots or is this just a basic server for you and a few friends? Your intentions will be as critical to your server as the server’s configuration and specs. The specs posted below are just a guide for a typical server and your deployment may be different.
To Virtualize Or Not To Virtualize?
One of the big words in doing Minecraft servers either at home or at a colo facility is virtualization. If you are running virtualization, you need to be aware of the server that is housing the virtual machine you’re running Minecraft on. If the server doesn’t have readily ample disk I/O and memory available to your VM due to oversubscription, your Minecraft server may lag considerably. I’ve used VMware Server on a quad core server with 8GB of RAM and found that under 1 or 2 users it was good however it would not handle more than 5 users concurrently. Your mileage may vary.
System Requirements
The system requirements listed below list both minimum and recommended specs. Performance specs are also listed if you have extra cash for the build.
- Minimum: 2GB RAM, 2GHz single core processor, 160GB Hard Drive
- Recommended: 4GB RAM, 2GHz dual-core processor, 320GB Hard Drive
- Performance: 8GB+ RAM, 3GHZ Quad-Core processor, 500GB HD
Operating System
Unlike my last how-to, the OS being used in this example is Debian Squeeze. Although the instructions are tailored to Debian Squeeze specifically, the same general steps apply and ultimately will not matter significantly in the finished product (your running Minecraft server). At a minimum, you should be using a 64 bit operating system to take advantage of all of the RAM in your sustem. The leading reason for using Debian is Oracle’s decision to remove Java from the repositories for Ubuntu. While there are third-party repositories, I would rather go with the same in-repo installation for Java than with a third party solution.
II: Installing Mono, Java, and a few other important things
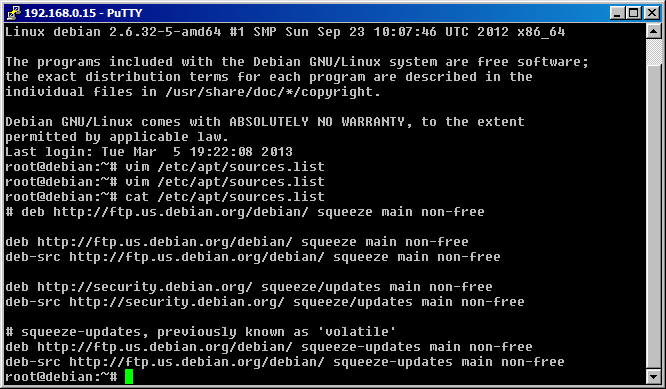
Like with all things, let’s start off with package installation. Login to your server, sudo bash or su – to root. First, we will need to make some changes to the apt repositories. Edit your /etc/apt/sources.list and add “non-free” to each of the lines in the file. This allows us to install the required components.
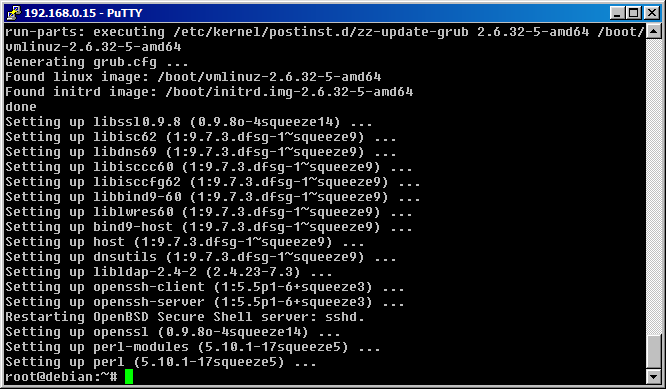
Next, do an apt-get update && apt-get upgrade and make sure to install any updates. This will ensure that your Debian installation is up to date and you will be ready to continue.
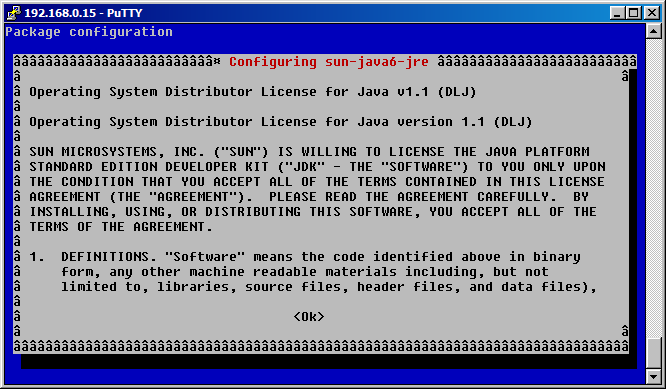
Now to install something towards completing our cause. Run apt-get install bison gettext fontconfig libpng12-0 libpng12-dev libX11-6 libX11-dev libexif12 sun-java6-jre unzip bzip2 wget build-essential screen sun-java6-jre
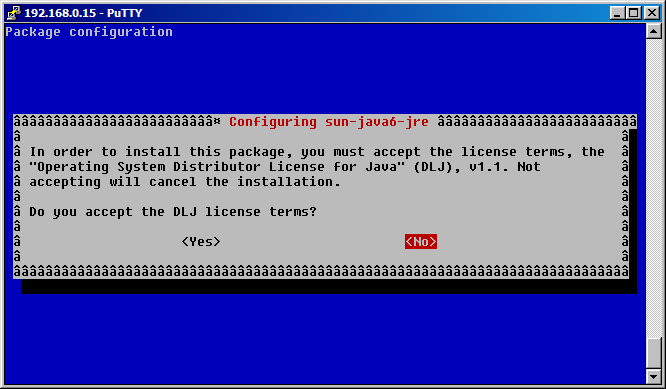
This command will install several packages including the Sun Java6 runtime environment which is required for running Minecraft. During the installation, you will get a prompt which looks like the below. Be sure to accept the license otherwise Java will not be installed. Please note: The weird characters are due to the fact I am using PuTTY in a Windows box. Although the text may not render properly, the functionality is the same. Just scroll down using the Page Down key, hit Tab, then Enter to go to the next screen
Finally, select “Yes” by hitting the Left Arrow and hit Enter.
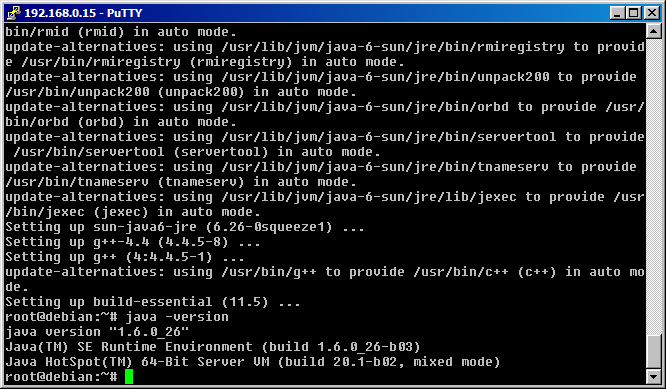
To validate that Java is installed correctly, run java -version and make sure the version comes up as shown. It should read “java-1.6.0_26-b03” as shown below.
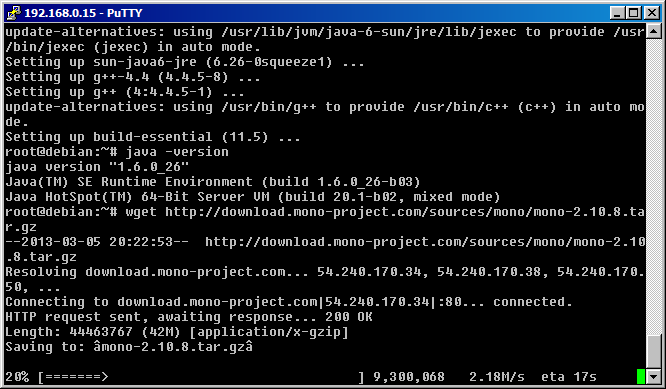
Now that Java’s installed, it’s time to download and compile Mono. Run wget http://download.mono-project.com/sources/mono/mono-2.10.8.tar.gz to download the mono source to your home directory.
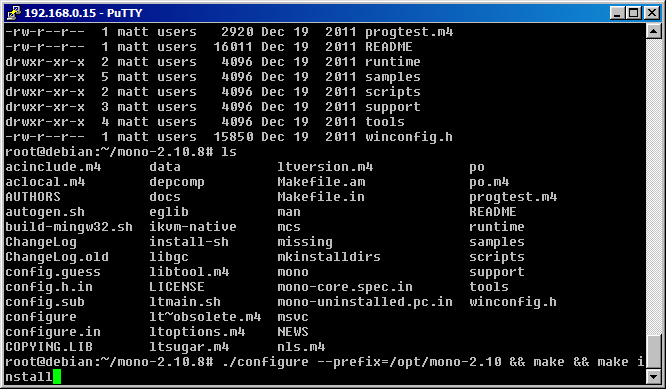
Once Mono has been downloaded, untar it wth tar -xzvf mono-2.10.8.tar.gz. The untar process will create a new directory called mono-2.10.8. Go into the directory via cd mono-2.10.8 and start the configuration process with this command: ./configure –prefix=/opt/mono-2.10 && make && make install This command compiles Mono and installs it in the /opt/mono-2.10 directory and will take approximately 20 minutes to complete.
Once mono is installed, you should be able to verify its version by running /opt/mono-2.10/bin/mono –version as shown below:
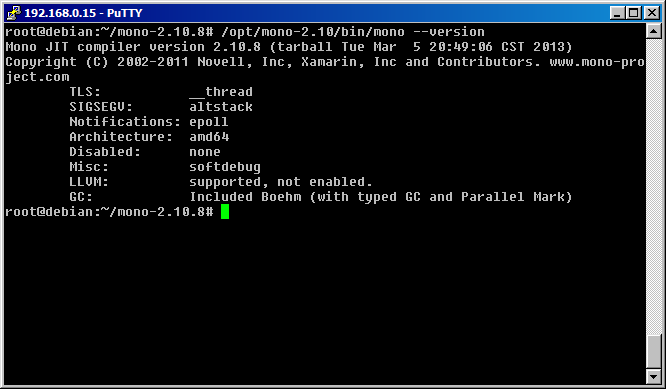
Now that we have Mono and Java ready, move on over to the next section to continue our build.
III:Installing McMyAdmin
Section 1: Standing up the MC server
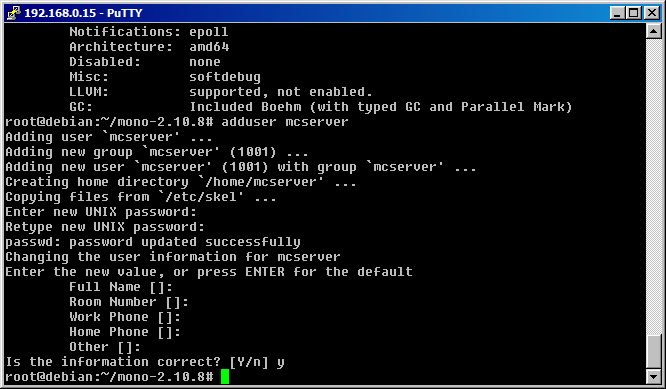
It is recommended not to run McMyAdmin as root so we will start off by creating a new user. For the purposes of this tutorial, we will use the name “mcserver” as the user that is running mcmyadmin. This will be the user that we will log in as to stop and restart McMyAdmin via SSH. You can use any other non-root user, just be sure to use that username in place of “mcserver” for the duration of this howto.
Start off by running adduser mcserver and follow the on-screen prompts. You can hit enter to all other prompts, but be sure to provide a good password.
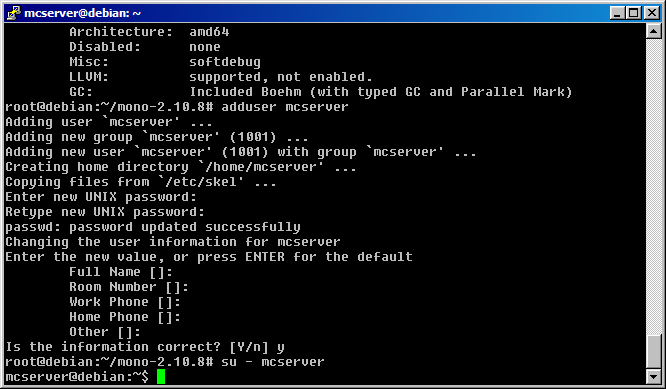
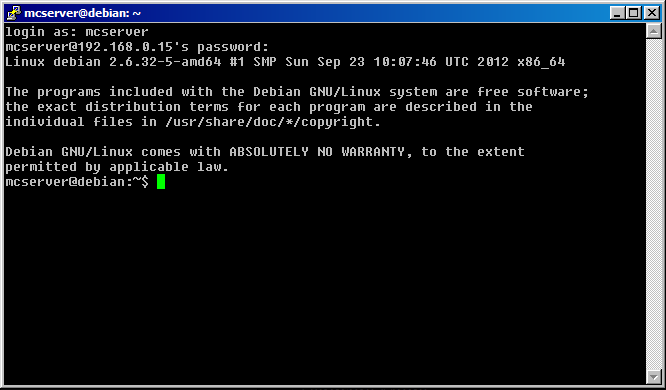
Now, we’re going to switch into that user and perform the McServer download. Run the command su – mcserver and you should see the prompt change from a # (for root) to a $ (for user).
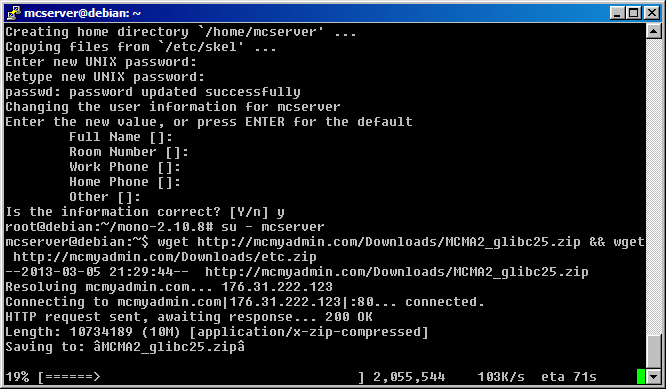
Now let’s wget http://mcmyadmin.com/Downloads/MCMA2_glibc25.zip && wget http://mcmyadmin.com/Downloads/etc.zip to start downloading the McMyAdmin files.
Now, let’s make a directory called mcmyadmin and extract the zipfile contents into it. Run mkdir mcmyadmin && cd mcmyadmin && unzip ../MCMA2_glibc25.zip
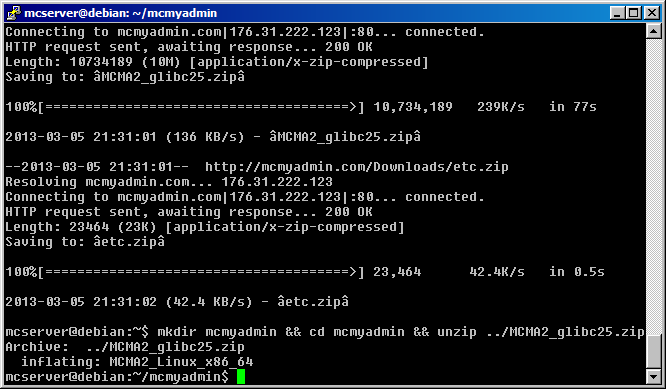
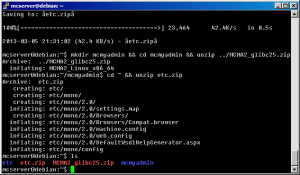
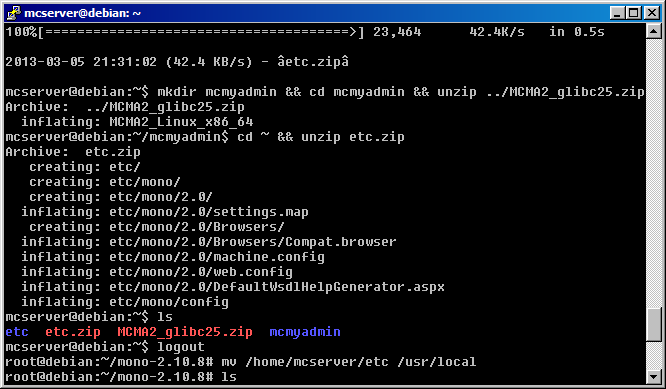
Now we’ll go back up one directory, and unzip the etc zipfile. Run cd ~ && unzip etc.zip. When done, you should have two zipfiles and two directories.
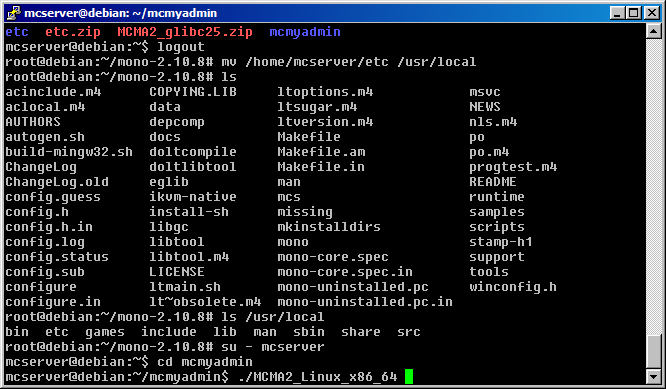
Before continuing, we need to do one thing before we perform the first start. Hit Ctrl-D to end your mcserver session. This should drop you back as root. As root, run mv /home/mcserver/etc /usr/local
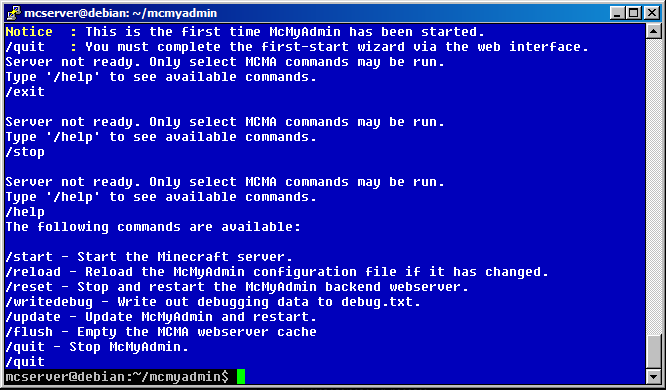
Next, we’re going to switch back to the mcserver user and we’re going to start the server process to download updates. Again, run su – mcserver and as the mcserver user, cd mcmyadmin, then finally ./MCMA2_Linux_x86-64 to start. Please note, this screenshot is just prior to starting McMyAdmin, as the screen will change.
If all went well and everything is where it should be, you should get a blue screen with white text asking if you want to update like in the below screenshot.
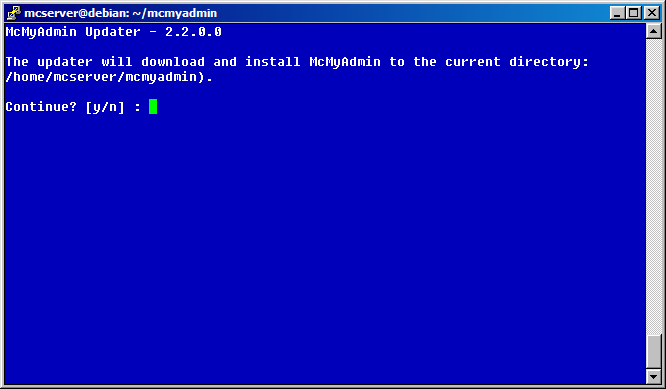
Of course, answer yes. This will download the core files and start up the MC server instance as shown below.
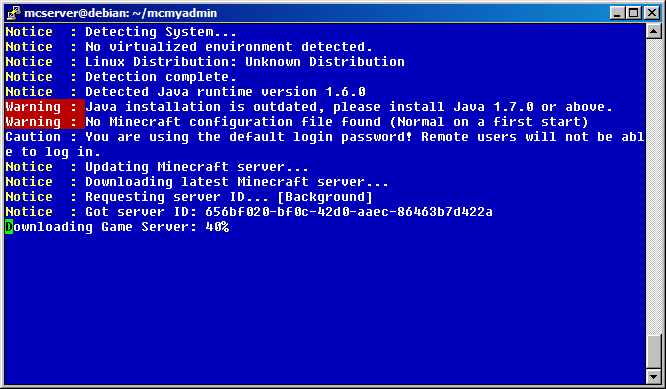
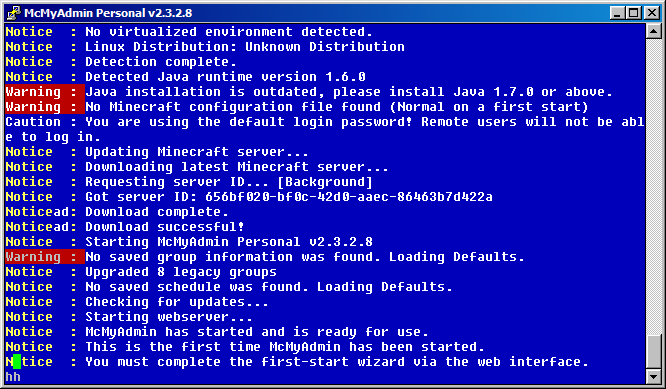
After a few moments, you’ll see this message “You must complete the first start wizard via the web interface.
This is going to be tricky. In order to login to the web interface, you have to connect to localhost. Before you go reaching for your New Tab button, there’s some trickery involved. It means localhost to which McMyadmin is running! Fear not, we have a workaround. By using remote port forwarding built in SSH, we can forward the remote service port for McMyAdmin to the local computer (the one you’re reading this and typing the commands on).
Windows Users
I’m going to assume you’re using PuTTY simply because I haven’t heard of any other Windows based SSH client (apart from cygwin). Configuring port forwarding is pretty basic in PuTTY. Please note, you don’t have to exit your session (and it’s advisable that you don’t exit right now otherwise the server process will exit.)
- Click on the PuTTY icon on the upper left hand window.
- Click on “Change Settings”.
- Click on the + next to SSH (should be at the bottom of the left hand window).
- Click on “Tunnels”
- On the right hand side, click the “Local” radio button.
- Type “8080” into the Source Port field.
- Type in “127.0.0.1:8080” into the Destination field.
- Click “Add”
Your port forward should look like the following when you enter it.
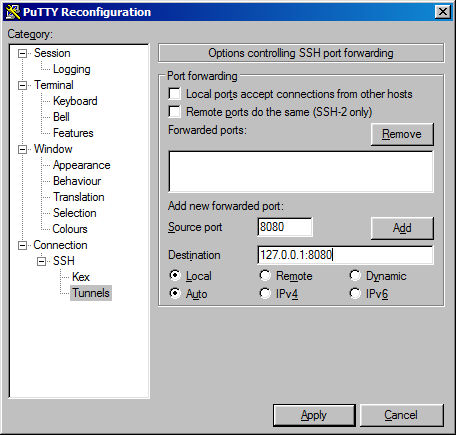
Your port forward should look like the following once you click “Add”
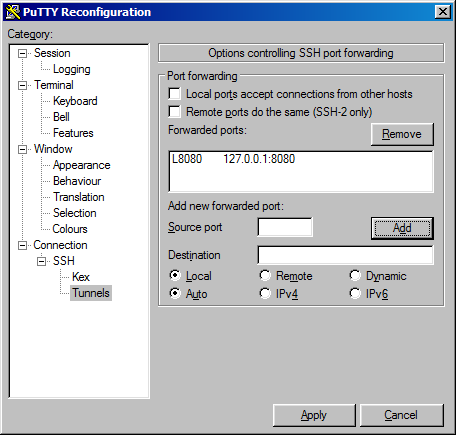
Now, click Apply to apply the port forwarding and regroup further below.
Mac/Linux Users
Mac and Linux Users will need to open a new terminal session and run this command. You will want to replace 1.2.3.4 with that of your Minecraft server: ssh -L 8080:127.0.0.1:8080 1.2.3.4
This will establish the needed port forwarding during your next steps.
Logging in to the UI for the first time
Now that we have the needed port forwards, it’s time to login. Open another browser window and go to http://127.0.0.1:8080
You should be presented with a login prompt like below:
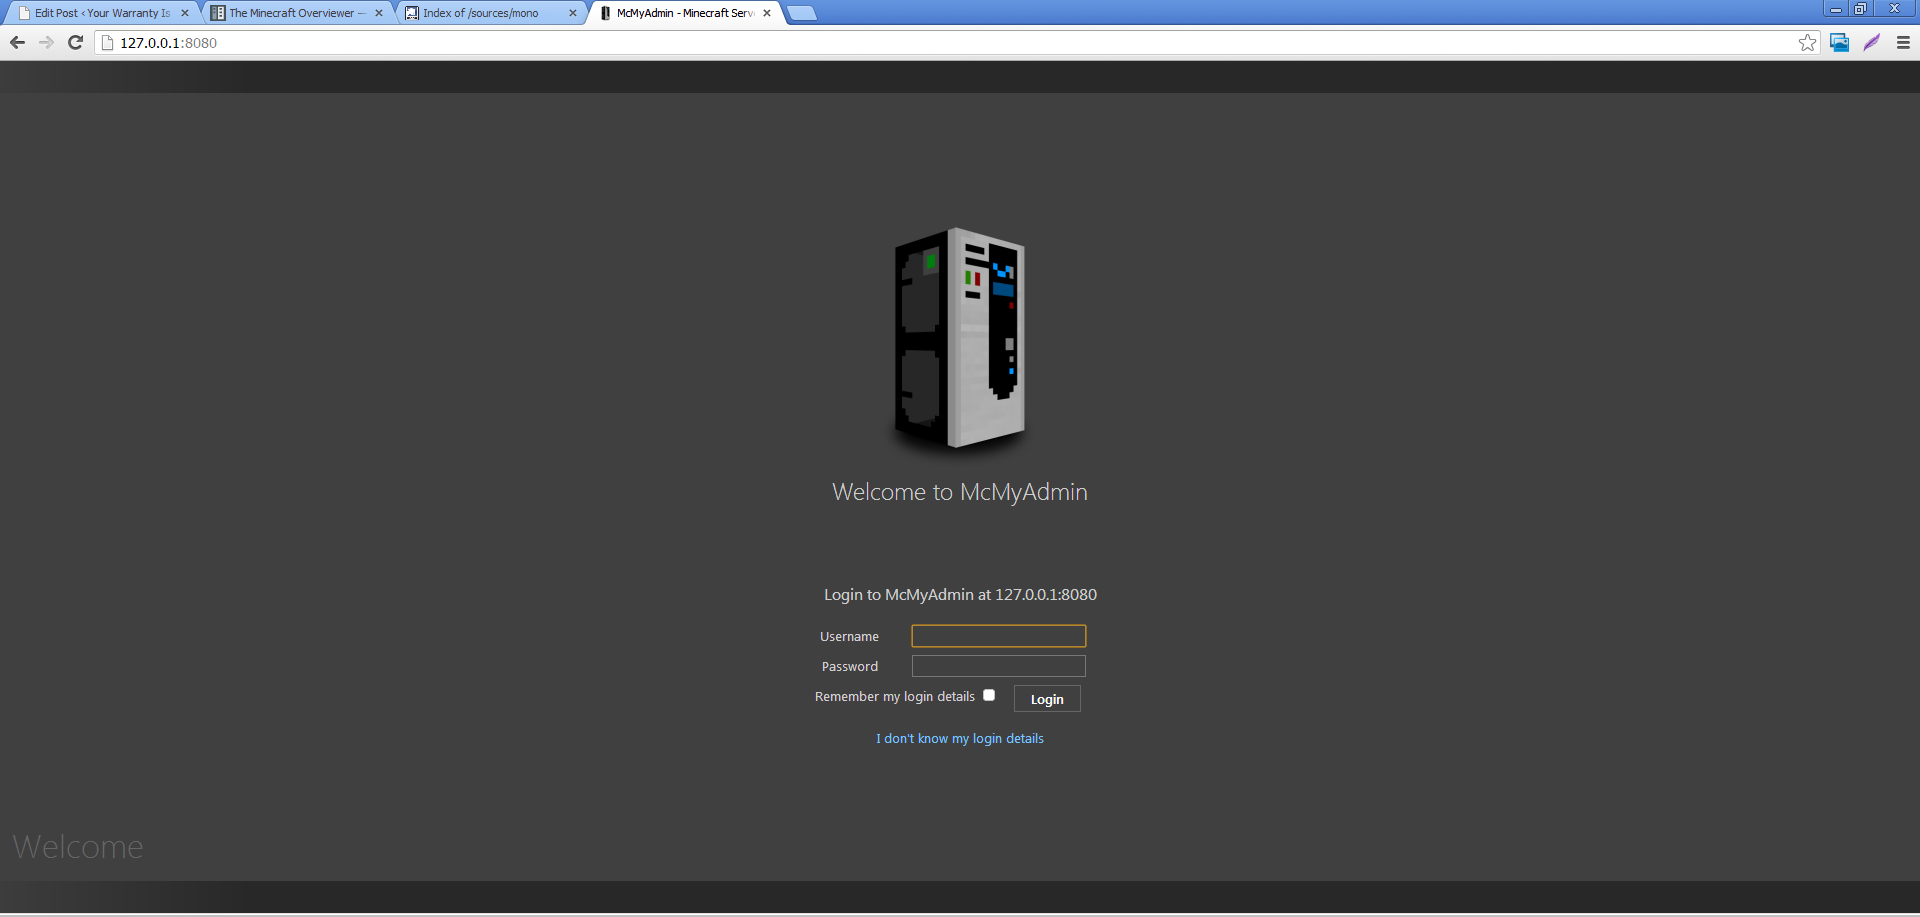
Login with the name “admin” and the password “admin”. Click OK to dismiss the Welcome message. You will be brought to the configuration game settings page.
We’ll discuss the game features later, but first we need to reset the admin password and establish remote connectivity to the McMyAdmin service. For now, click on “CHANGE PASSWORD” in the upper left hand corner and change your password to a more secure password. The “old password” is “admin”. You will need to choose a fairly complex password, it won’t let you set a “test1234” password.

Now that we have the password set, log out of the web interface and go back to your terminal session. In order to shutdown the server, type in /quit and hit enter. Then, type it in again until you’re back to terminal prompt. (I had some issue with this as evidenced in the screenshot.)
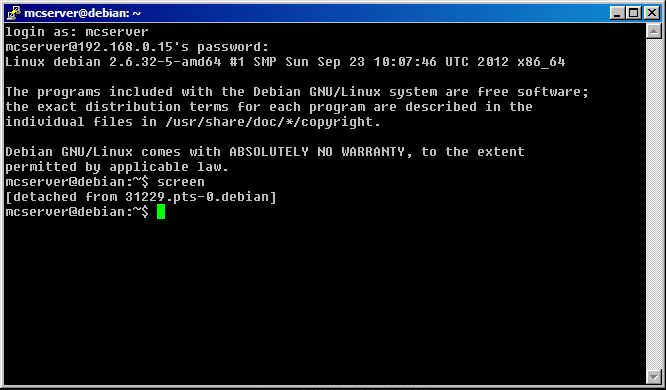
With the server down, we need to restart it properly. To do this, use Ctrl-D to log out of the server as mcserver and again to log out as root. Log back in again, but this time use only your mcserver username and password.
Next, run screen and hit enter to get back to a shell prompt. (Sidenote: For the uninitiated, “screen” is an application that creates a virtual terminal that is not bound to your SSH session. If we started the server process and then closed our SSH window, the process would be terminated. Since we want it to stay running, we use screen to keep the process running. You can use screen -r to reattach to the screen session and CTRL-A then D to disconnect without terminating a screen session)
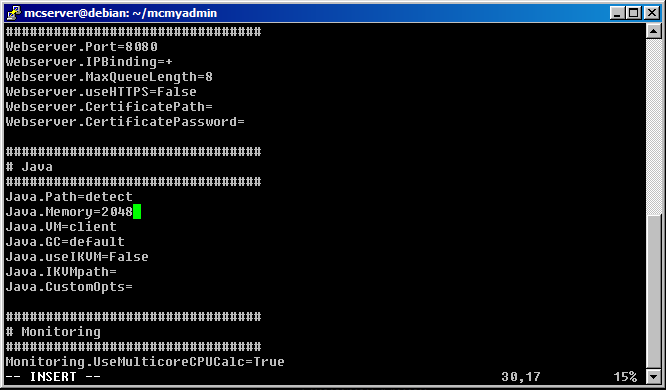
If you have more than 2GB RAM, you will want to change something first before you fire up the server again. First, cd mcmyadmin and open up McMyAdmin.cfg in your favorite text editor. Scroll down to the Java section and look for the line that reads Java.Memory=1024.
You will want to change this to 2/3 of your server RAM as this allocates the memory to the Minecraft server process. The cursor in the screenshot below is located on the line to alter. Since this server has 3GB RAM, I am using 2GB RAM to the Minecraft process. You’ll need the remaining RAM to run your OS and to handle the map generator later.
To restart the server in our screen session, cd mcmyadmin then run ./MCMA2_Linux_x86_64
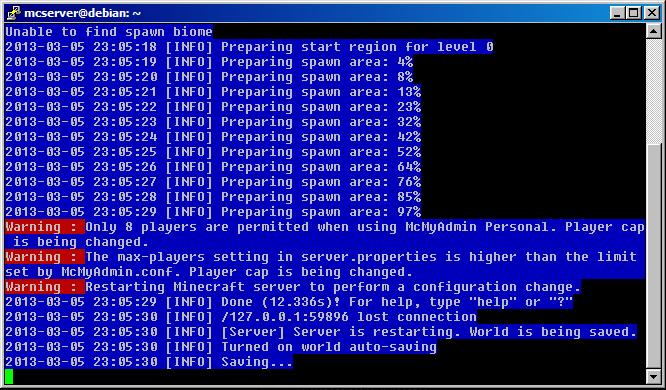
If you did it correctly, you should see the Minecraft Server begin generating your spawn chunks. Use Ctrl-A then D to detach the screen session, then CTRL-D to logout. When you detach from the screen session, Screen will print a message letting you know that the session was detached and it looks like this.
Next, let’s make sure that you can access the Minecraft server panel remotly. Try to point your browser to your Minecraft server’s IP address on port 8080, e.g. if your IP is 1.2.3.4, then you want to browse to 1.2.3.4:8080. If you get the McMyAdmin page and you are able to login, you’re good to go on to the next section.
Section 2: Web Configuration
At this point in the configuration, we have successfully stood up the McMyAdmin server process and we’re ready to configure our game. First, we’re going to adjust the game options then we will restart the server to apply those options, then finally we will add a user as admin and continue configuration.
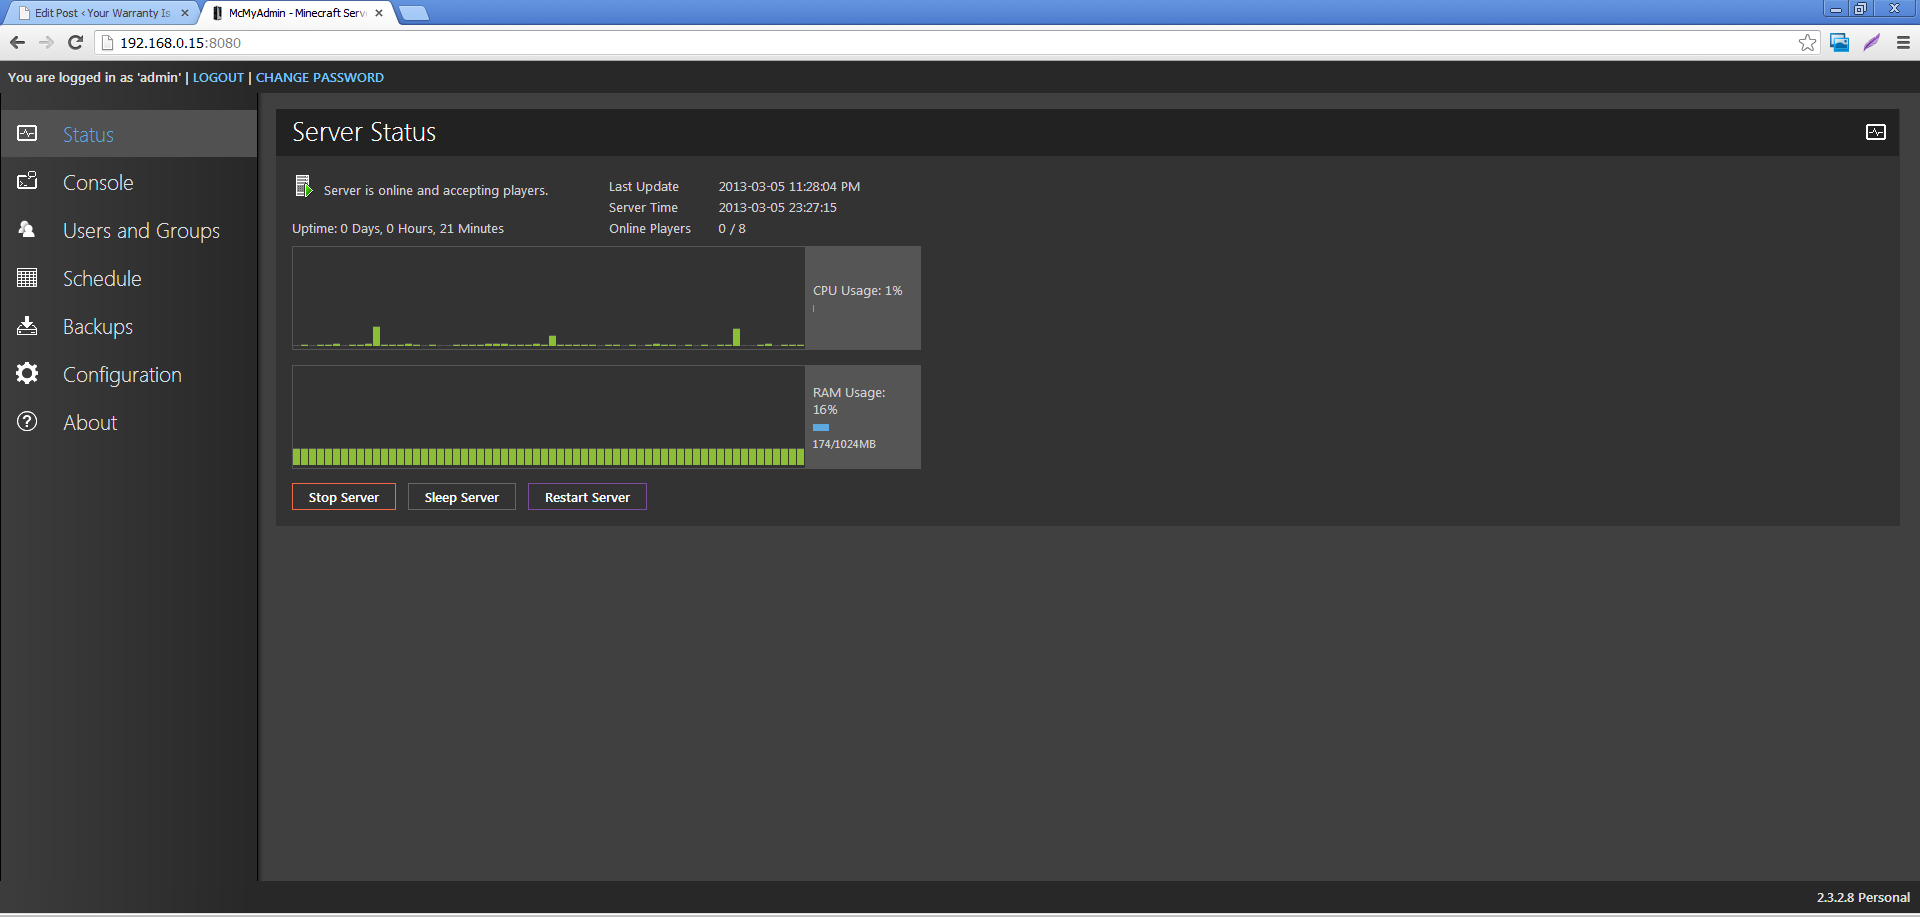
Logging into the Web UI, we get a nice display of the server’s current status as shown below. This screen is important as it shows the CPU utilization of the server (top graph), the amount of memory allocated to RAM and how much is currently being used (bottom graph) and we can see how many users are logged in. (above the CPU Utilization graph). We also see that the server is active and ready to receive players.
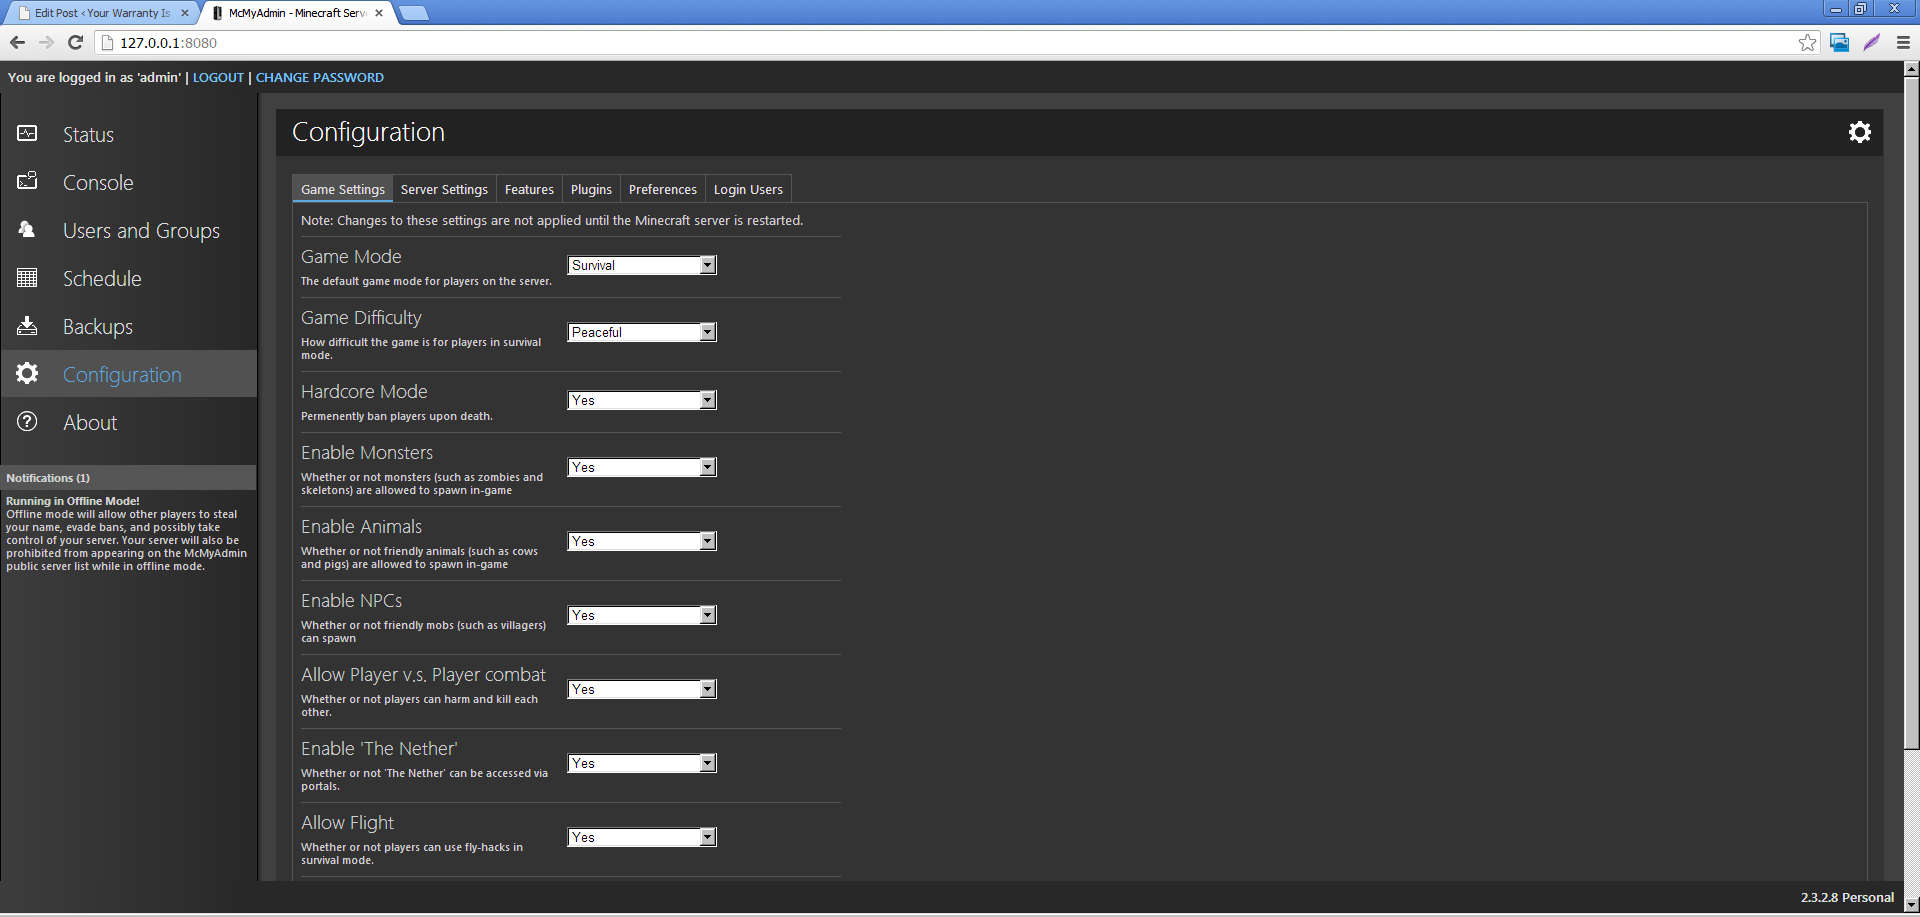
On each page, we will cover all of the options available under the “Configuration” tab. You will want to set these settings according to how you want your Minecraft server set.
Game Settings
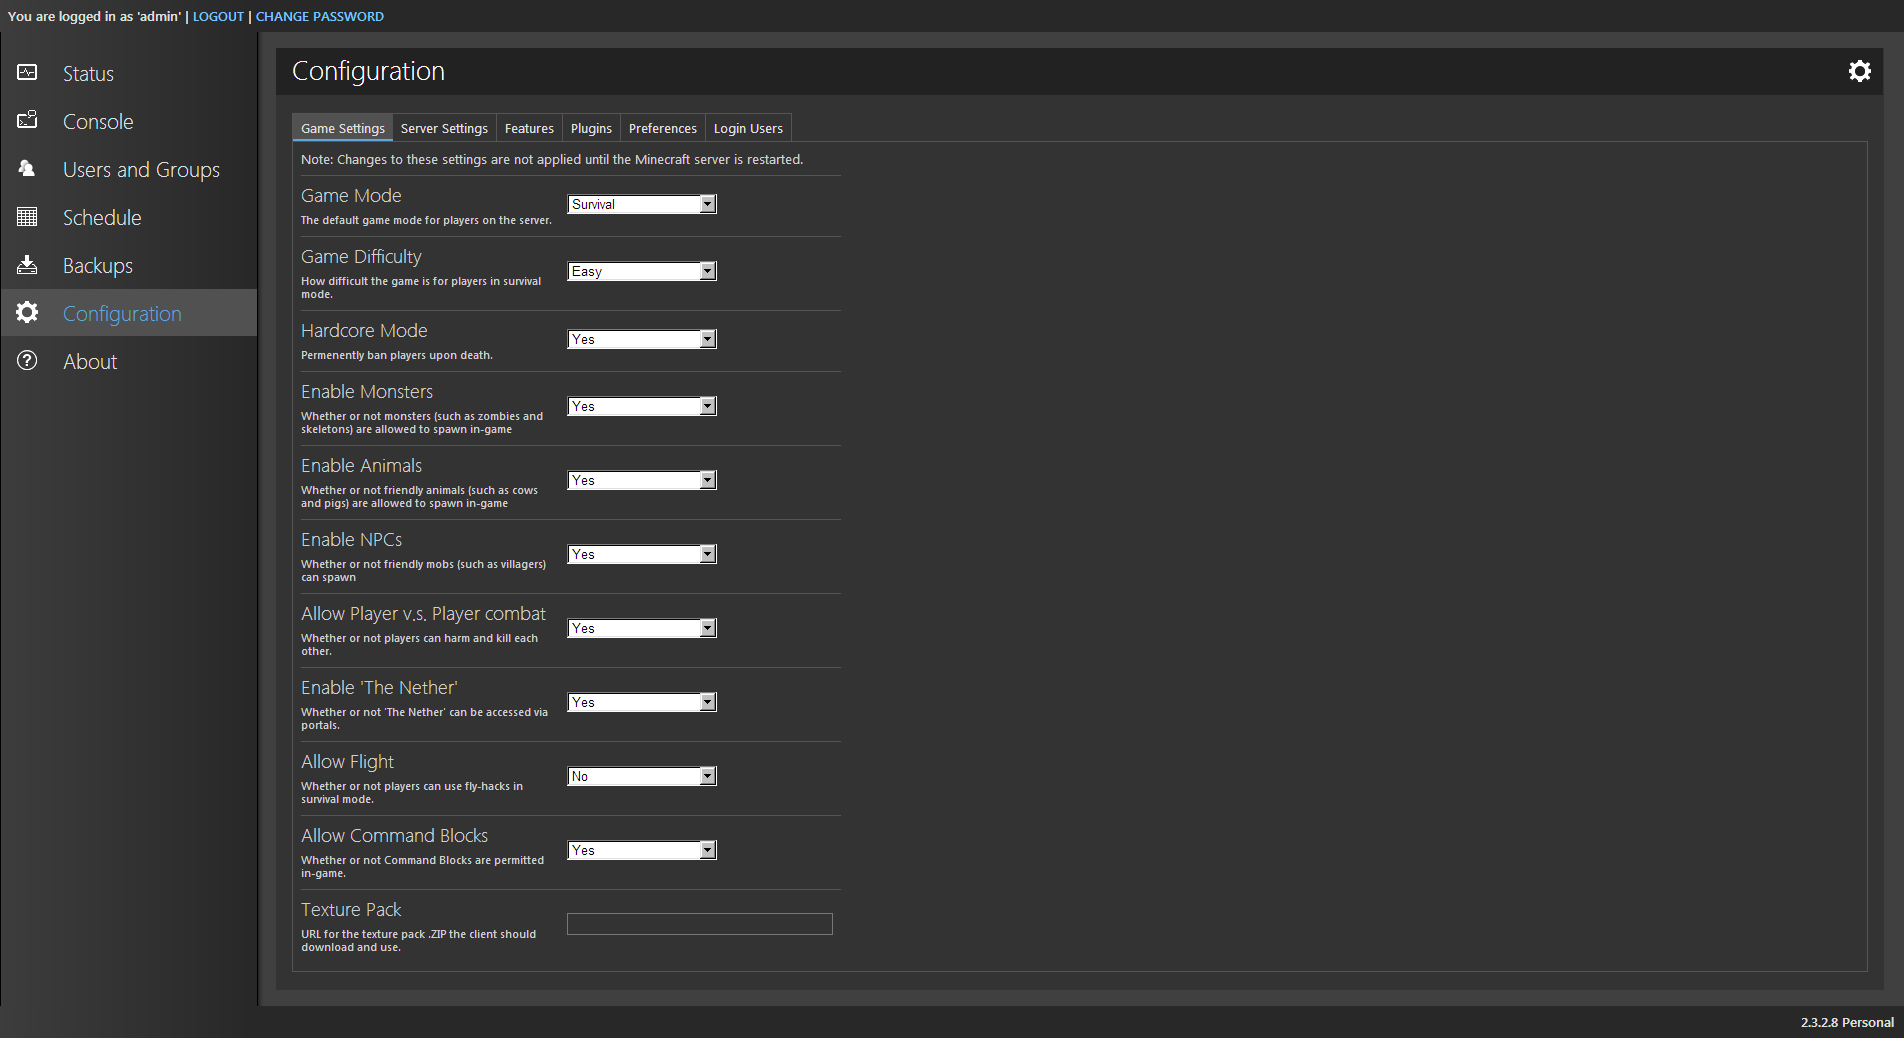
- Game Mode – You can set your game mode here, Available options are Survival (mine for minerals, avoid monsters, farm, build, etc), Creative (All players have access to all blocks in inventory from the start) and Adventure (not implemented except on some specialized servers.) You will more than likely want Survival Mode as this is the most common game mode.
- Game Difficulty – This affects the mobs difficulty settings. Available options are Peaceful (Mobs won’t attack unless provoked), Easy (Mobs will rarely attack), Normal (mobs will sometimes attack), and Hard (mobs will actively seek you out.)
- Hardcore Mode – This sets the option for what is called ban-on-death. If a player (even an OP) dies for any reason, they are banned and can never come back. Most servers don’t enable permaban, because they want the users to come back.
- Enable Monsters – This controls whether or not enemy monsters spawn. Enemy monsters are Skeletons, Creepers, Slimes, Zombies, Witches and other hostile mobs. Note: Disabling slimes may result in your players not able to make Sticky Pistons.
- Enable Animals – This controls whether or not neutral mobs (Cows, Sheep, Chickens, Bats) spawn. It’s recomended to leave this enabled.
- Enable NPCs – This controls whether or not NPC characters like Villagers spawn. It’s recommended to leave this enabled.
- Allow Player versus Player Combat – This is whether or not players can get damaged by other players. Turning this off disables PVP.
- Enable “The Nether” – This enables or disables Nether Portal functionality.
- Allow Flight – Can users with the appropriate client plugins use flight? It’s recommended to leave this set to Yes so that you can fly around as OP.
- Allow Command Blocks – This controls whether or not Command Blocks are enabled.
- Texture Pack – If you are using a specific texture pack (not covered in this How-To), you can specify it here.
Here is all of the options on the Game Setting screen. Be advised, some of these settings require a server restart.
Server Settings
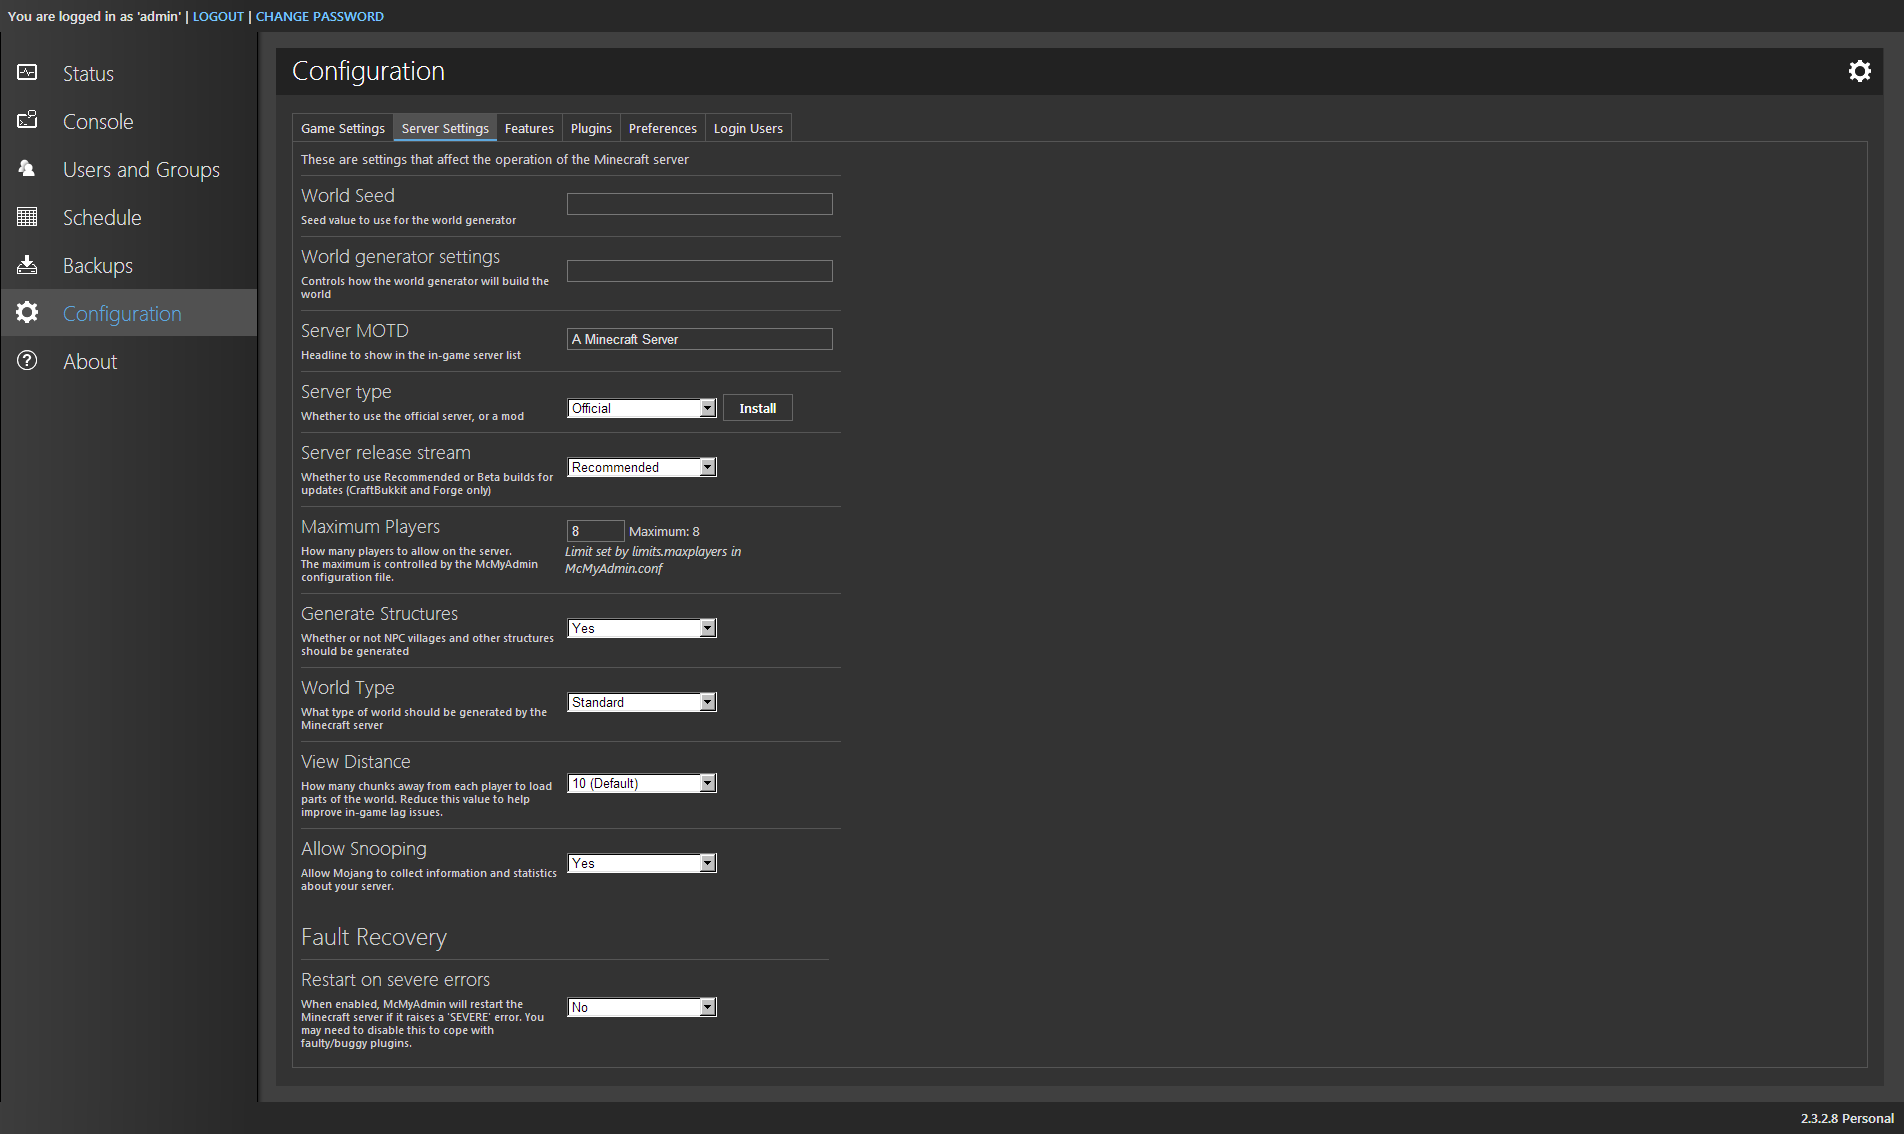
- World Seed – If you have a predefined World seed, you can specify it here. Please note that entering a seed will require you to delete your existing world first. It’s ok if this is blank.
- World Generator Settings – If you have any additional settings for the World Generator, you can specify them here. You will have to delete the world and recreate it to generate the world using these new settings.
- Server MOTD – This is the message that your users will see when they first login to the server.
- Server Type – There are several popular settings for the Minecraft Server process, you can use the Official engine (from Mojang), or you can use some of the popular alternates (Bukkit/CraftBukkit, Tekkit, FeedTheBeast, Spigot and Forgemod). Note: See the last section “A cautionary tale about mods and plugins” for more details as to what these are. If you are unsure, set it to Official.
- Server Release Stream – This is how you tell which version of the Server Type to download. There are the “Beta” releases and there are the “Recommended” releases. For most purposes, “Recommended” is, well, recommended.
- Maximum Players – You can control how many concurrent players are allowed in the game. Because we are using the free version of McMyAdmin, we are limited to 8. Note: I have run my server for two years and have not had any issue with this limit. Larger servers may require that a license be paid for if players are getting server full messages.
- Generate Structures – This controls whether or not NPC villages and other structures are generated. This does not affect mine generation, but will affect strongholds, dungeons and abandoned mineshafts.
- World Type – This controls how biomes and what kind of terrain are generated. The choices are Standard (usual Minecraft terrain, mountains, cliffs, hills, forests, etc..), Large Biomes (same as standard but with huge tracts of land instead of the standard sized biomes), and Flat (which is well, flat.).
- View Distance – This controls the default view distance of the clients connected to the server. If the server’s view distance is smaller than the client’s, it will force the client to use the lower value. The default value is 10 and honestly, I’ve never found need to change it.
- Allow Snooping – This controls whether or not the Minecraft Snooper process is allowed to collect non-identifying stats about the Minecraft server process like how much RAM is allocated, how many concurrent players (no usernames), etc. I have this disabled on my server but you can either turn it off or leave it on. This setting does not affect gameplay.
- Restart on Severe Errors – Should the MC server process encounter an unexpected fault and abnormally terminate, should McMyAdmin attempt to restart it? I do not recommend turning this on. If the server crashes unexpectedly, especially in a vanilla installation like what is covered here, this could be the sign of a severe hardware failure. Attempting to restart the server process only to have it crash again could trash your map.
Here is all the options of the Server Settings page. Changes to these settings will definitely require a restart of the Minecraft server as they affect low-level components of the server’s operation.
Features
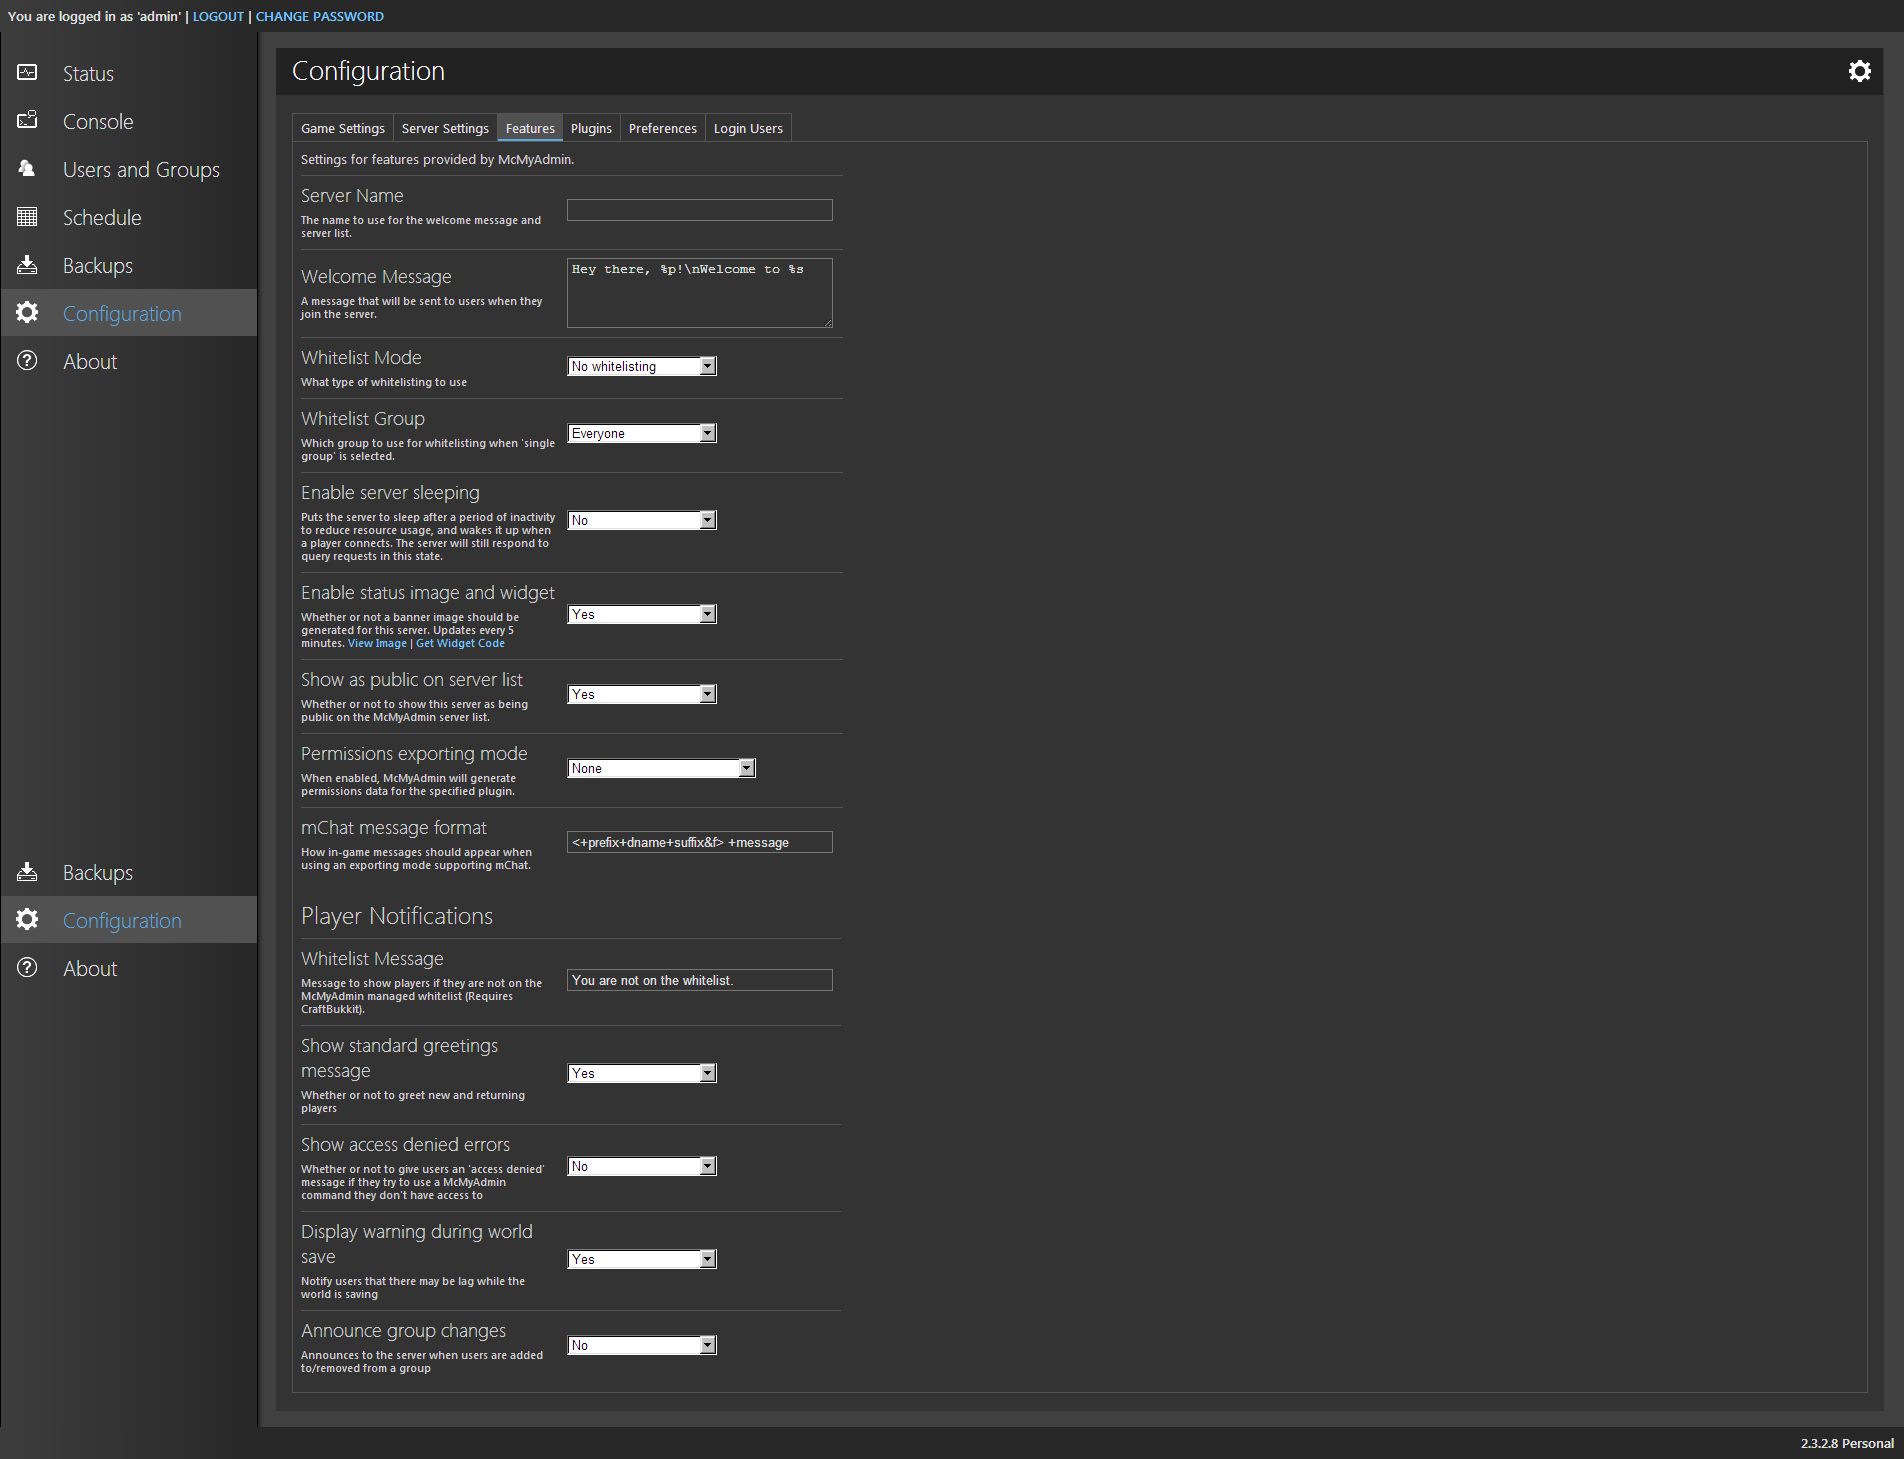
- Server Name – This is the name of the server that will show up in the client’s server list once added. This will also be the name of the server that shows up on any public Minecraft Server lists on the Internet.
- Welcome Message – This is the message that the server displays for users when they login to the server. This can be freeform text and can be used to convey information to your users like maintenances or contests, etc.
- Whitelist Mode – This controls how users are authorized to join the server. The options are No Whitelisting (Anyone can join unless explicitly banned), Lockdown (Admin only), Single Group (only users in the Whitelist Group can join), and Match Any Group (Any group in the users tab will be allowed to join, non added users will get rejected.).
- Whitelist Group – If the “Single Group” option is set, this field must be set with the group that holds your authorized users. If you are using any other Whitelist mode, this field is disregarded.
- Enable Server Sleeping – This is a feature that you may want to consider if you are on a server that runs other applications as well. If there are no users logged into the Minecraft server after a set period of time, the MC server process is temporarily paused. When a user reconnects to the server, the MC server process is spun back up and the user receives a “Starting up, please reconnect in a bit”. After about 30-60 seconds, the server is fully online and ready to accept players. While I can see the benefit of this feature in some deployments, I have it disabled.
- Enable Status Image and Widget – This feature gives you a status image you can display on a webpage that reflects the server status. Please note, if you are not on the same network as the Minecraft Server you are building, it won’t display. If you are installing this on an externally accessible server (non-NAT), then this may be of use to you.
- Show as public on server list – This controls whether or not your server is listed as public or private on McMyAdmin’s public server list. Honestly, I’ve never seen this list nor do I see a link on the site so I’m not sure if it’s still an option. (If you know where this page is, please leave me a comment and I’ll update this post.)
- Permissions Exporting Mode – McMyAdmin makes it easy to export the permissions set in it to a plugin for permissions control. This is where you can select from a list of popular Permissions plugins. NOTE: Although it seems to be pretty popular, countless threads on Reddit’s /r/admincraft strongly discourage the use of PermissionsEX. Avoid this plugin to save yourself some plugin permissions hell later on.
- mChat Message Format – If you elect to use the mChat plugin on your server, you can set special formatting options here. Since I don’t use mChat and am not familiar with it, I can’t advise further on it.
- Show Standard Greeting Message – This controls the “Welcome Message” being displayed when a user logs into the server.
- Display Warning on World Save – This controls whether or not the World Save broadcast message is displayed during world saves (both periodic saves and manual saves)
- Announce Group Changes – This controls whether or not a change in groups for users is displayed in-game.
These settings control both McMyAdmin and Minecraft. Depending on the options, you may need to restart McMyAdmin as well as Minecraft.
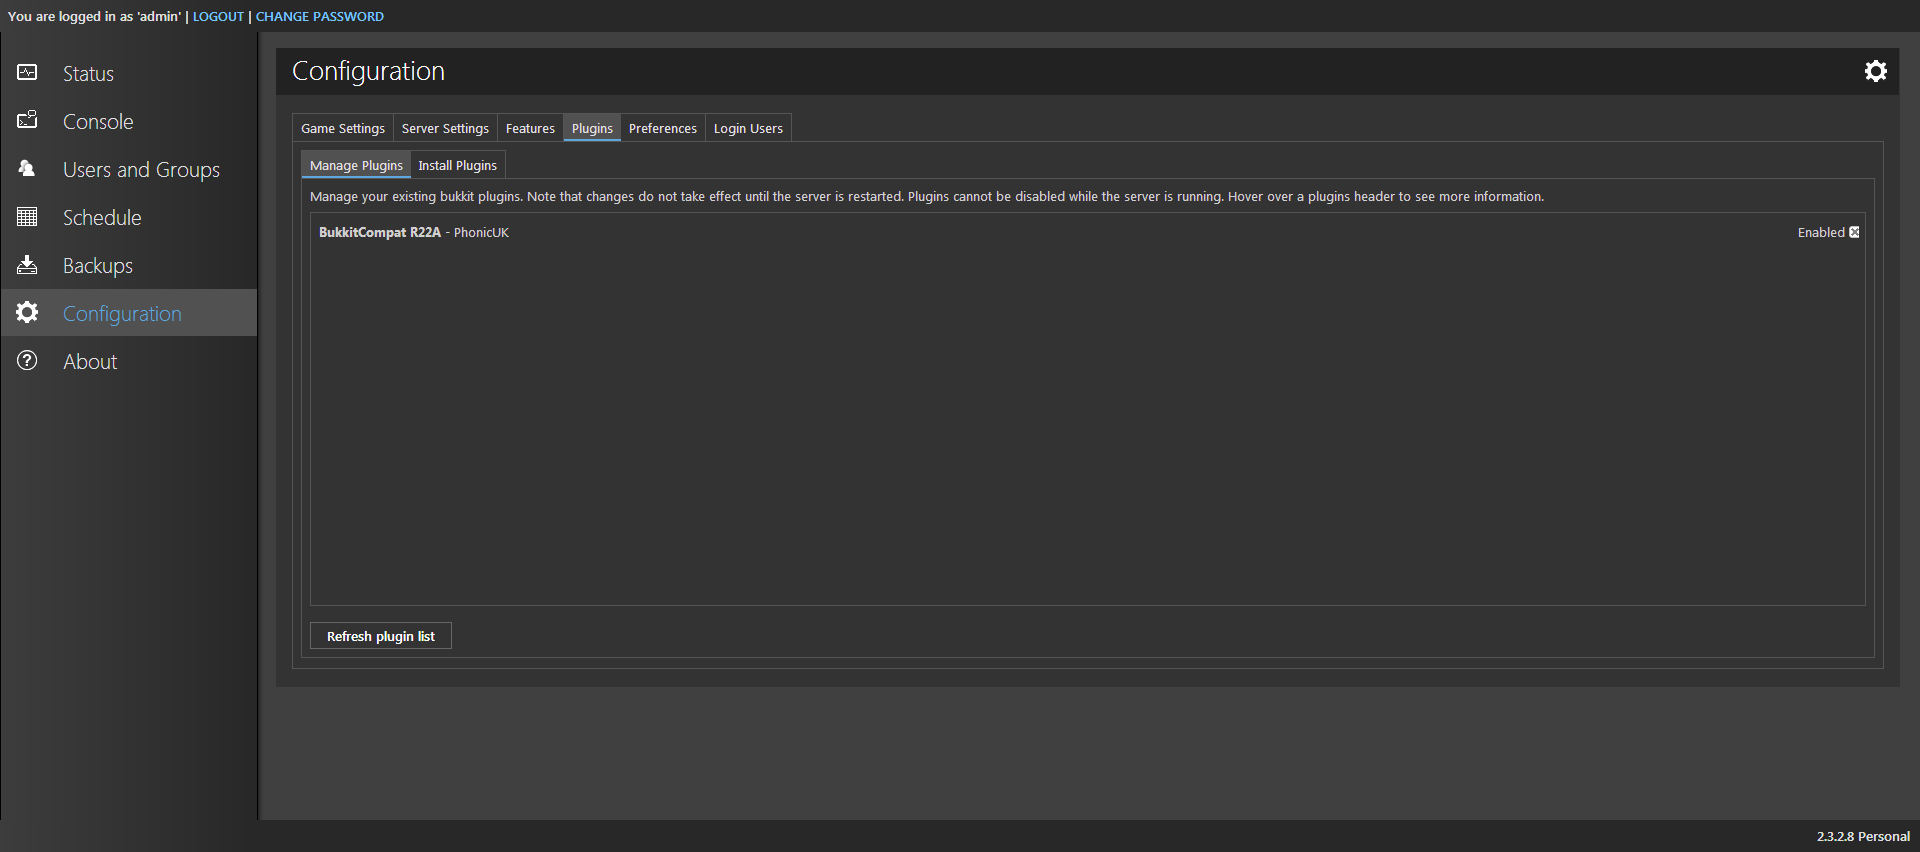
Plugins
The Plugins page allows you to enable and disable plugin modules. Since we’re not using plugins on our vanilla server, we are showing this just as a reference. If you use plugins, you can disable and enable plugins, then restart the Minecraft server to apply the changes. If you are using CraftBukkit, you can search and add plugins on the “Install Plugins” sub-tab.
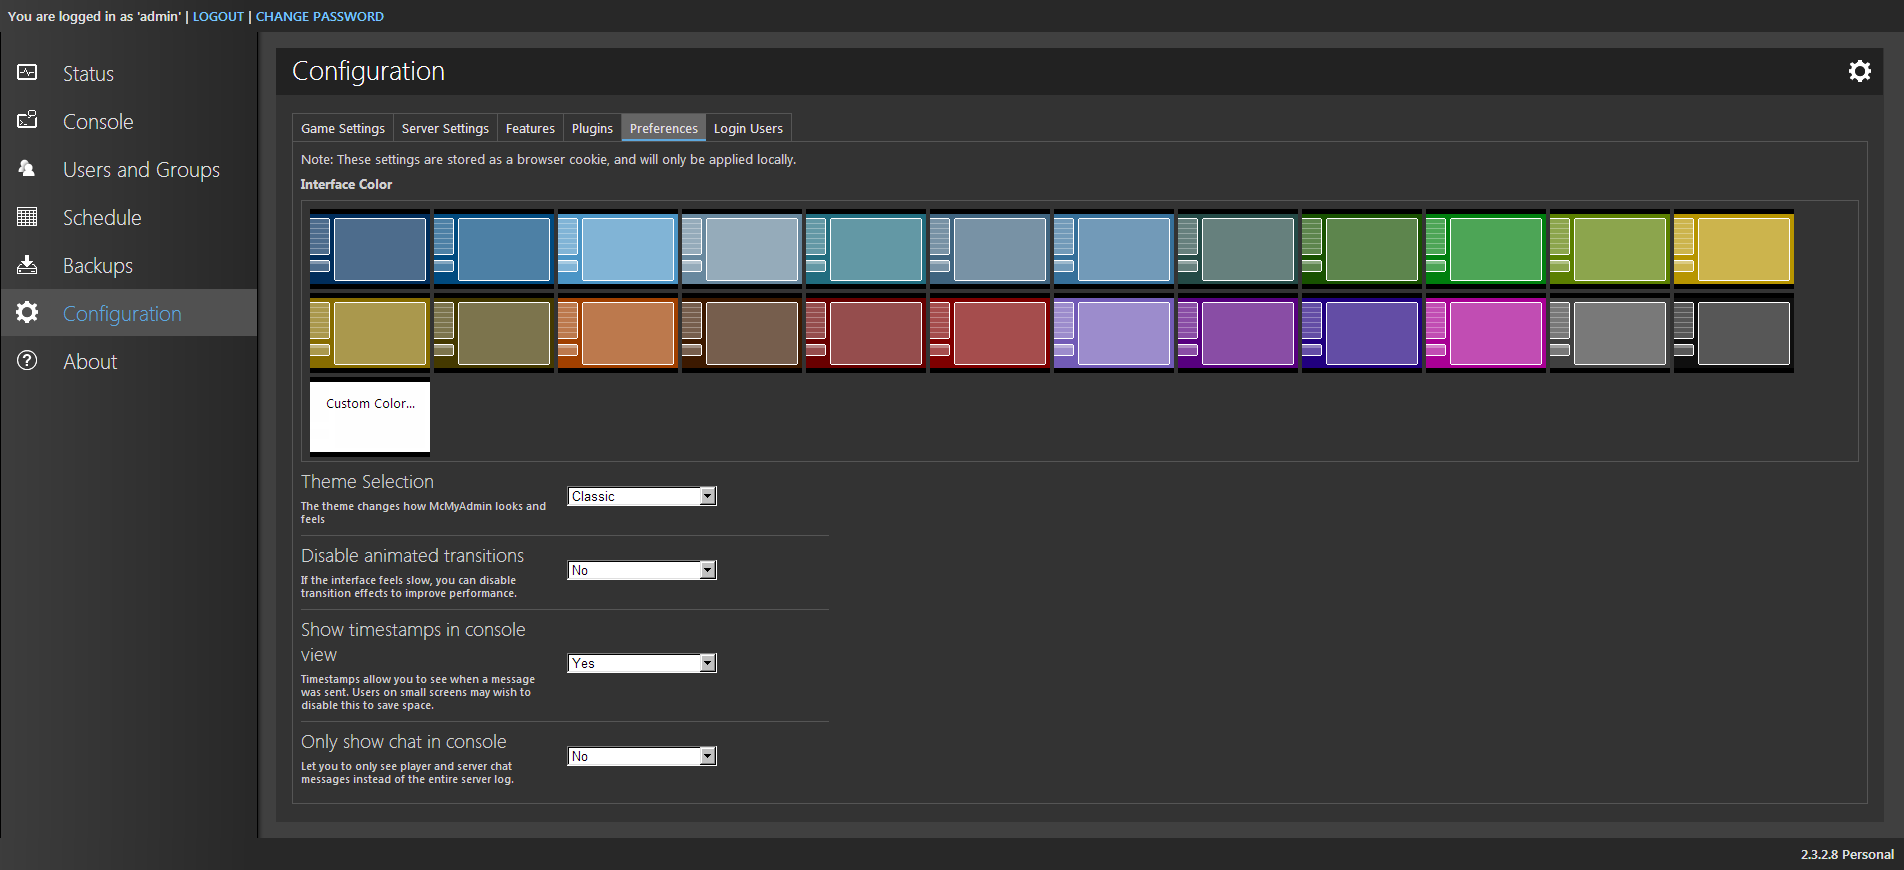
Preferences
This page affects only McMyAdmin in regards to the UI skin and changes some reporting methods for the server console.
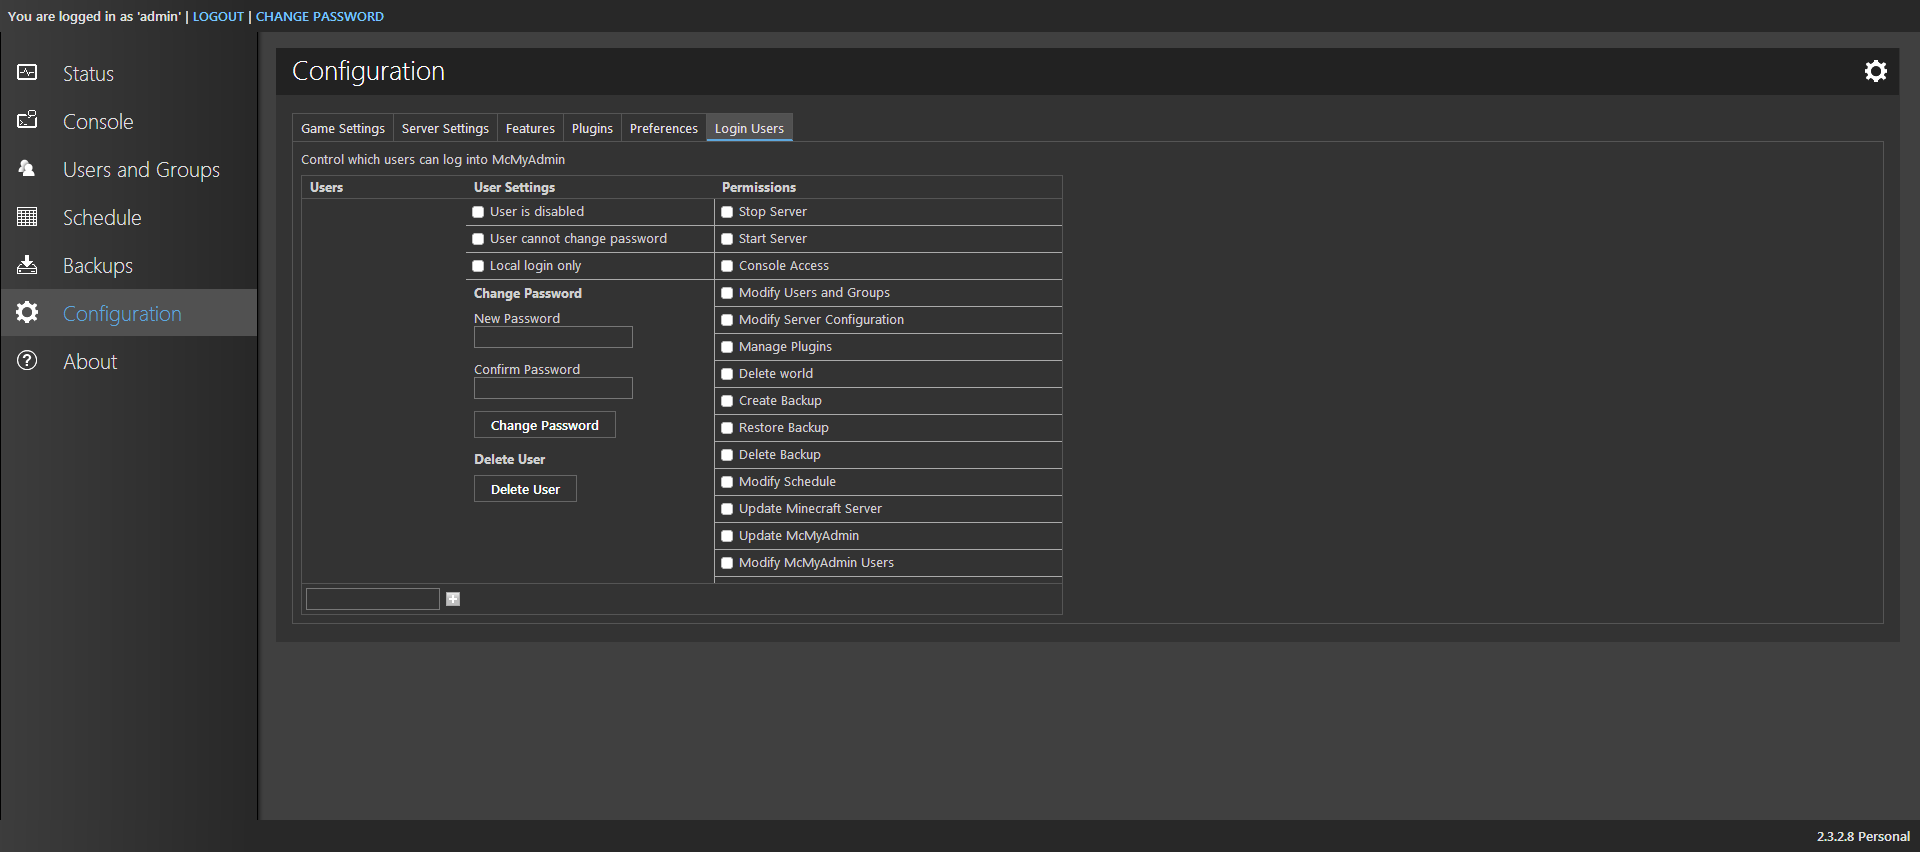
Login Users
This page is for controlling access to McMyAdmin. You can define custom roles for any additional users if you need to add them. NOTE: This does not affect user access to the Minecraft game, only access to McMyAdmin is affected.
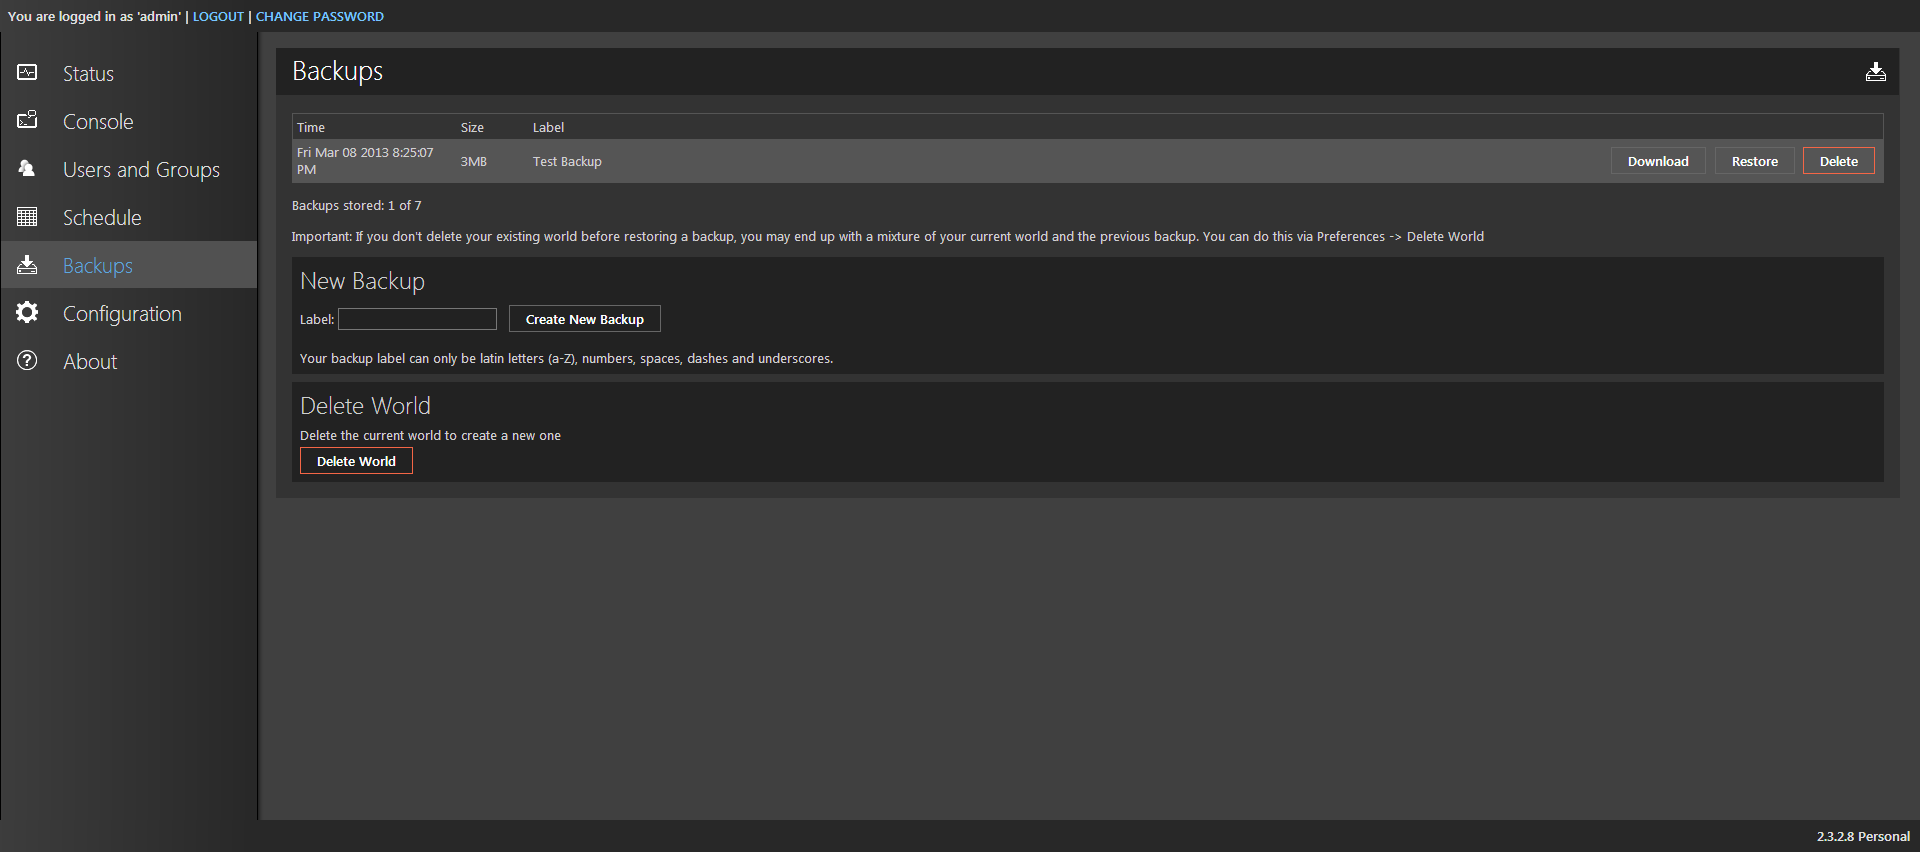
Backups
First rule of Minecraft Administration is don’t op the kids! Second rule of Minecraft Administration is Backup, backup BACKUP!!! No, seriously. Your world map is your biggest asset in the eyes of your players so you want to take care of it. You can store a maximum of 7 backups and download them off-server later. You can also restore the backup should you need to for whatever reason. Alternatively, if you need to delete your current world, you can do that from here. Please note, deleting the world will cause the Minecraft Server process to restart to create the new world.
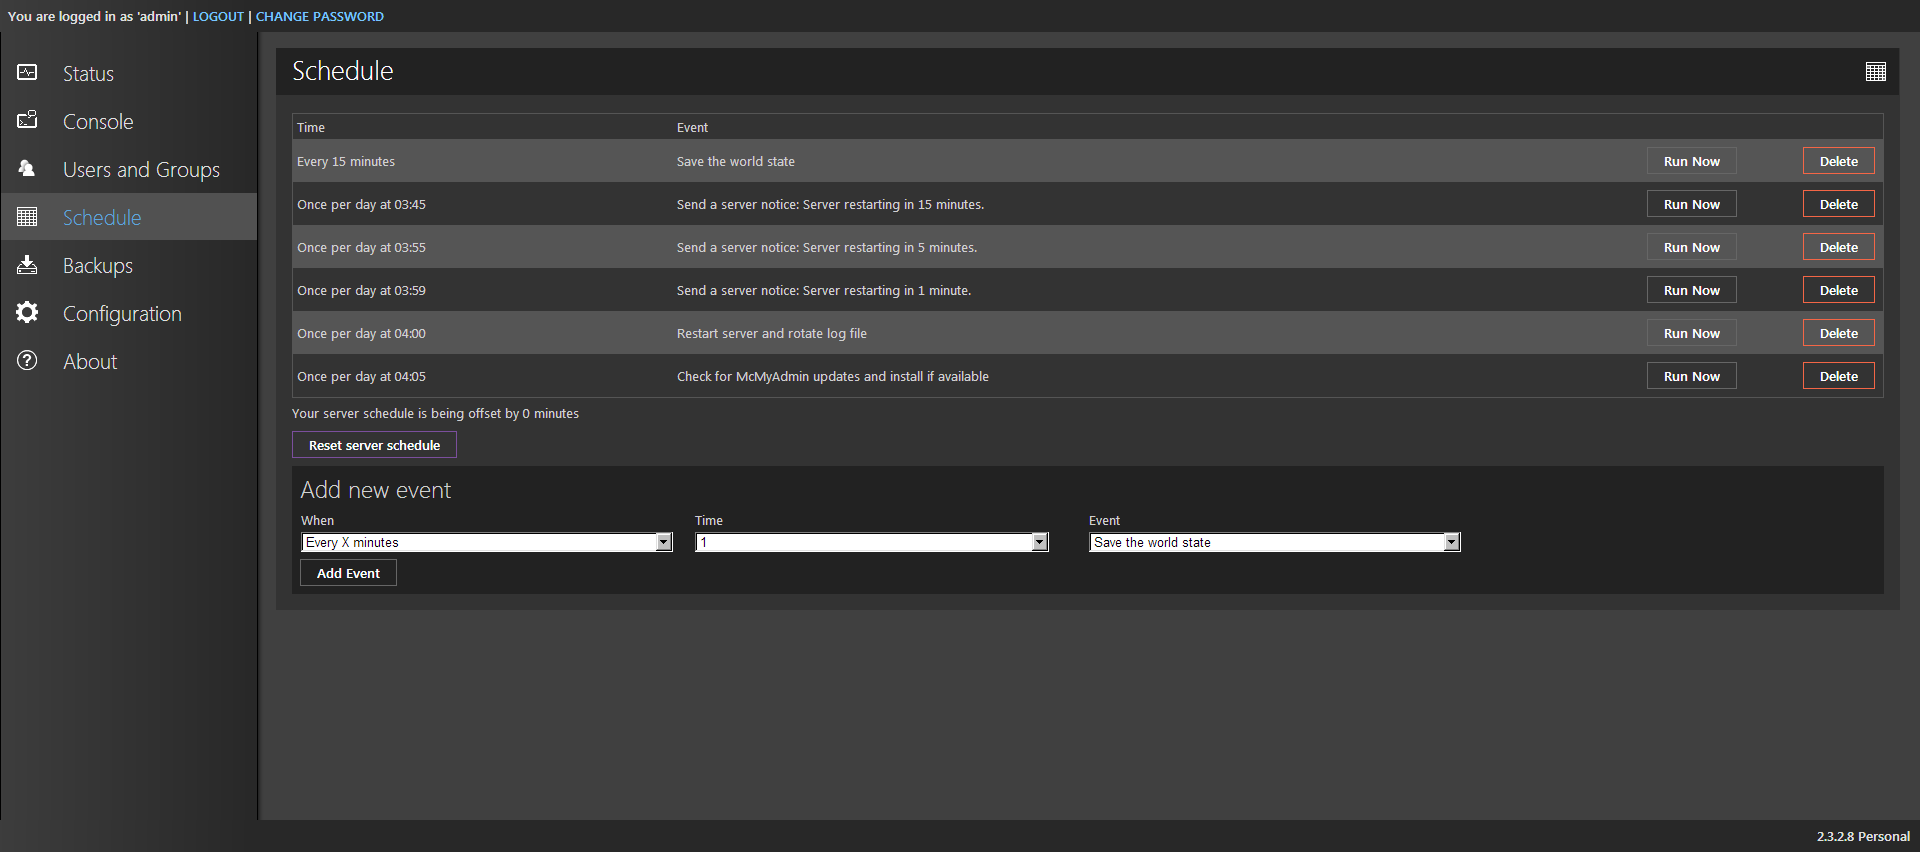
Schedule
This is where you can configure various scheduled tasks on the server such as world saves and server restarts. It is highly recommended to take a look at the available options, there may be something you need later. Think of this like cron for Minecraft.
Users
Now we need to add at least one user. It is recommended to add one user (you) to the Administrators group to be able to issue server commands from within Minecraft. To add your user, add your Minecraft username to the third column where the screenshot says “AdminUserHere” then click the + icon.
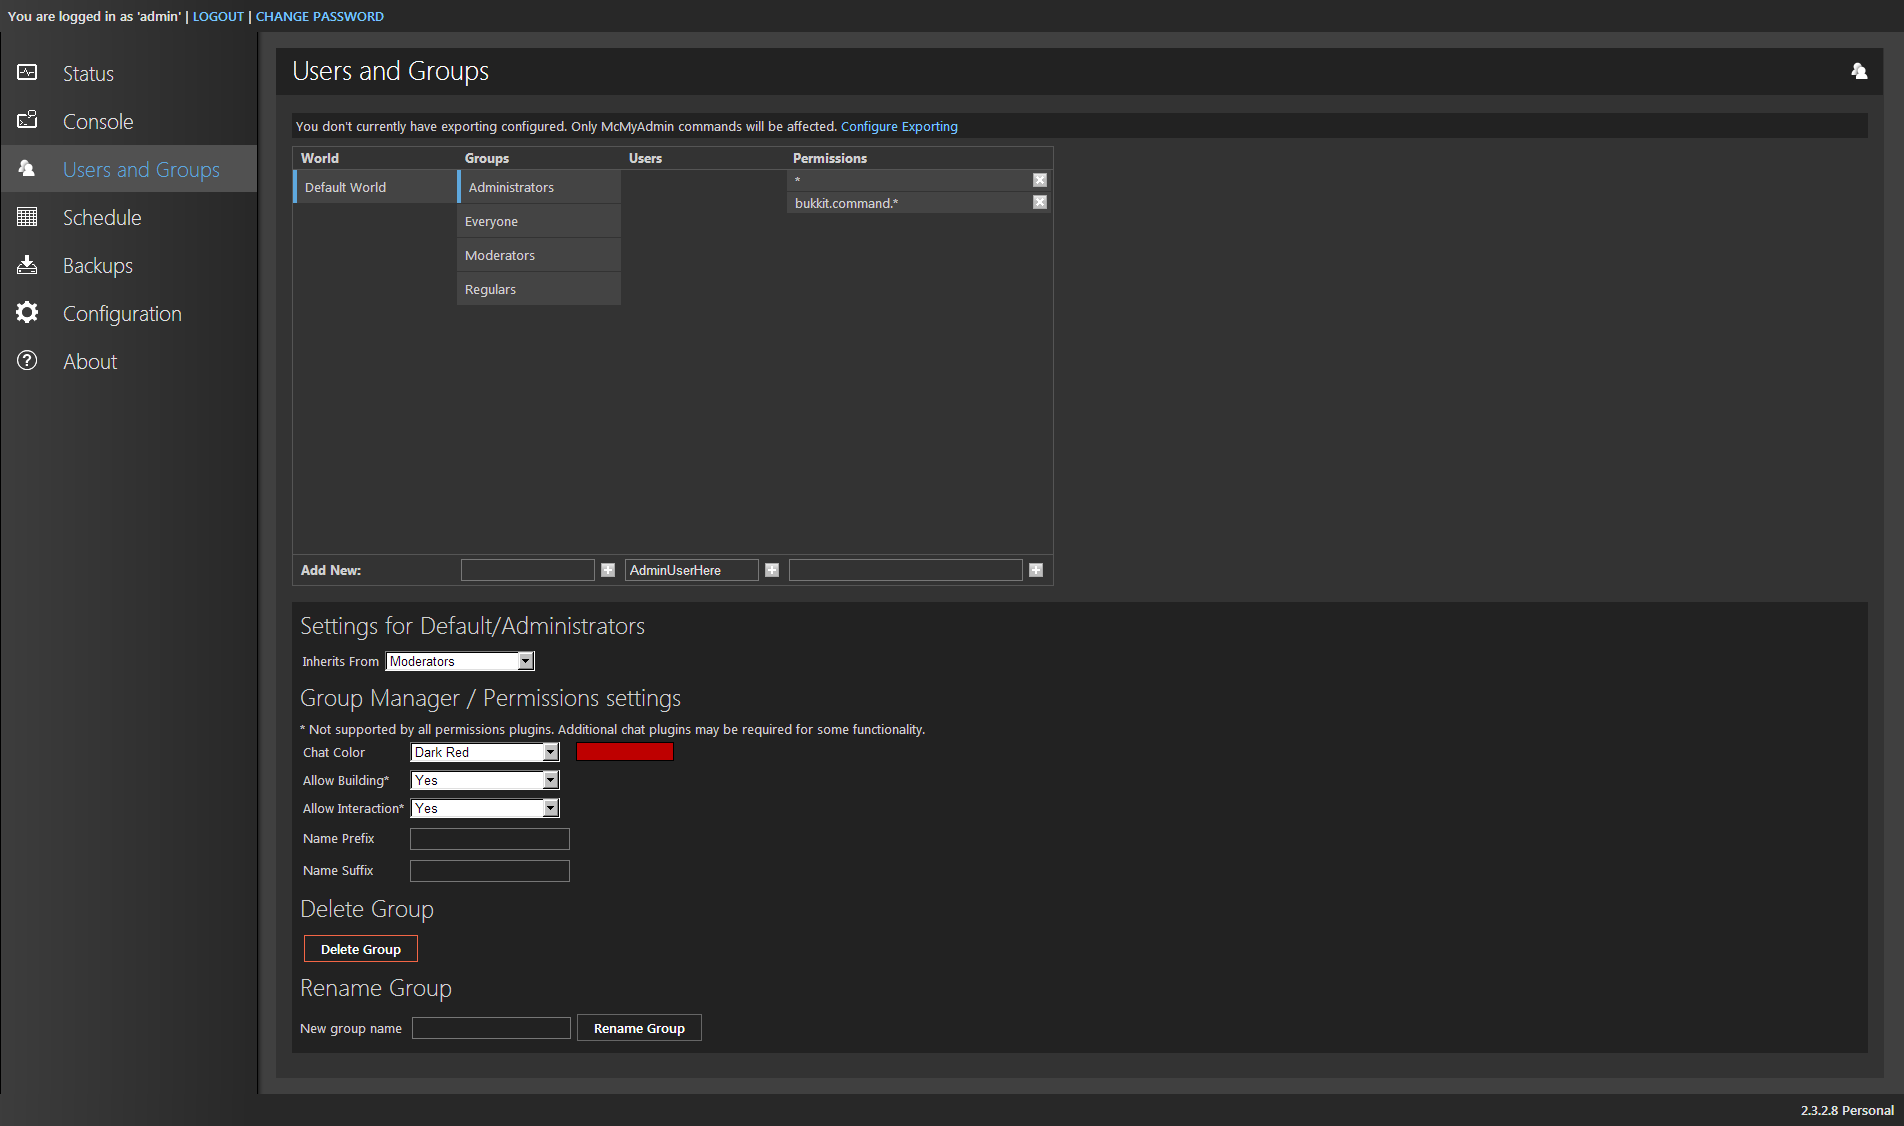
Be aware that if you’re using a permissions plugin, you can add permissions to a group by clicking on the group, then adding permissions as needed using the textbox at the lower right column. You can also add groups, or users to an existing group by this method. Existing users can be removed by clicking the “x” that appears next to their name.
There are several chat options that are applied in conjunction with a user’s group membership. They can be adjusted in the lower half of this screen. As a sidenote, be careful when setting your groups heirachy as MCMyAdmin works off the bottom-up principle. Everyone has the least commands but will have the most users, then Regulars have access to more commands including what Everyone has access to, Moderators have access to more commands including what Regulars have access to, and finally Administrators have access to all commands.
Console
This is the server’s console and it shows status messages and chat activity. You can also execute server commands here. Since Minecraft Vanilla doesn’t have any permissions modules, you will need to “op” yourself from the console. In this screen, I typed in “/op firestorm_v1” and the server console shows that I have opped (given admin rights to) myself.

Restarting the server and preparing for the first player
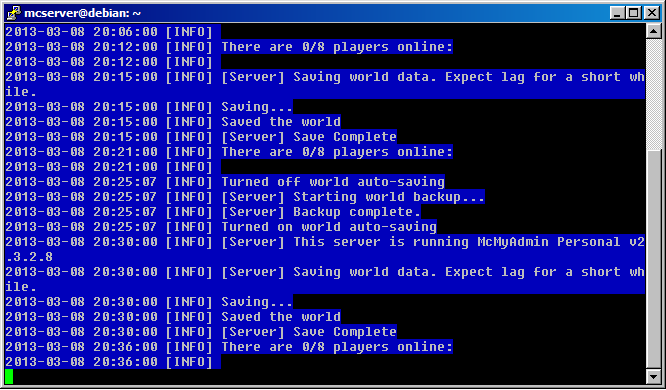
If you have made any changes to either McMyAdmin or to Minecraft, you will more than likely want to restart both processes to make sure your server reflects your settings. To do this, SSH to the server as the mcserver user and then user screen -r to resume your screen session. If all goes well, you’ll have a window like this:
Type in the command “/quit” to save the world, stop the server and exit McMyAdmin. You should see something similar to this screenshot:
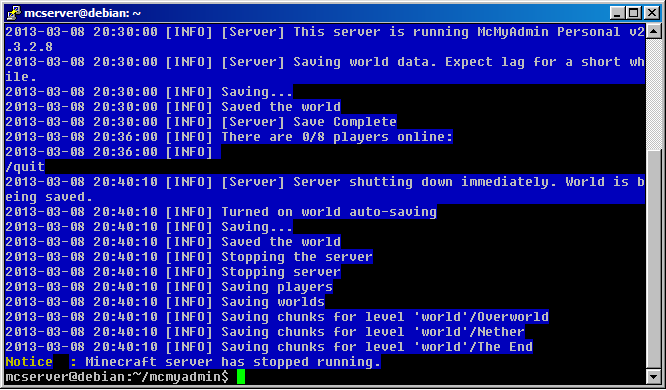
To start it back up again, just type in ./MCMA2_Linux_x86_64 and the McMyAdmin server process will restart. Make sure that the Minecraft server process is started.

Now that we’ve configured the server and restarted the processes, let’s get to Minecraft.
Section 3: Let’s give it a go, shall we?
In the long section above, we performed initial configuration of the Minecraft server, added a user as Administrator and used the server console to op the user so we should be ready to try it out.
Fire up your Minecraft Server Client and login. Click on Multiplayer, then “Add Server“.
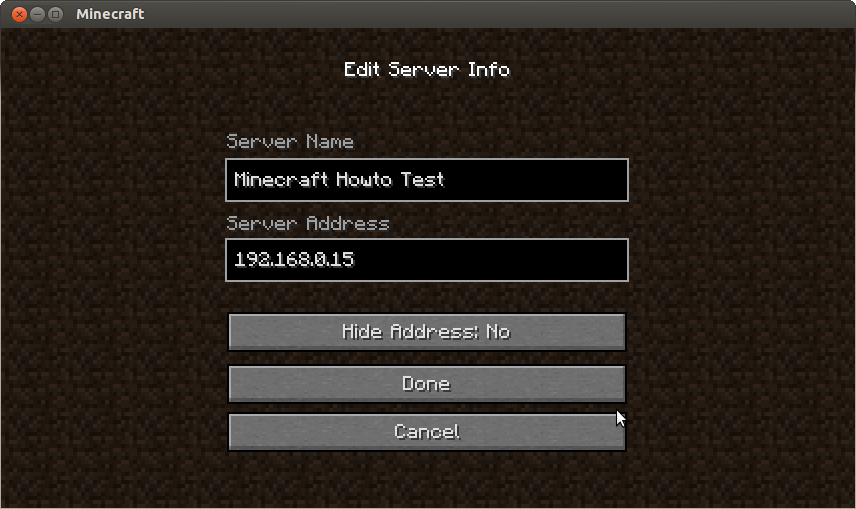
Click “OK” and you should see your Minecraft Server and the Server MOTD listed. You can see the connection quality on the right (just like cell signal, more bars == better connection/low latency) and how many players are on. (0 players out of 8 slots)
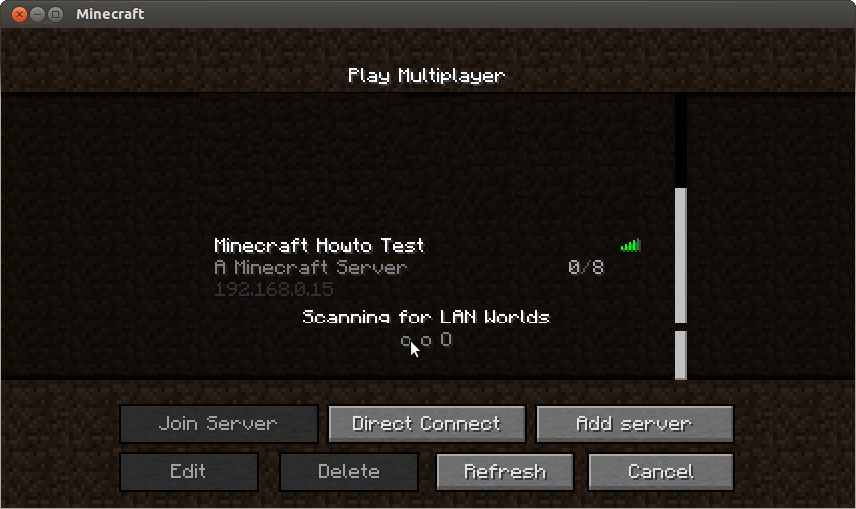
Click on “Join Server” and you should be logged in and playing on your own server.
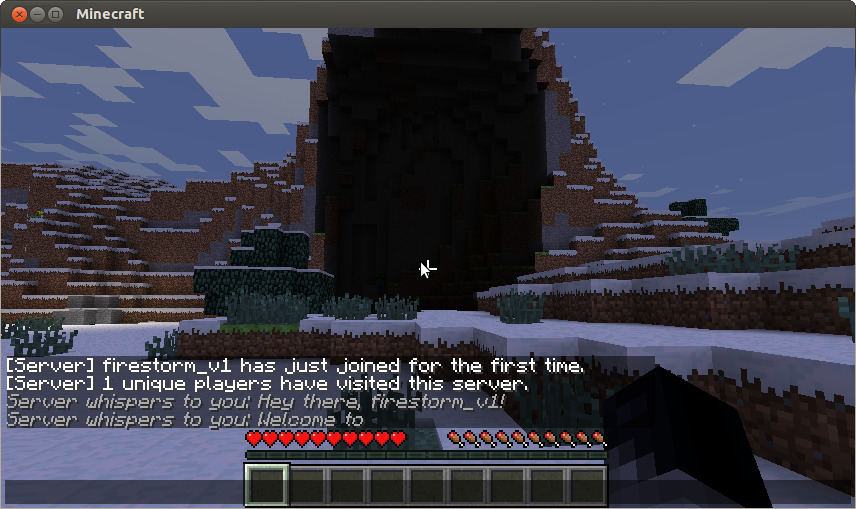
First thing you want to do is to try an Operator command. I usually will either use /time set 0 and see if the time changes, or if it’s already daytime, try /gamemode 1 playername (where playername is your player. These kind of commands are reserved only for users that have been “opped” and we want to make sure that you are the first op on your new server. If either command works, then you should be good to go. Feel free to start playing around on it. You’ll probably want to have a decent bit of exploration under your belt for the next section because we will be installing the Map service next!
IV: Installing and Configuring Minecraft Overviewer
If you haven’t already, go ahead and use gamemode 1 and fly around for a bit. This will cause the world to generate some chunks for our next step which will be to configure the Minecraft Overviewer, a very powerful mapping utility for generating Google Maps style maps of your world. These next steps are a highly condensed version of their installation and configuration pages as well as some other steps for configuring Nginx, a lightweight web server to serve the map to your players.
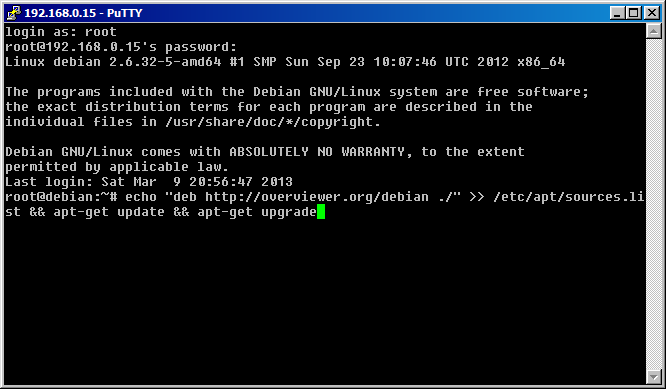
Log in to your Minecraft server via SSH, either as root or su to root for these steps.
First, we need to add the APT repository for Minecraft Overviewer to our sources list. Run echo “deb http://overviewer.org/debian ./” >> /etc/apt/sources.list && apt-get update && apt-get upgrade to insert the repo into your sources list, update APT, and then to make sure that all the software on the server is up to date.
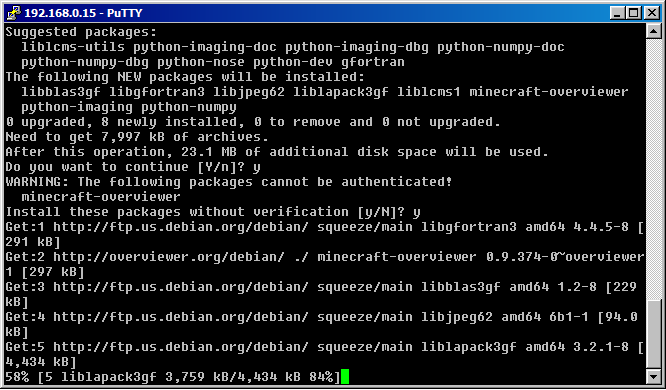
Next, run apt-get install minecraft-overviewer and let it install. You will get an authentication warning for Overviewer, this is expected. Hit “y” to install.
In order for Minecraft Overviewer to work properly, it has to have the original server .jar file in order to generate the textures for the map. This is a required step as without it, Overviewer won’t have any textures to render. To install the Minecraft .jar file, start a new SSH session to the Minecraft server (do not su to root) and run this command: wget -N http://s3.amazonaws.com/MinecraftDownload/minecraft.jar -P ~/.minecraft/bin/
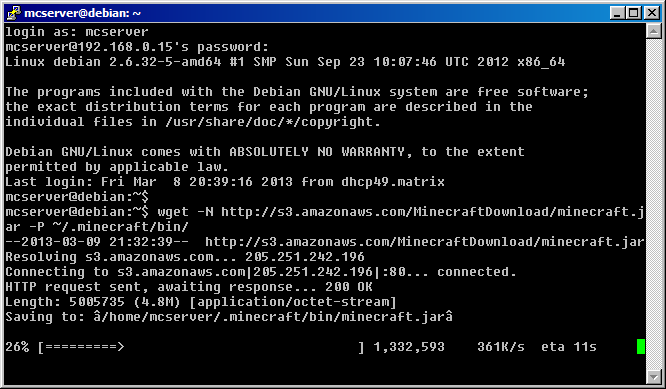
This downloads the Minecraft .jar file to the server’s .minecraft/bin directory (as if the server itself had installed the Minecraft client.). Once the installation has completed, you can exit your second session.
We’re going to skip Overviewer configuration right now, because some of our configuration options will be dictated by our next step, setting up the web server.
Installing and configuring Nginx
In order for Minecraft Overviewer to be of use to us, we need to install a web server. We could install the Apache2 web server, but that’s the equivalent of using a tank to drive across the street. While I like Apache2, it’s endless configuration options make it a lot harder than what is really needed. I use NginX on the Minecraft server as it is a small, lightweight, and easy to configure web server. We’re not doing multi-hosts or fancy domain stuff here so there’s not a need for something as complex as Apache2.
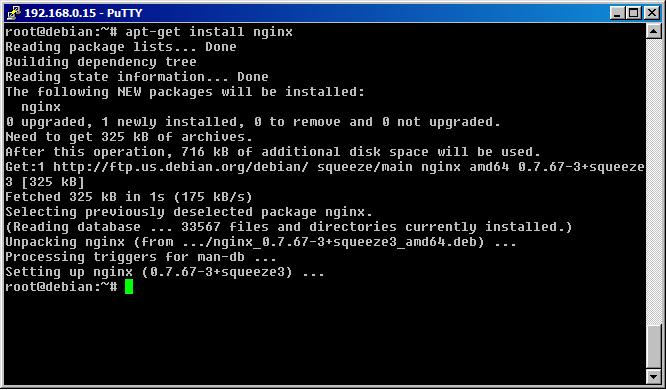
First off, time for more apt-get commands: apt-get install nginx
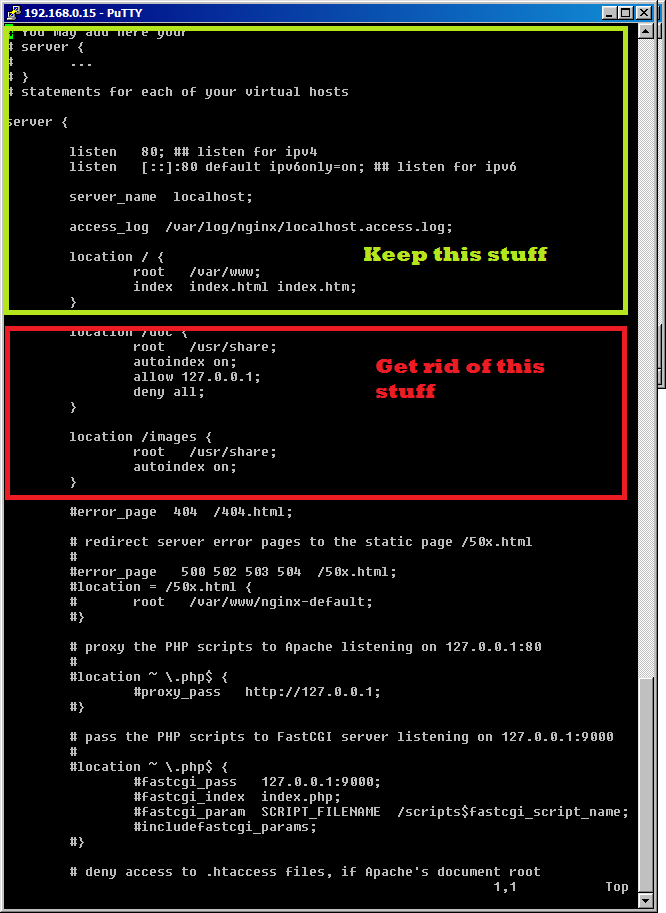
Now, we need to take a look at its default configuration in /etc/nginx/sites-available/default and remove some stuff. There are three “location” stanzas defined in the default configuration. We only need to keep the “location /” stanza, and delete the other two. (“location /doc” and “location /images”).
When you are done, save and exit, then restart nginx with /etc/init.d/nginx restart. This will ensure the updated configuration is in place and running.
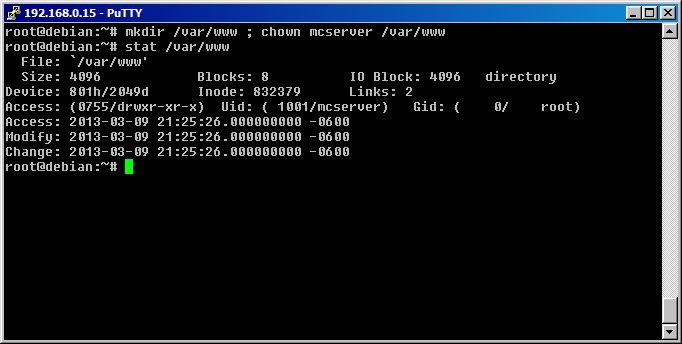
For the last thing necessary to configure nginx, we want to make sure that the mcserver user has read and write access to the /var/www directory (the root of the / location that we left in the configuration file.). In order to do that, we need to create the /var/www directory and then give the mcserver user owner access (read and write) so that Overviewer can write into that directory when it builds the map. To do this, run mkdir /var/www; chown mcserver /var/www and this will create the directory and set it’s owner as mcserver. Running stat /var/www should indicate it’s now owned by mcserver as shown below.
Now, we have the destination for our generated map and we can start configuring Overviewer.
Configuring Minecraft Overviewer
We’re going to create a text file in mcserver’s home that will contain the configuration data for the Overviewer. This file is usually called overviewer.cfg and contains many stanzas of code. First, we’re going to cover the basics of the configuration file and generate our first map, then we’ll come back and cover how to set points of interest. If you are still logged in as root, use su – mcserver to switch to the Minecraft server user.
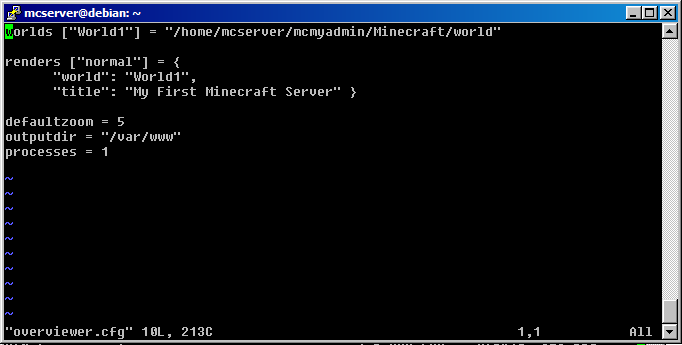
We’ll start off the configuration file by first specifying where to find the world data files that the Minecraft server uses for the players. These are stored in /home/mcserver/mcmyadmin/Minecraft/World so our “worlds” stanza that tells Overviewer where the files are looks like the code below. We are creating a “World1” definition and assigning the directory path to the World files. :
worlds["World1"] = "/home/mcserver/mcmyadmin/Minecraft/world"
In addition to that, we need a “render” stanza that sets some configuration options. These options affect how the Overviewer shows some items like the title of your world. To do this, we will create a render definition called “normal” and we will assign it an array of parameters as shown below:
renders ["normalrender"] = {
      "world": "World1",
      "title": "My First Minecraft Server" }
Please keep in mind, the “world” definition in your render, must match the worlds[] definition from the first stanza. Otherwise, the renderer won’t be able to find your world file to generate.
Next, we’re going to tell Overviewer where to put the completed files when it’s done.
outputdir = "/var/www"
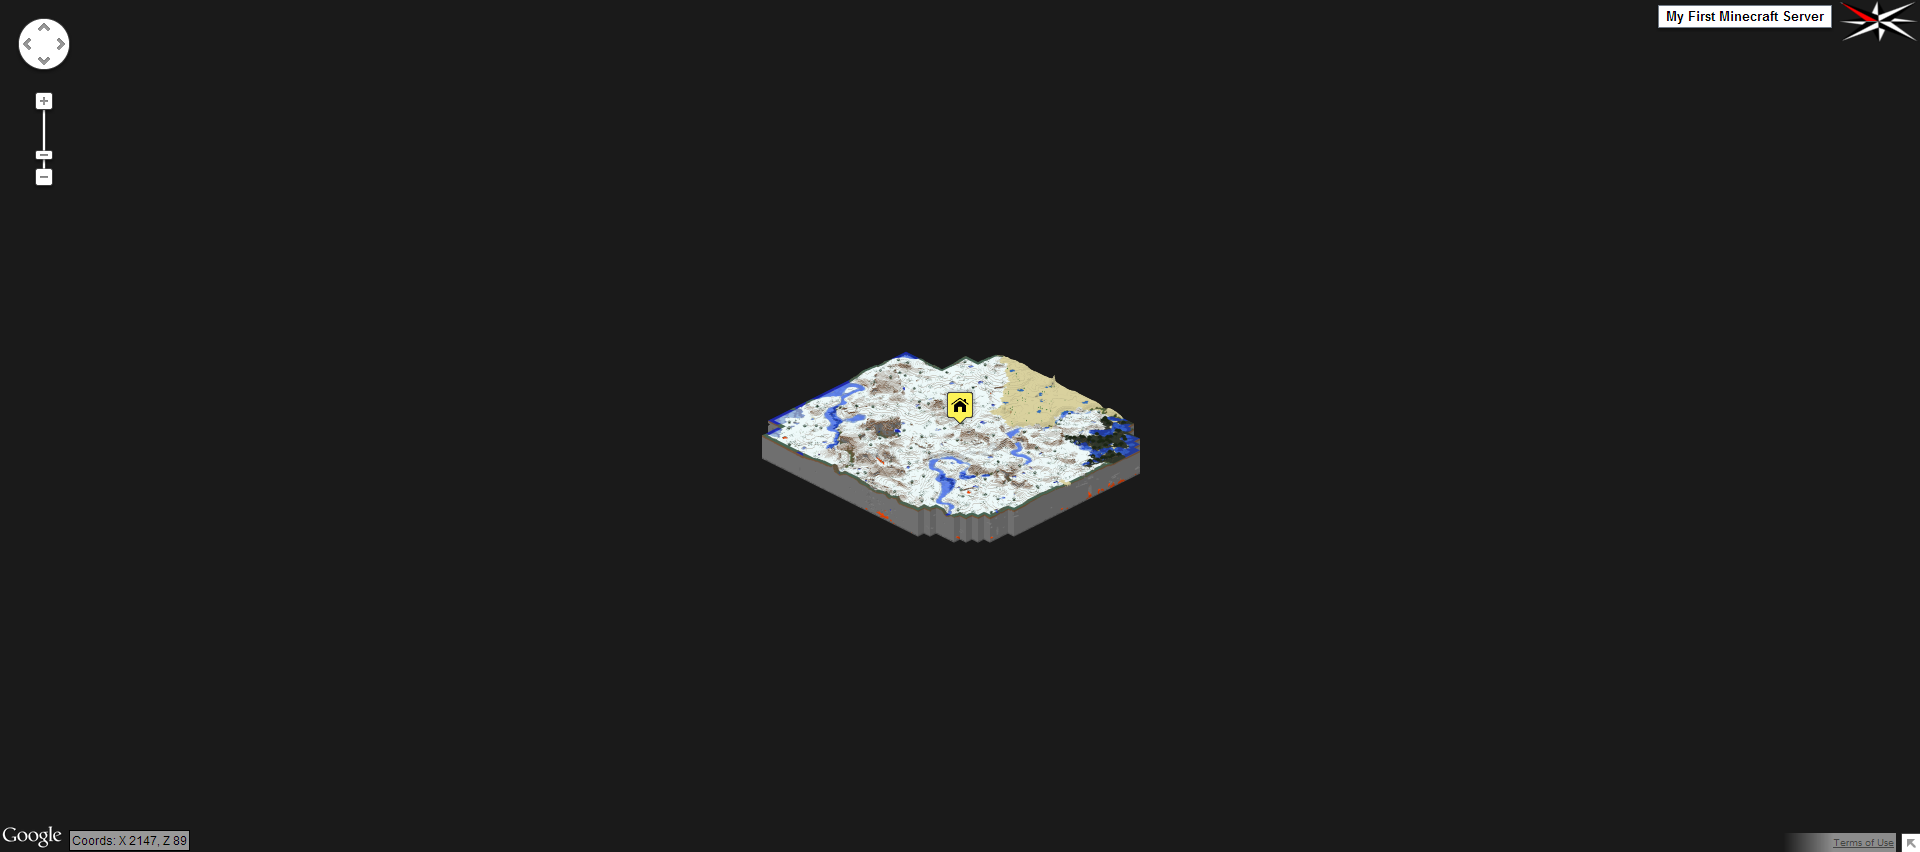
We’re also going to place a default zoom level. This is the level of zoom that the user first sees when they go to the Overviewer server. The lower the zoom level, the smaller your map looks. You may need to adjust this as your map gets bigger over time.
defaultzoom = 5
Finally, if you want your renderer to go faster and you have a multi-core server, you can specify how many processes to spin up. Note: Do not exceed the maximum number of cores in your server, severe performance degradation can result if there are players on the server at the same time the Overviewer starts to run. This server is a single core server so I will only spin up one process.
processes = 1
Compare your configuration file with the basic configuation file here. You should have these options:
Now, we’re ready to run Overviewer for the first time.
Running Overviewer by hand
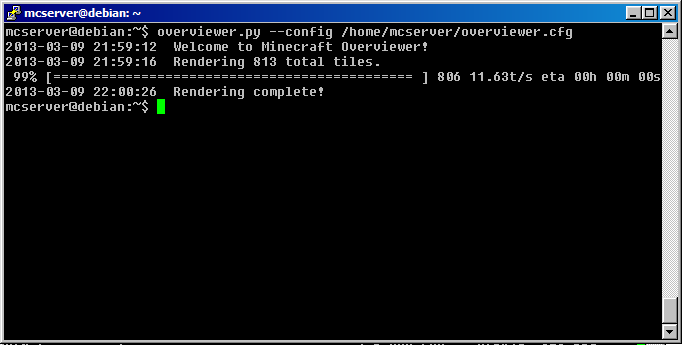
Before you configure cron to automatically run Overviewer, it’s best to run it once by hand so you can see any issues that may be present such as config file errors, file not found errors or permissions issues that may be present. To run Overviewer by hand, run overviewer.py –config /home/mcserver/overviewer.cfg and hit enter. You should see output that resembles the following, or at least a description of a problem in red text.
Here is what Overviewer looks like when it has completed successfully:
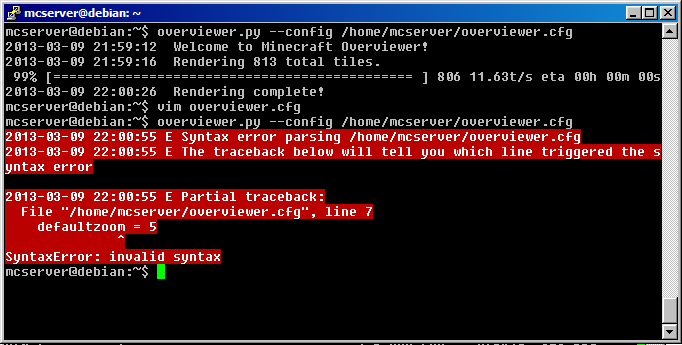
Here is what an error in Overviewer looks like. In this case, I left off an ending curly bracket “}”.
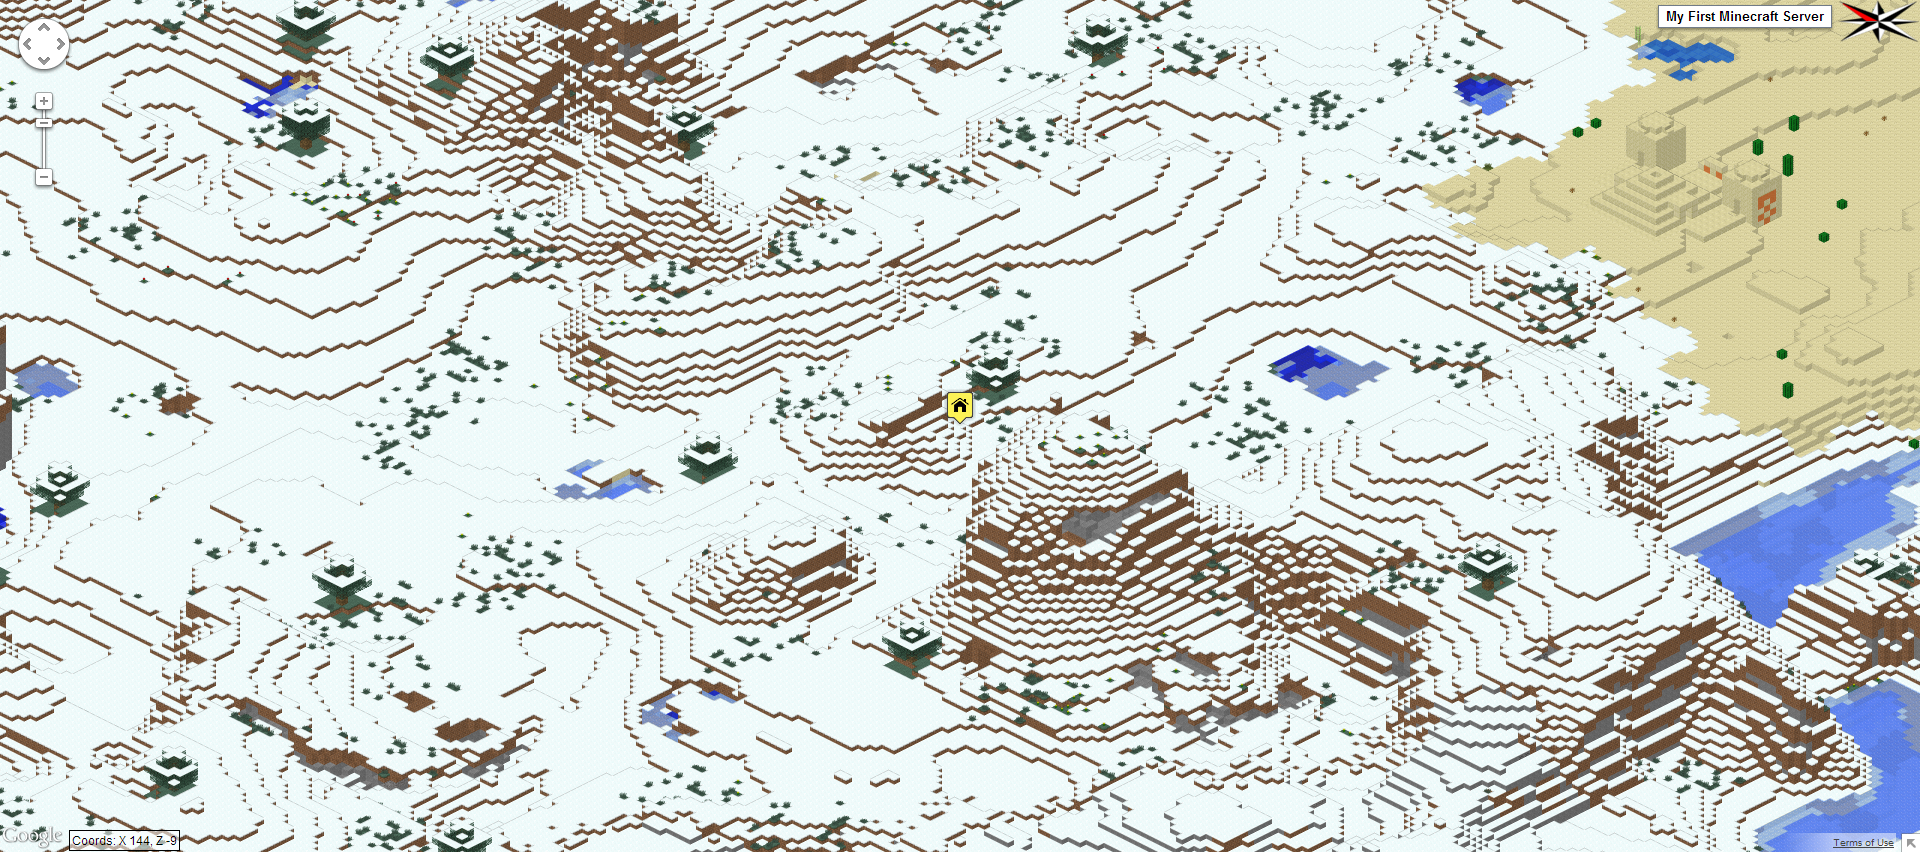
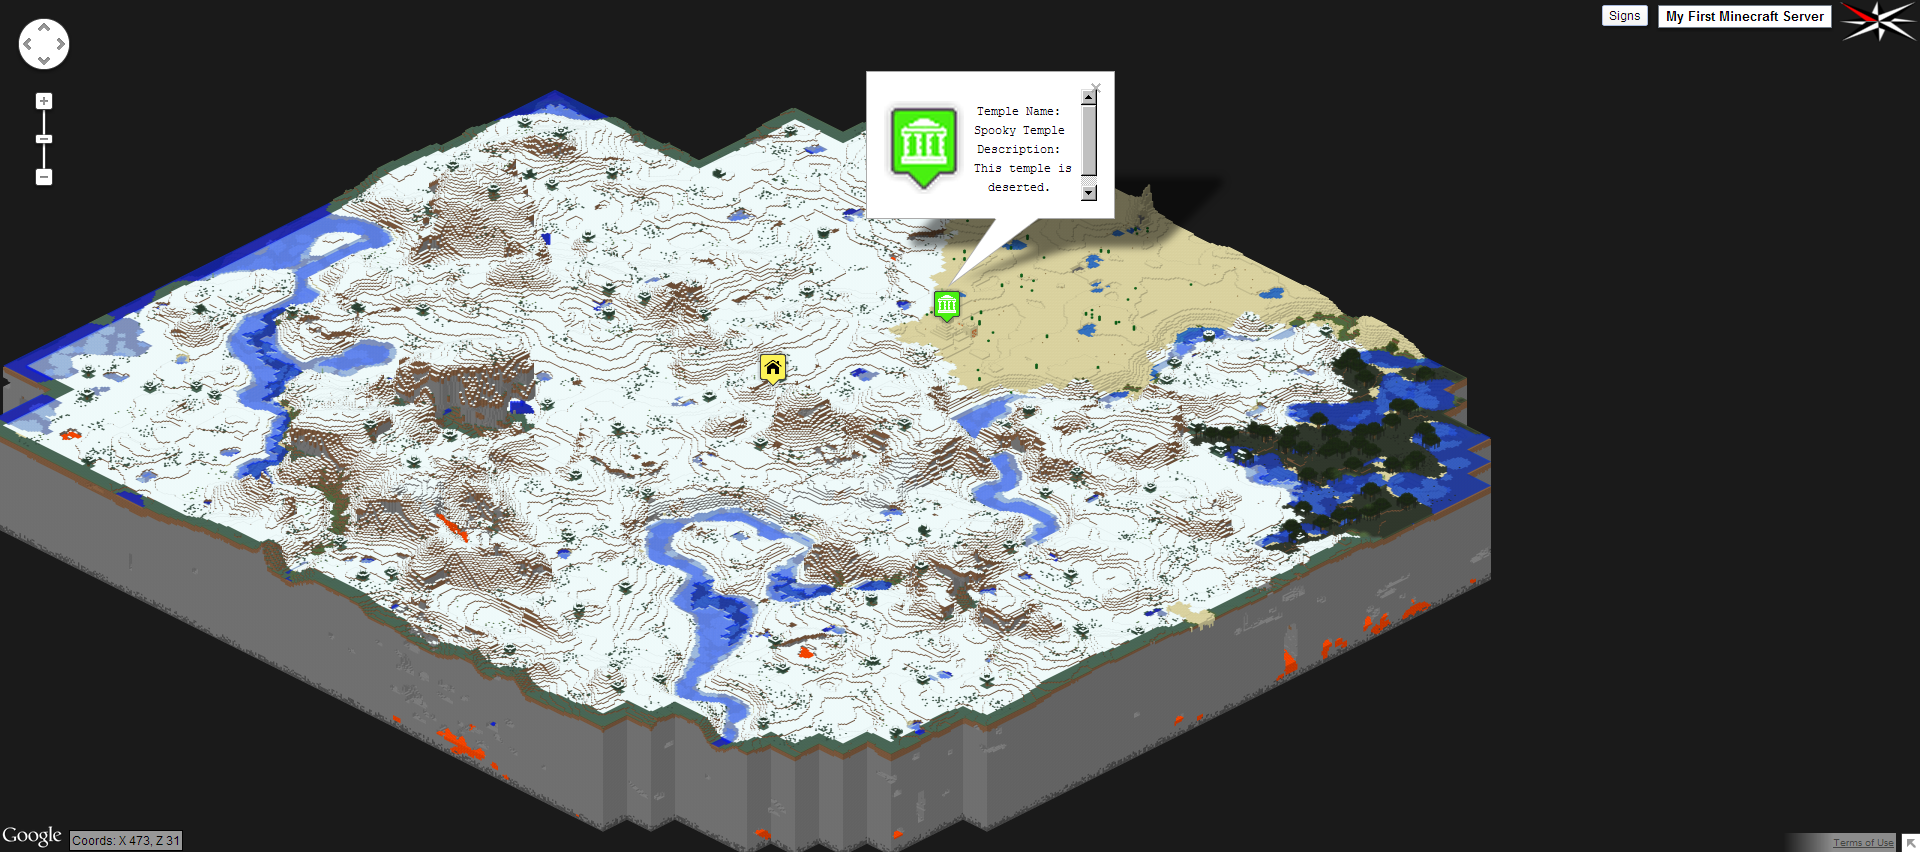
Open a new tab in your browser and type in your Minecraft server’s IP address. Unlike when we connected to the McMyAdmin control panel, leave off the “:8080”, it’s not needed. You should see the map you were playing on earlier with a yellow marker in the middle. That marker is your spawn point in the Minecraft world.
If you want to make a change (like the default zoom level or you want to change the name of the map) just change your overviewer.cfg and then re-run the overviewer.py script. Here is a screenshot of the same map, but this time with a defaultzoom of “1”.
Making things automatic
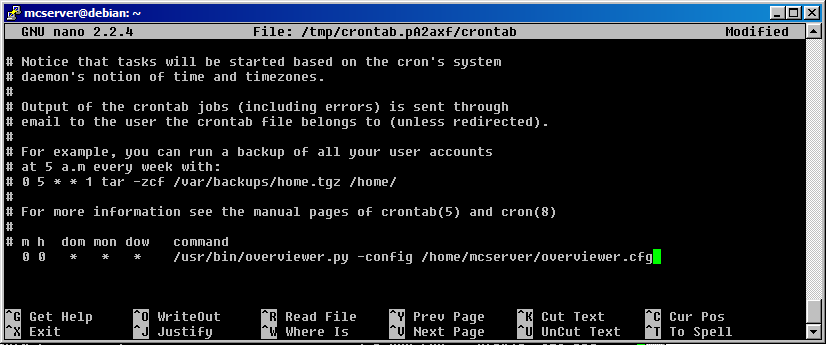
Now that we have a working configuration file, we can set about having cron run the command for us. As the mcserver user, run crontab -e and add the following line to the configuration file:
0 0 * * * /usr/bin/overviewer.py –config /home/mcserver/overviewer.cfg
Save and exit the crontab editor via Ctrl-X then Y. This will kick off the Overviewer to re-render the map every night at Midnight (00:00). Your cron entry should look like the below:
Now, we have the Overviewer’s basic configuration all set. Then, there’s Points of Interest markers…
Get Fancy: Create custom Points of Interest flags
A POI (or Point of Interest Marker) is an icon of some sort used to designate an associated point of interest like a mine, train station, village, etc.. and can be a good way to orient yourself in game. It may also be useful to add POIs to your map so that new users know where to go for certain activities like shopping, mining, or to indicate where a home is of another user. I won’t be telling you which POIs you will want to make and you can make as many as you have patience for so feel free to get creative. On my sever, I have Train Stations, Villages, Player Homes, Player Structures and Mines all with their own custom Point of Interest.
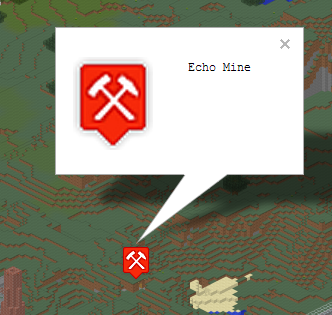
This is a point of interest taken off of my production server. All mines have a red pickaxe symbol and when clicked on or pointed to will reveal a popup with the name of the mine. It’s a good idea to go ahead and think about which kind of points of interest you will want to generate as well as what ideas you will want for a marker. For a PVP arena, you might want a castle icon. For Shopping, either a handbag icon or a dollar sign icon will work. For a rail line, the train engine is popular and so forth.
A great resource for generating your own POI markers is http://mapicons.nicolasmollet.com/ who has a wide variety of “stock” icons which you are able to change the color on to your liking. When you have the color and the icon picked out, save it to the server in the /var/www directory. We will need that later.
To create a point of interest, you will need four things:
- Coordinates – Where is the actual point of interest in the Minecraft World.
- POI Marker – Some kind of icon to place in the map (needs to be present in /var/www)
- a definition for the POI description, e.g. “Temple of DOOM”
- a dict marker for the POI type, e.g. “Desert Temples” (for Overviewer)
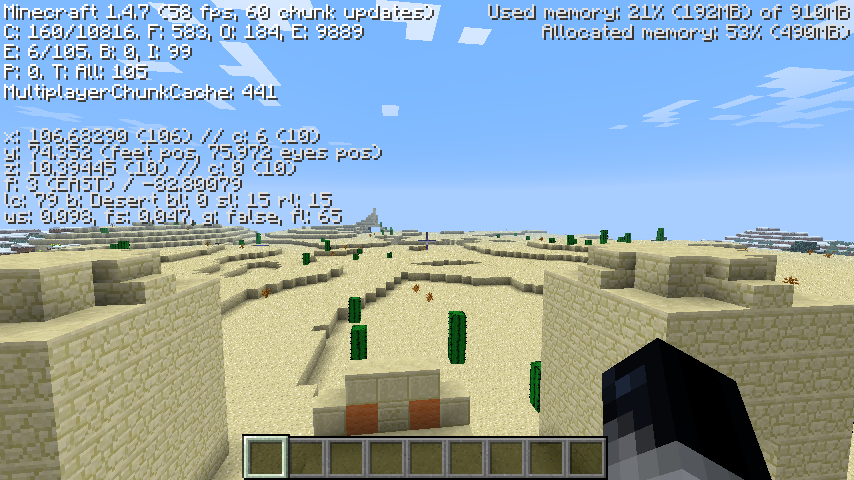
To get your POI’s coordinates, fire up Minecraft and go into Creative mode. Then start flying (double tap spacebar) to the area where you want to set your point of interest. In my case, a desert temple was generated not far away from spawn, so we’ll use that. When you get to your destination, hit F3 to turn on Minecraft’s debug mode and take note of the X, Y and Z coordinates. These are the coordinates we’ll need to put in Overviewer’s configuration so it can generate the POI. In our sample below, the X coordinate is 106, Y is 74, and Z is 10 (whole numbers only).
Now that we have the coordinates, we need to get a marker. Head over to Nicolas Mollet’s map icons site and find an icon for your POI. Since this is a desert temple, I went with this temple icon: http://mapicons.nicolasmollet.com/markers/tourism/monuments-structures/temple/ If you want to change the color of the icons, you can use the color picker to select your color, then hit the Generate button. Right click on the icon you want, then click “Save Image As” and choose a name. SCP it to the server using the mcserver user name and password and place it into /var/www. In my case, the file is temple-2.png
Next, it’s time to open up an SSH session as the mcserver and edit the overviewer.cfg we created earlier. First off, we’re going to add some code to read the description using some definitions (defs). Basically this code will make it so that if you add a description, it will be read into the note that will be displayed when the POI is clicked on. A sample def is listed below:
def templeFilter(poi):
     if poi['id'] == 'temple':
          try:
               return (poi['name'], 'Temple Name:\r\n' + poi['name'] + '\r\n' + 'Description:\r\n' + poi['description'])
          except KeyError:
               return poi['name'] + '\n'
This definition creates a filter called “templeFilter” which attempts to read the name and description of a POI that is defined. If there is no description, it simply returns a name. If there is a description, it returns “Temple Name” followed by a newline (\r\n), then the name along with a newline (\r\n), and then the word “Description:” followed by the description from the POI we’ll define next. It is important that for every type of POI you want, you have a definition filter to read the name and description, otherwise the POI may not even generate. If you don’t plan on returning a description on your POIs, you must at least return the name. The def filters must be placed between your “worlds” definition and your “renders” definition to ensure it’s read properly. (Don’t worry, I’ll include a full sample at the end.)
Along with the templeFilter, we need to create a dictionary (dict) of markers to establish some common parameters for the POIs. These parameters are the name of the poi that the dict will run for, the filterFunction to execute against the POI, the icon file to use and whether or not the POI type is displayed by default (checked=true). In the sample dict below, we have declared that this dict will execute for all “Temples” and will execute the templeFilter we built earlier. The file “temple-2.png” which is in our /var/www directory will be used by the POIs and the POIs with a “Temples” type are displayed by default. Please note that the filter function must point to a vaild def Filter specified above. This should be inserted after your render declaration and before your general options.
'markers': [dict(name="Temples", filterFunction=templeFilter, icon="temple-2.png", checked=True)]
Now for the part that ties it all in. We need to build a POI that will trigger the dict we just created, using the filter we just created.
'manualpois': [ {'id':'Temple','x':'106','y':'74','z':'10','name':'Spooky Temple','description':'This temple is deserted.\r\n Watch for traps!'}
Like the dicts, the manualpois table must go in the This POI has six fields, id (which determines the POI type), x,y,z (the coordinates from Minecraft), name (the name of the POI), and the description. For the description of the poi, you must use \r\n if you want to insert a new line and you must escape single quotes (use \’).
Here is the completed configuration file:
worlds ["World1"] = "/home/mcserver/mcmyadmin/Minecraft/world"

def templeFilter(poi):
if poi['id'] == 'Temple':
     try:
           return (poi['name'], 'Temple Name:\r\n'
                + poi['name'] + '\r\n'
                + 'Description:\r\n'
                + poi['description'])
     except KeyError:
           return poi['name'] + '\n'

renders ["normal"] = {
          "world": "World1",
          "title": "My First Minecraft Server",
          'manualpois' : [ { 'id': 'Temple',
               'x' : '106',
               'y' : '74',
               'z' : '10',
               'name' : 'Spooky Temple',
               'description':'This temple is deserted.\r\n Watch for traps!'} ],
          'markers' : [dict(name="Temples",
               filterFunction=templeFilter,
               icon="temple-2.png",
               checked=True )]
}

defaultzoom = 1

outputdir = "/var/www"
processes = 1
With the proper config options set, we can now run overviewer again, this time with a new parameter. Run this command overviewer.py –config ./overviewer.cfg –genpoi to generate the points of interest, then open your browser to the Minecraft server’s IP. If everything has gone well, you should now see two points of interest. The yellow POI for spawn and the new POI we just defined. You can click on it and read the description. If the description is longer than the popup window, you’ll see a scrollbar.
Keep in mind that you can have multiple POIs with the same type, but for each type of POI, you need to create a dict for the icon and a filter for the POI data. As a method of keeping track of your dicts and your filter, keep your naming convention, the name of the dict should match the filter and should match the type of POI you’re building. If a POI doesn’t match the actual location of the intended point of interest, check your coordinates and re-run the Overviewer with the –genpoi option.
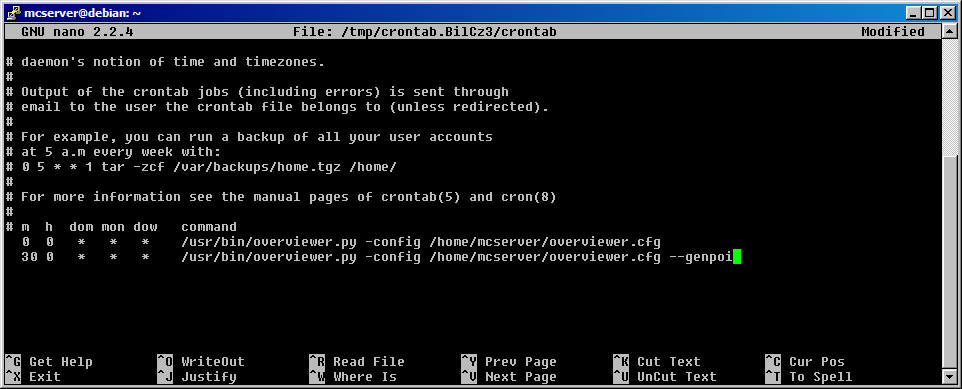
The last thing to do now is to add it to our crontab. It is important to know that Overviewer is an incremental generator meaning that it will only render/rerender chunks that have changed since the last run. If you are using an existing world, you will notice that your first render takes a long time, but subsequent renders (provided that you don’t purge the destination directory) are very fast. That being said, we need to ensure that there is enough time between the first command (renderer) and the second command (generate POIs) to allow the renderer to finish. I recommend anywhere between 30 minutes and an hour between runs. Use crontab -e as your mcserver user and copy the first command we added earlier, this time changing the first number from 0 to 30. This will kick off the POI generator 30 minutes after midnight. By then the render should be completed. Below is what your crontab should look like with both commands entered.
At this point, we have our vanilla Minecraft Server running with the McMyAdmin control panel and using Overviewer to generate a nice Google Maps style map. We have set up Overviewer to automatically render the Minecraft map and generate POI markers. We are done with the vanilla server and you should be clear to invite your friends to join in.
V: Now what? (Website, plugins and other things)
Website
As your server gets more popular, you will want a way of conveying messages to your players outside of Minecraft. There are many ways to do this including using Facebook and/or Twitter. An alternative would be to use a dedicated website or forum group to post updates about the server and maintenances or outages. Consider a website or Facebook page as your “storefront”, you want to entice players to join your server. Post information about your server, any mods or plugins that are running, and provide a link to the map server. These bits of information server to generate interest in the server and hopefully new players will be the result.
Plugins
As touched on earlier, there are multiple alternative core Minecraft installations available in McMyAdmin and just about all of the alternatives offer extensibility via plugins. For example, there is a plugin for CraftBukkit that can allow only specific people to use chests which have been locked. This functionality is in a plugin called “SecureChests” and is not in the vanilla instance.
It is very easy to get sucked into loading up many plugins as possible in a modified server, but before you go reaching for them just yet, make sure you do your research first. Many plugins do more than one task (like an Economy plugin that also does PVP protection, or Factions plugins that also do land claim protection) and too many plugins can easily render a server unplayable either due to map corruption, feature overlap, or general flaky operation. It is recommended to run a testing server so you can check plugins operation and compatibility before pushing the configuration to your production server.
As the owner of the server, it is important to remember that your players are your greatest asset. When you make a change on the server, it affects them as well. If you are thinking about adding plugins, ask your players what they want and consider any legitimate requests.
Other things
Now that you have your server running, you will want to consider setting up some behavior rules and guidelines. Are you going to allow PVP (player versus player combat)? Are you going to set any anti-griefing rules? Are you going to set any regions for free-build or any areas that should not be built in. You will want to craft out your rules before your server goes accessible outside so there are no questions about gameplay. If the server is for just you or a small group of friends, notification and rules may already be easy to establish. The rule of thumb is to make your rules now while the server is still new rather than try to apply rules later after the server is established. If you are looking for a good guide, check out austindkelly’s post to /r/Admincraft: [Tutorial] Server Rules, the right way.
Since you’ve built a very capable Minecraft server, you may be thinking about asking for donations. Before you do, you may want to read over PhonicUK’s link titled Paypal, Money and Minecraft Servers – The do’s and don’ts to help avoid getting bitten.
If you’re looking for an excellent resource for Minecraft Administration, definitely check out /r/Admincraft on Reddit. There are many active users with every Minecraft server type and configuration that you can think of and they are very helpful. Of course, make sure you have your ducks in a row and make sure you have done research first because as helpful they are, they (and most forum members in general) frown on blatantly obvious questions.
Welcome to Minecraft Administration. — Have fun!
April 6th, 2013 on 7:52 pm
Hi,
Can you provide a couple of guidelines on when you want to stop or start the minecraft server from the command line versus the mcmyadmin interface?
Thanks!
jIM
May 14th, 2013 on 8:39 am
Hello Thanks for the tuto !
error with this command :./configure –prefix=/opt/mono-2.10 && make && make install
-> configure: error: invalid variable name: `.prefix’
Bye
May 20th, 2013 on 11:46 am
Hey, Should I use Debian Wheezy or Squeeze? I have a mac and was wonder what is the best way to go about this?
June 3rd, 2013 on 9:20 am
Got it going with Debain 7 and lots of correction/typo but it working now.
Thanks
July 10th, 2013 on 3:33 pm
How do you change the map using Putty?
July 12th, 2013 on 3:52 am
Spot on with this write-up, I seriously think this site needs far more attention.
I’ll probably be returning to see more, thanks for the information!
July 18th, 2013 on 1:24 pm
If you mean “change” like delete and create a new map, I highly recommend using the “delete world” function through McMyAdmin. If you are wanting to migrate a map from another server, you will need to create an archive that contains the “world”, “world_nether”, “world_nether_backup”, “world_end”, “world_end_backup” directories and then copy that archive to the new server and unpack it in the same location. I’m not in front of my minecraft server but I believe the path for the world files is ~/mcmyadmin/Minecraft/*
Hope that helps!
FIRESTORM_v1
July 18th, 2013 on 1:36 pm
When I wrote this document, i used Debian Squeeze as Wheezy was still in pre-release. You can use either one now that Wheezy is general availability.
Thank you.
FIRESTORM_v1
July 18th, 2013 on 1:52 pm
Honestly, the only time I need to stop the server is when I’m powering it down or rebooting it. The process is like this:
– SSH to server as minecraft
– screen -r to resume your screen session
– in the blue screen, type “/stop” to stop just the Minecraft server or “/quit” to stop McMyAdmin and Minecraft.
– Ctrl-D to close your screen session,
– Ctrl-D to log out of your SSH session.
Aside from that, I use the McMyAdmin interface for everything else.
Happy Mining!
FIRESTORM_v1
July 18th, 2013 on 1:56 pm
Looks like “Smart Text” bit you there. the command should be (dash)prefix, not (period)prefix on your command.
Replace the dot with a dash and you should be good to go.
Good Luck!
FIRESTORM_v1
February 18th, 2014 on 5:09 pm
Great write-up. Thank you for taking the time to detail all this. I’m assisting my nephew on setup of a MC server. Do you have a recommendation for minimum/preferred Internet speeds to support multiple players? My nephew has DSL at their house, so I am concerned if it will be enough of a pipeline to support multiple players. We would probably start off with the free version of McMyAdmin just to get him familiar with running the system. The $20 cost of the Pro version is nominal to support what looks like a good product. I’m planning on using Debian Wheezy running on a retired commercial server that I was given from work: HP DL380 G3 with 2Gb memory and 2 Dual core 2.8Ghz Xeon processors. Any other words of advice would be appreciated.
Thanks again.
June 21st, 2014 on 9:11 am
Great tutorial! Too bad I’m a year late to the party.
A couple of notes about overviwer. First, if you have multiple renders and are using manual pois, make sure they are defined for each render otherwise they won’t show on the map. Also, overviewer should not be run on a running world file. This can lead to world corruption if the world is changing while the render is running. Always run overviewer on a backup of the active world and not on the world itself. I had to learn this the hard way.
July 20th, 2014 on 2:17 pm
Hello Tonelock:
You make an excellent point. In my setup, I use MyMcAdmin for my server which force-saves every 30 minutes with a -5 minute offset so it’s writing every XX:25, XX:55 and my overviewer kicks off at 12:00 noon every day. The five minute gap is to ensure that MCMA doesn’t try to write the world as it’s being rendered which could lead to some interesting corruptuons in the Overviewer map.
My walkthrough only covers a single render which is enough for most people just interested in getting a world-atlas of their minecraft server. I have yet to expand my map into multiple renders, but it’s on the long list of things to do.
Thanks for the info!
FIRESTORM_v1
July 20th, 2014 on 2:41 pm
Hello Mick:
Every user on a server uses approximately 25k/s bandwidth, maybe double that on initial spawn. Of course, the more bandwidth you have, the more concurrent players you can have at a time. I’ve had success with a 2mb symmetrical line supporting 4 players (before lag became an issue). McMyAdmin Free is great and I have considered getting a Pro license on my production MC server as well. The server you have specced out sounds great and the Xeons are excellent choices for a MC server, however the RAM may hurt you. If you can get it, I’d recommend 4 GB for a plain Vanilla (no mods) server, or 8GB for a Bukkit server (with mods and plugins).
Good luck!
FIRESTORM_v1
October 29th, 2014 on 5:09 pm
I’ve never touched Linux before – ever – and I was able to make it through this tutorial and get my debian server up and running with a minecraft server. A few steps along the way had me hitting up Google for some errors, but in the end I was able to figure it out. I’m going to set up the map later this week. Thanks for this write up!
The areas I got stuck on started with the big, apt-get install bison gettext fontconfig libpng12-0 libpng12-dev libX11-6 libX11-dev libexif12 sun-java6-jre unzip bzip2 wget build-essential screen sun-java6-jre
it couldn’t find java6 so i ended up installing each package individually, while trying to troubleshoot the java6 problem. I had to do a lot of -version checking to make sure my installs actually happened. I had to go back at several points and specifically install bison, then mono, and screen. Having 0 experience with Linux, I ended up looking up most things on Google.
I found a helpful site that eases you into Debian commands and methods for using the OS here:
http://www.aboutdebian.com/linux.htm
Thanks again for this write-up, you made the process a lot easier for a complete Linux Noob (me). It inspired me to dig deeper into Linux, I think I like it.