
You don’t have to be an elite hacker to keep your personal data personal and in this first part of the two part series discussing Facebook and the Cambridge Analytica scandal, we’ll walk through securing your browser and Facebook all while discovering what exactly Facebook’s been hoarding about us. In the second part of this series, we’ll go over how advertising turned from that annoying clip on TV and Radio to one of the most sinister methods of “Big Data” Matrix-esque surveillance to date.
Before we begin…
While every effort has been made to ensure this article’s accuracy, things will change from time to time especially as the cat-and-mouse game of avoiding ad trackers evolves. As new tools become available, I’ll add them here and of course as Facebook decides to change their method of doing things, I’ll try and keep the screenshots up to date.
That being said, please be careful. If you don’t know what a specific something does, try searching for it. I’ve gone through great lengths to ensure that this article clearly outlines each and every potential ramification (especially with respect to the Facebook settings) however ultimately the decision to set (or un-set) options lies with you.

Securing your browsing habits
First off, unless you browse Incognito/Private mode all the time in your browser, chances are that you are leaking userdata through your browser by simply clicking on pages. This tracking can be disrupted by disabling notifications, location requests, and installing some privacy plugins:
- uBlock Origin (for Firefox and Chrome) by Raymond Hill
- This plugin will stop most tracking scripts for advertisements and will suppress most ads.
- uBlock Origin Extra (for Chrome, not needed for Firefox) by Raymond Hill
- This plugin will try to stop most of the “Disable adblock to read article” popups on most sites.
- Privacy Badger (for Firefox and Chrome ) by EFF Technologists (or www.eff.org)
- Graphically shows you what requests are coming from external sources and which are known trackers and gives you the ability to disable them on a per-tracker basis.
- HTTPS Everywhere (for Firefox and Chrome) by EFF Technologists (or www.eff.org)
- This plugin directs you to HTTPS versions of sites if the site supports. Using HTTPS prevents inline content analysis.
Possible ramifications
These plugins integrate with your browser to act as content filters by blocking known advertising methods and script code. For most sites, you’ll notice that ads simply stop showing up however every now and then, you might come across a site that just doesn’t work. If that’s the case, you’ll need to try altering the settings in order to regain site functionality. There’s not many sites that do this and the plugins are constantly being updated to work around these anomalies. Privacy Badger, for example, allows you to toggle and un-toggle blocked sites until it starts working again and “learns” which sites you visit so it can stop the ads. uBlock Origin is a wholesale content filter, which can take some advanced tuning to do precise filtering on specific elements of a site. Both can be turned on and off just by clicking on the respective icons and then “Enable” or Disable” and reloading the page.
While the plugins above will do a reasonably good job about protecting your browsing habits, there’s no 100% method. Keep your wits about you and watch what you click.
Now that your browser is secured, we can set about conquering the Facebook monster.

Securing Facebook
Download your “user data archive” first.
This archive is a zip file of all of the userdata you have posted to Facebook. It is not all of the data Facebook has of you. Before you begin, you want to make sure you know your Facebook password as you’ll need it to start your file generation, and again to download it to your personal machine. This zip file contains a lot of information such as your profile details, contacts (from Messenger), timeline posts, photos, videos, friends list, messages, and even your ads information. At the very least, download the file and retain it so you can be aware of what all Facebook has been watching about you.
To start your archive download: (Desktop or Laptop only, link not available on phones)
1: Click on the little down arrow in the upper right hand corner of your Facebook page. You don’t need to be on a specific page for this to be available.
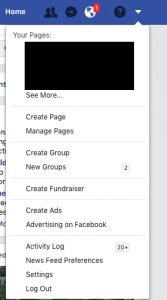
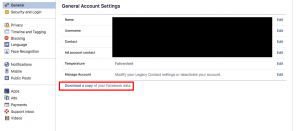
2: Click on Settings. You will be presented with the Account Settings page. Click on the “Download a copy” link highlighted in red.
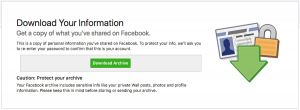
3: Click the green “Download Archive” button and enter your password when prompted.
4: Depending on the size of your profile, it might be a while. Keep watch for a notification (or an email) that looks like the below: (Excuse the redaction and the MS-Paint userpic)
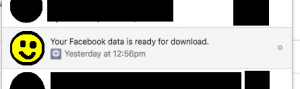
5: When you get the notification, click on it and you’ll be brought to the same screen as in step 3. Click the green button to begin the download.
6: Unzip the archive to your desktop
7: Open the directory and double click the .html file inside. Your archive will have several directories in it, the HTML file will be the only non-directory file in it.

Planning our first strike!
Before proceeding with the account lockdown, let’s talk about your personal information. We’ve already established in part 1 that Facebook (and their third-party ad buying affiliates) scrape Facebook’s public profile userdata for any tidbit of information that could be used to target ads at you. This means hiding all public profile information (Likes, Dislikes, Education, Religion, Marital Status, etc…), posts, photos, profile information changes, and other data into “Friends Only” or “Only Me” where applicable. Once we’ve secured the account, we’re going to move on to the “Platform”(where the Algorithm shows you the third party apps that have access to your posts and more personal userdata), then on to the “Ad Preferences” where the Facebook Algorithm shows you what it “thinks” you like in an attempt to sell ads. After that, we’ll tear through the Messenger site and perform a similar exorcism. The less data they have, the more confused the algorithm will get.
For these next steps, you’ll need to be at a computer as most of these settings are not available in Mobile versions.
Securing the profile
We’re going to step through each section and each question will be explained as to its function and what it means for you security wise.
General Account Settings
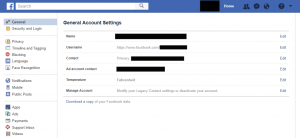
The first page in settings is “General Account Settings” and lists off details of your account such as your name, your username, email contact addresses, etc.. There’s not really much to change here. Important (slightly not relevant) note: If you are doing this for someone else, please review the Legacy Account settings under “Manage Account”. This setting allows you to delegate control of your account to a trusted family member in the event of your death. I know it’s morbid, but it’s something worth mentioning. More to the point, this is also where you could delete your account (permanent) or disable your account (temporary) should you so choose.
Security and Login
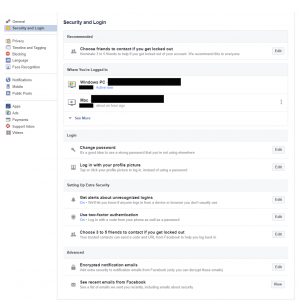
1: Choose Friends to help if you get locked out
What this does: This allows you to set some trusted friends to receive security codes on your behalf and to vouch for your authenticity. I don’t use this feature, however if you’re having problems with your account, delegating “friends” to vouch for you might be worth it to you.
Why it’s important: In the event that you have an issue with account access, trusted friends that are selected can be contacted by Facebook to verify authenticity. Honestly, using a password manager and practicing good password methods has never failed me yet.
2: Where you’re logged in
What it does: This lists all of the current sessions that Facebook records you as having logged in from. For most people, it’ll be a computer (home computer and possibly work computer) and your phone. If you don’t recognize one of the sessions listed , you can remove it and it will force login from that device again.
Why it’s important: It’s important to ensure that you and only you have access to your account. If you do not recognize a device or location on this list, immediately reset your password and force-logoff all listed sessions as it could be signs that someone has gained unauthorized access to your account.
3: Change Password
What it does: No shady mess here, this is how you can change your password. When you decide to change your password, you have the option to kill off all current sessions and force re-login (good idea to do if you think your account’s been compromised.)
Why it’s important: Regularly changing your password keeps the bad guys guessing. Heed the warning and do not re-use passwords!
4: Login with your Profile picture
What it does: This is supposed to provide an easy method for user switching, however it is so poorly done, it should never have been implemented.
Why it’s important: I highly recommend you disable this feature. This is a bad idea and never should have been implemented. If you click “Logout”, you should have to put your password in to login again. This just opens up the possibility of someone else using your phone/computer and gaining access to your profile without your permission.
5: Get alerts about unrecognized logins:
What it does: This feature alerts you when a unknown device (computer or app) tries to login to your account.
Why it’s important: If Facebook catches an attempted login from a unrecognized device, it will give you the option of allowing it or revoking it. Even with the correct password, a revoked unrecognized login can’t get into your account. If you login with a correct password on a new device, you will have to “authorize” the login from an existing device or PC. Once authorized, you can then add the device with a name to your active sessions list and it won’t bug you again unless you revoke the authorization (see item 2 above)
6: Using Two Factor Authentication:
What it does: This enables Two Factor authentication for your account. Codes can be delivered either by SMS or via the Code Generator function in the Facebook app.
Why it’s important: If you try to login to Facebook from a new computer, you can use the Facebook code generator from a previously authorized device to generate a one-time code to authorize login for the new device. Two-factor should always be enabled, not just on Facebook.
7: Choose 3 to 5 friends to contact if you get locked out:
What it does: In the event of an account lockout, you can delegate friends to serve as secondary points of authorization and receive login codes to reenable access.
Why it’s important: If you are ever in a scenario where you can’t get to your phone but you’re logging into Facebook on a new device, a friend can receive codes on your behalf. This can be deprecated by using a password manager and good password policies.
8: Encrypted Emails:
What it does: This is optional (and is also a new feature). If your primary method of receiving Facebook notifications is via email, you can provide your GPG Public Key so that incoming emails are encrypted and only readable by your decryption key.
Why it’s important: If you think your emails are being analyzed by a third party in transit, you can use GPG to encrypt them. Most users won’t need this although it’s nice to know it’s there.
9: See Recent Emails from Facebook:
What it does: If you think you’re being phished by an odd Facebook email, you can examine the last few emails that Facebook has sent you. If the email in your email account doesn’t match any of the emails listed here, it’s more than likely phishing and should be deleted.
Why it’s important: It’s a good idea to check out suspicious emails that are pretending to be Facebook. If it’s legit, you’ll see it here too.
Privacy
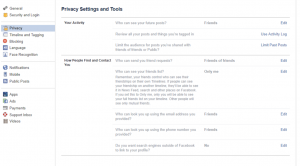
1: Who can see your future posts:
What it does: This sets the default permissions of the post windows in Facebook and the FB App.
Why this is important: You should set this to Friends Only and ensure that public users can’t read your new posts going forward. If you use a custom defined list, that you use as your “default”, this will save you from having to set that list as default on future posts.
2: Review all the posts and things you’re tagged in:
What it does: This allows you to see what you’ve been tagged in from your account’s creation to current and allows you to remove your tag if you choose to do so.
Why this is important: If someone’s tagged you in something embarrassing, you can remove the tag. This is for existing tagging, not future posts. We will adjust that in an upcoming section.
3: Limit Past Posts:
What it does: This feature allows you to set the minimum security of past posts to whatever you have selected in item 1. If you posted a lot publicly, you can increase security on those posts to “Friends Only” with a single click as opposed to setting them post-by-post.
Why this is important. Older versions of Facebook didn’t have explicit settings for the level of granularity provided in the current version and previously forgotten about public posts can be blanket-reassigned easily. I recommend that if you adjusted Item 1 (Who can see your future posts), that you use this to ensure all your posts are at minimum set to “Friends Only”.
4: Who can send you friend requests:
What it does: This determines what audiences are allowed to send you friends requests.
Why this is important: By setting to “Friends of Friends”, you don’t completely inhibit people from sending you friend requests but you will stop the random people on the Internet from spamming you with requests. At a minimum, a new “friend” should know you via one of your already established “friends”. This does not stop you from originating friend requests.
5: Who can see your friends list:
What it does: This controls who can and cannot see your friends list on your profile.
Why this is important: If set to Public or Everyone, any random person perusing your profile will know who you are friends with. It is generally unwise to make this information public however it’s usually OK to allow your friends to see your friends list.
6: Who can look you up using the email address you provided:
What it does: This controls whether or not someone can find you by looking for you by your contact email address(es).
Why this is important: If someone knows your email address, they can find your profile unless you set this to something other than “Public”. I have this option set to “Friends”.
7: Who can look you up using the phone number you provided:
What it does:This allows people to find you by typing your phone number into Facebook search.
Why this is important: If you use your phone number (for SMS Two-Factor), your phone number could be leaked into Facebook’s public listings. I have this option set to “Friends”.
8: Do you want search engines outside of Facebook to link to your profile?
What it does: This controls whether or not search engine crawlers (Google, Yahoo, etc..) can index your Facebook profile so if someone searches your name in Google, they can find your account.
Why this is important: Someone could find you on search engines by typing your name. If you have anything questionable public, it will show up. I have this option set to “No” and recommend you do the same.
Timeline and Tagging
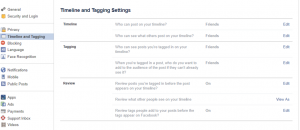
1: Who can post on your timeline?:
What it does: This controls who can and can not post on your timeline.
Why this is important: If set to Friends, this allows your friends to post to your timeline, usually it’s customary for Happy Birthday posts and the like. If it’s set to a looser set of permissions, this means that anyone can post to your timeline and you generally don’t want that. Mine is set to “Friends”.
2: Who can see what others post on your timeline?:
What it does: If Friend A posts on your timeline, does Friend B get to see it?
Why this is important: If someone posts something contraversial on your wall, you can either inhibit drama by being the only person that sees it. You can tighten or loosen this restriction as necessary, however anything looser than “Friends” is calling for trouble. Mine is set to “Friends”.
3: Who can see posts you’ve been tagged in on your timeline?:
What it does: This controls who else can see posts you’ve been tagged in on your timeline.
Why this is important: If this setting has a wider audience than #2 above, then this could be a potential source for information leakage in your groups of friends.
4: Add to the audience of that post?
What it does: If you’re tagged in a post, you can automatically select an audience for that post that can see the post you’ve been tagged. While at first glance, this might overlap with #3, this allows for an independent adjustment. For example, if you have “Who can see posts you’ve been tagged in” as ‘Only You’, but you want your friends to be able to see that you were tagged in a post, this allows you to extend that view without compromising your timeline.
Why this is important: If someone tags you in something, but you only have “Only Me” as set but you have “Friends” added to the audience, this allows your friends to see that you’ve been tagged in something. Generally speaking, this should be the same as #3 or tighter.
5: Review posts you’ve been tagged in before allowed on your timeline?
What it does: This allows you to see all the things that others tag you in (controlled by #3), however you have to “approve” the post/image/whatever before it will appear for your audience (controlled by #4).
Why this is important: I highly encourage that you turn this feature on. Essentially, anyone tagging you in anything requires your approval before it can be seen. This is one of the best ways to inhibit the “Embarassing Pic” or the “Drunken Stupidity” posts as you can simply hide the post. The post will still get published, however it will not contain you tagged.
6: Review what others see on your timeline:
What it does: This allows you to play detective against your own security settings and see what others can see on your timeline (posts, pictures, shares, etc..) and defaults to “Public”. This can be very helpful in determining what everyone can see and gives you the capability to go in and clean it up.
Why this is important: This allows you to play the role of “Joe User” and see what information you’re leaking to the world. It’s a good idea to do this every once in a while.
7: Review tags others place on your posts?
What it does: This allows you to approve tags others place on your posts. As an example, if you took a picture of a friend that was less than stellar and someone else tags them in it, you can remove their tag from your post.
Why it’s important: Just like with Timeline Review (#5), this allows you to control the tags of others on your posts.
Blocking
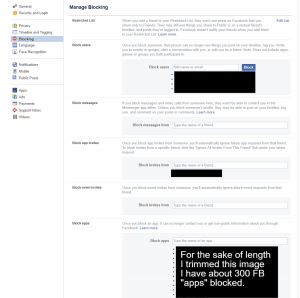
1: Restricted List
What it does: Allows you to temporarily suppress someone for “Friends” posts or better but still allows them to interact with public posts.
Why it’s important: In my usage of Facebook, it’s not really all that important. If someone upsets me to a point where they’re needing to be put on a list, I’m going to reach for the unfriend button.
2: Block Users
What it does: Unlike the Restricted List above, this all out denies someone from contacting you, regardless of your permissions settings. Useful to have if someone is harassing you or otherwise being an ass.
Why it’s important: If someone is just harassing you or sending you incendiary comments, or message spamming you to death, you can kick them out. Once blocked, they will not further be able to get in contact with you via Facebook. Of course, this is only per-username so if your assailant has multiple Facebook accounts, this won’t stop them from contacting you on one of the alternate accounts.
3: Block Messages
What it does: This only blocks people from messaging you. If you’re going to ban someone, do it with option 2 instead.
Why it’s important: Just like with #2, if someone’s harassing you specifically by Messenger, block them and this will shut off their ability to contact you via Messenger. Honestly though, if you’re going to block them, just use option #2 since it blocks everything.
4: Block App Invites:
What it does: Y’all remember the hell that was the first time that “Apps” were allowed to post to Facebook on your behalf? If you had a friend that was into all of those “Candy Crush” games but were otherwise cool, you could block them from sending you app invites. This is useful because for a long time, apps would arbitrarily post to the app user’s Facebook wall until Facebook locked that down (to some degree).
Why it’s important: Stupid social-media apps (I’M LOOKING AT YOU KING GAMES WITH YOUR ** SAGA GAMES!) need to die in a fire. This is one avenue of controlling them. I’d recommend trying to convince your friend that keeps sending you Candy Crush Saga spam invites that the game sucks and is only a time and money sink. There’s a lot better phone apps out there for entertainment that were’t made with the express intent to bleed the user dry.
5: Block Event Invites:
What it does: If you know a friend that creates an event for every, little, thing, in, their, life, you can use this to suppress them without reaching for the banhammer. Fortunately I don’t know anyone that’s spammy with the invites, but here’s where I’d go if I needed to. Alternatively, just talking to them about the invites works too.
Why it’s important: Sometimes, people get overzealous with the invites. You can block them without having to unfriend them.
6: Block Apps:
What it does: Oh dear god, here we go. This is for all of those stupid FB games that spam and clutter up your timeline with advertisements for their game (CANDY CRUSH, FARMVILLE, FARMING SAGA, WITCHES SAGA, ANYTHING BY KING GAMES, GET REKT!)… Ahem, sorry about that.
Why it’s important: Because blocking the friend isn’t an option yet you value your sanity. As the screencap above shows, I’ve blocked well over 300 different “games” on Facebook. Unfortunately, this predates the App Platform (more on that in a bit) and is largely legacy now with respect to blocking your userdata access. Now it’s useful for blocking apps that constantly show up in your newsfeed.
7: Block Pages (not pictured, it’s the last option on this page)
What it does: Much like “Citizens United” (Corporations are people), this function allows you to block a specific page from interacting with you. As an example, let’s say you’re getting harassed because you left a less than desirable review of the pizza place down the street and the person running the page isn’t the most sane of people and has now taken it upon themselves to tell you everything wrong about your life. Just like the banhammer is for people, the Block Pages function allows you to block Pages from you as well.
Why it’s important: Anyone can create a Page for something on Facebook, if that page starts harassing you, you can block the Page.
Facial Recognition
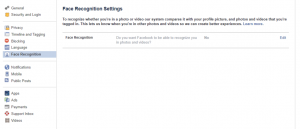
Facial Recognition Settings:
What it does: Facebook tries to use Face Recognition to tag you in photos and videos.
Why it’s important: Just turn it off. It’s too close to 1984 for me.
We’re going to skip the Notifications section simply because that’s a per-user thing. The worst you can do is give Facebook your phone number, but in all reality if you have Facebook on your phone, they already have your number. It does enable you to use your phone for a secondary method for two-factor authentication.
Apps Settings: (AKA: Oh god, kill it with fire!)
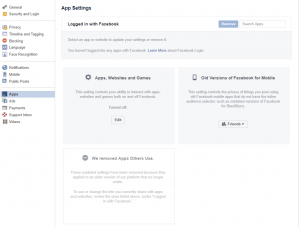
Logged In With Facebook:
What it does: It’s supposed to show you which apps you’ve used to login to Facebook however I have disabled this wholesale and I highly encourage you to do the same. Any website, any game, or any app that says “Login with Facebook” will show up here. Please do not login with Facebook to anything other than Facebook. If you disable this feature, be aware that some sites/apps won’t work anymore.
Why it’s important: This basically controls whether or not Facebook is allowed to be an authentication source for a third party site. This is where all those ‘Login with Facebook’ login methods come from as they rely on Facebook to say you’re you. It’s not a good idea to trust Facebook for authentication if they can’t keep from selling your information to others.
Apps, Websites, Games
What it does: Some apps allow you to send invites from the app (remember in the above Blocking section) and posting to your account as you. Other apps are a bit more nefarious and will scrape your profile data and start spamming your friends with ads. This is the “App Platform” and there’s no good that can come of it. If you disable this feature, be aware that some sites/apps won’t work anymore or won’t recognize you.
Why it’s important: This has been a thorn in my side ever since the “App Platform” launched. This whole thing is a security vulnerability waiting to happen. An app that uses the Platform essentially mimics you from an API standpoint and not all third party apps are built the same. Stay far away and turn off this thinly disguised ad platform.
Old versions of Facebook:
What it does: This is more of a relic than anything, however it can be useful, especially if you use(d) an older version of Facebook. Previous versions of the Facebook app used an API to post to your timeline and they didn’t have as fine of a granularity as the current version of Facebook does when it came to access permissions on posts (who could see what). This sets the default level of posts sent from older versions of the Facebook app to a minimum level specified here.
Why it’s important: This isn’t really important if you’re using the current version of Facebook. This is primarily aimed at older FB apps on older phones. Just set it to “Friends” and you’re set.
Apps Others Use (deprecated?):
What it was: This used to be an option (and was at the start of me writing this article) where you could see what OTHER USERS were using that had access to YOUR data. Thankfully, Facebok finally got wise to this and disabled that functionality. This was a huge security risk and it allowed apps that your friends were using to access your data.
Facebook Ads (AKA: Kill it with Fire Pt. 2)
I know that going through these settings are no fun but it’s necessary. So far, we’ve secured your profile and your posts, but have done nothing about the heart of the advertising beast, the Ad Platform. In this next section, we’re going to go through and nuke it all. Click on “Ads” in the lower left hand section of your Settings page and you’ll get something similar to the screenshot below:
This page shows what Facebook “thinks” are things you like in the first section. Your task is to go through all available headings and wipe them all out (even if you ARE interested in them). The whole point of this is to throw off the Ad Machine. As an example, my screenshot only shows “Flipboard” but I’ve never used the app and I don’t have it on my phone. While traversing the various options in “Your Interests”, you’re going to find a lot of random stuff. Some of it might be really accurate, but a lot of it is going to be crap, like “Ballpoint Pen”, or “Building”, etc..
For each icon under each headings, hover over it and click on the grey X that shows up in the upper right hand corner. This causes the image to shadow. Repeat for all the categories and icons displayed for Your Interests. By removing them from the interests list, you’re throwing the Algorithm for a loop.
Remember the part where I described how Facebook sells its users’ data to the customers? This is where you get to see that in “Advertisers you’ve interacted with”. Go through and remove all of them from all the header items in that group.
In the “Your Categories” section, disable all sliders and remove all items under “Your categories”. This inhibits the Algorithm from giving your details (marital status, etc..) to advertisers, and inhibits the Platform from learning what categories your interests fall under (target advertising)
Under Ad Settings, disable both of these options and set the “Ads with your social actions” to OFF. This inhibits advertising based on “so-and-so liked some-product-name”.
For Hide Ad Topics, turn everything off except for “Hide Permanently”, Just for giggles, I got “Alcohol, Parenting, and Pets” as my categories.
Important Note: To continue to throw off the algorithm, it is necessary to come through and ‘clean house’ on the Ad Preferences page at least once a month. You’d be surprised at all the stuff that can accumulate in this section in just a month’s time.
After going through all that, that’s still not all. It is beginning to sound like a bad Billy Mays ad…

Time to shoot the (Facebook) Messenger
Now that you’ve survived the Facebook onslaught, it’s time to deal with Messenger. There’s only one problem. Facebook hid the contacts list in Messenger! In order to remove your imported contacts (whether or not it was done with your permission), click this link: https://www.facebook.com/mobile/messenger/contacts These are all the contacts imported from your phone via the Messenger app whether or not you gave it permission to. We’ll come and fix that in a moment.
While you’re in Messenger, purge any and all old conversations (older than a month), the less data exists, the less can be scraped.
Ramifications: None. This does not inhibit you being able to send and receive messages with your friends provided your security settings are set appropriately. There is literally no reason why Facebook should have your contact data and it does exactly nothing with sending and receiving messages via Messenger.
It’s the app-pocalypse
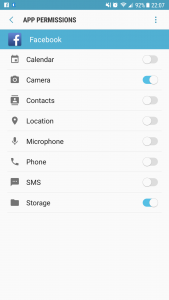
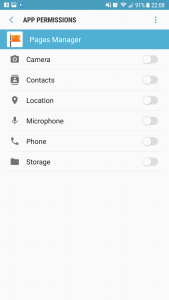
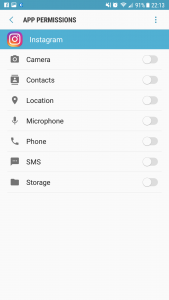
Now for your mobile device. We’ve purged Messenger, we’ve reset stricter controls on your Facebook account, now it’s time to do something about the apps. First thing’s first. Go through and remove all apps that have required you to login via Facebook. It might be a fun app, but it’s not worth leaking your personal information to some random third party. Most apps feature an alternative method for creating an account using an email address and password (no facebook integration needed). As for the Facebook, Messenger, Pages Manager, and Instagram apps, we can adjust those manually. Please note: Even if you do not use one of the apps, disable it.
For Android phones, you can get to the app permissions by going to Settings, Apps, then clicking on the app in the list. If you do not use the app, first thing you should do is click “FORCE STOP” then “DISABLE”. This will stop the app’s processes if it’s running and will prevent it from starting again. On this same page, you can click on “Permissions” and disable certain accesses that the app has.
For all apps, if you revoke a permission, you might get an error if you try to do something that would involve that permission, for example if you revoke camera permissions then try to use Facebook to access your camera, it will produce an error message. Aside from that, there’s no reason why Facebook needs to drive its tentacles into your Calendar, your Location, your Microphone, or your SMS messages.
This is true for all apps, not just Facebook. Think about what the app does, then go through the permissions list. Why does a screensaver need access to Contacts? Why does a clock need access to SMS. Keep your wits about you when downloading apps and read the store page to find out what permissions they require BEFORE you download them.
Below are my permissions settings for Facebook, Messenger, Pages Manager, and Instagram. (Other apps aren’t installed, but generally the same guideline applies for all Facebook owned apps.)


OMG, Finally!
After going through all these pages, steps, settings, and options, you should at least feel enlightened to know what data Facebook has on you and just how complicated Facebook makes it. What’s worse is that this is only the information they allow you to see that they have on you. They will never fully reveal their hand. Going forward, be mindful of what you share online and continuing to monitor your account’s settings, security options, and the Ads page to ensure that your data goes only where you allow it. While you don’t have to be a matrix-hacking master, a little common sense and a healthy dose of paranoia goes a long way towards maintaining security. Of course, permanently deleting your Facebook account is always an option, but for many, this would also involve losing contact with family and relatives. This article (and appropriate security settings) is hopefully the next best thing than deleting your account.
Remember, if you’re not paying for a service, you are the product.
Happy Paranoia!
FIRESTORM_v1