IBM RS/6000 display repurposed for Arduino
by firestorm_v1 on Jul.23, 2012, under Embedded devices, Hardware, Microcontrollers

I couldn’t find a picture of an IBM server with the LCD so here are some squirrels.
We managed to unearth an old IBM RS/6000 server at work and decided that since the machine didn’t work, it was time for it to go away. Right off the bat, one of the things I noticed about this machine was that it had a diagnostic LCD panel in the bezel presumably for showing POST error codes and warnings. Since the machine was going to the scrap heap, I decided to relieve it of the LCD and managed to get it to work on an Arduino with minimal effort. Read on for pictures and a wiring pinout.
About the LCD
As stated, this LCD module came from an IBM RS/6000 server and has an IBM FRU# 82G3614 as well as “DM110Y” imprinted into the LCD. The module also features a dedicated backlight LED display that shows up amber when driven with +5V. While it’s not the most attractive color, it will work quite well in a project. It was free, after all,
The LCD itself is driven by a Sanyo LC7985NA driver chip which is HD44780 compatible. This works for us as the HD44780 protocol is very common and has pretty much become its own standard. The HD44780 gives us greater control over the LCD than simply displaying text. Using the HD44780 protocol, you can clear the screen and control the cursor blinking and position. You can even write your own characters and display them like any other character as needed. The HD44780 even includes its own character map (font) so it’s the simplest type of display to get up and running.
An added benefit to the HD44780 display is the option to enable 4-bit mode. Generally communications with an LCD display require 8 data lines (8bit) and three control lines (a total of 10 pins) to be able to send data to the module for display. In 4-bit mode, each character (or control code) is sent in two 4-bit nibbles then the display acts on the data as if it was a single byte. This comes to the advantage of saving I/O pins (7 pins versus 10 pins) on a limited device while sacrificing a minimal amount of processing cycles.
Editor’s Note: The LCD module is not Arduino specific. Be sure to perform research on your microcontroller prior to hooking up the LCD and to ensure compatibility. This LCD will NOT work with 3.3v TTL devices.
The Arduino IDE comes with a library called “LiquidCrystal” which is written to make interfacing with a display easy. It is preconfigured to work in 4-bit mode to save I/O pins on your project and the library already includes sample code.

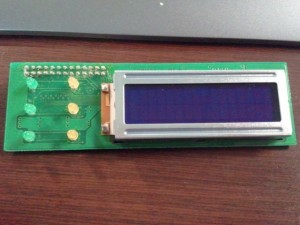
LCD Display Panel – Front
As shown in the above image, there are six LEDs and then the 2 row by 16 column LCD display. The upper left hand corner shows the 26 pin header that we can use to talk to the various devices on board (LCD, LCD backlight, LEDs).

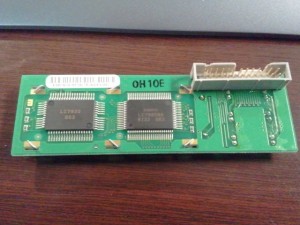
LCD Display Panel – Back
This shows the back side of the LCD panel, with the LEDs and the header on the right and the Sanyo LCD driver on the left.
Pinouts and wiring
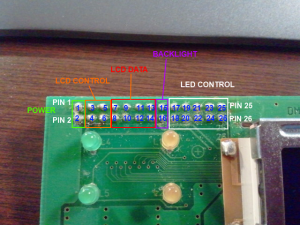
The header has 26 pins because it also carries the signalling for the LEDs and the backlight is brought out into its own pins instead of running off of the +5V driver pin that some newer displays use. If you are viewing the display with the LCD and LEDs towards you, pin 1 is the upper left most pin and pin 26 is the lower rightmost pin on the header. If the LCD is facing away from you, pin 1 is the upper right most pin in the header, and pin 26 is the lower leftmost pin in the header. To orient properly for the LEDs and with the LCD facing you, the upper leftmost green LED is “A”, middle is “B”, lower is “C”. The upper right yellow is D, middle is E and lower right yellow is F.
Here is the pinout of the header:
- Vss (GND)
- Vcc (+5V)
- Contrast – Run this to the wiper (middle pin) of a 10K variable resistor to control the display’s contrast.
- RS – Register Select – Arduino pin 12
- R/W – Read/Write Character RAM – wired to GND unless needed.
- E – Chip Enable – Arduino pin 11
- D0 – Data pin 0 – Not connected in 4-bit mode.
- D1 – Data pin 1 – Not connected in 4-bit mode.
- D2 – Data pin 2 – Not connected in 4-bit mode.
- D3 – Data pin 3 – Not connected in 4-bit mode.
- D4 – Data pin 4 – Arduino pin 5
- D5 – Data pin 5 – Arduino pin 6
- D6 – Data pin 6 – Arduino pin 7
- D7 – Data pin 7 – Arduino pin 8
- Backlight Vss (GND)
- Backlight Vcc (+5V)
- Common Anode (+) for LEDs A,C,D,E,F
- D cathode (-)
- E cathode (-)
- F cathode (-)
- A cathode (-)
- B cathode (-)
- C cathode (-)
- Not connected
- Not connected
- B anode (+)
End result:
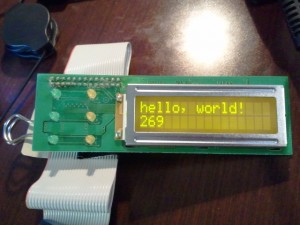
If you got the LCD wired up properly and you got the sample code uploaded to your Arduino, you should see the below show up on your LCD display. The sample code can be retrieved from File -> Examples -> Liquid Crystal -> HelloWorld in your Arduino IDE.

LCD Test Run
Alternative Uses:
Now that the LCD is up and running, you could write Arduino code for the LCD to display information from sensors, the serial port or any data source you desire. Additionally, you can even direct-wire this LCD to a parallel port and use it as an information display. Unfortunately, the LEDs won’t be able to work without some kind of microcontroller to interpret commands but that shouldn’t get in the way of using the LCD module for something fun.
Next time you hit the parts store, keep a sharp eye out for one of these displays. They’re easy to come by and easier to control.

September 18th, 2012 on 11:28 am
Hi,
great idea, i guess there should be some old IBM servers lying in the basement at my workplace. Will take a look. Is a potentiometer included on the PCB? or should I add a small trimpot myself?
greetings,
Johan
October 30th, 2012 on 9:16 pm
thank you very much for posting this information
I have an LCD you have, I could use for a miniPC with RS232, and could connect to rs232 pin to pin? Any idea?
thank you very much. –
Adrian
November 2nd, 2012 on 6:32 pm
Hello Adrian:
Unfortunately, the LCD is a parallel LCD and won’t be pin-compatible with the RS232 signalling. If you are wanting to use this LCD with a miniPC and don’t have a parallel port, I would recommend https://www.sparkfun.com/products/258. This is a serial “backpack” module that you can use on your parallel display to make it serial compatible. It also includes extra features that may make it easier for you.
Good luck!
FIRESTORM_v1
November 2nd, 2012 on 6:40 pm
Hello Johan:
There was no pot on the display’s PCB. I would recommend either a potentiometer or you might be able to use a PWM source with a transistor to drive the LCD backlight.
Firestorm_v1
November 9th, 2016 on 9:17 am
Thank you SO MUCH for this info!
We’ve had one of these servers lying about for >10 years
and finally decided to dump it. I kept the display and
PSU. I was just tracing out the circuitry and wondered if
anyone else had messed with one of these and Googled
“dm110y”, expecting nothing.
Yay, Google!