The Raspberry Pi Foundation announced a new arrival to their existing line of awesome little credit-card sized computers. I was fortunate enough to get my hands on one and give it a go. In the article (with pics!) below, I’ll cover what’s changed, what’s stayed the same, and what you can expect from everyone’s favorite mini machine.
First, an overview
The Raspberry Pi line of boards was released by the Raspberry Pi Foundation in 2011 and initially only offered the Model “A” Pi which was targeted at educational goals of getting children interested in programming and electronics. The Foundation’s goals in designing such a small and affordable platform was not to knock any of the heavyweights from their perches in the computing space, but rather to get people interested in programming and electronics. For $35, a teacher could pick up a class set of Raspberry Pi boards and if the kids managed to tear up a few, the school would not be out very much money. Easy to replace and accessible hardware made the Pi a hit in the educational sector. Not very long after the Model “A” was released, the Model “B” was made available and the Pi platform took off with audiences beyond the education sector. Now, the Pi has expanded from its initial educational goal to all kinds of applications where a small credit-card sized machine can be of use. This includes everything from embedded navigation systems, to dedicated media centers all while still being able to be used for its original goal, education.
The original Model A unit offered the below connectivity options:
- Broadcom 700MHz SOC (system on chip)
- 1 USB Port
- 26 GPIO pins
- 1 HDMI port
- 1 Composite port
- 1 headphone audio jack
- 1 SD Card slot
- 512 MB of RAM.
- Headers for both a camera module and an LCD screen.
The Model B featured all of what the Model A featured and also included the following:
- 2 USB ports
- 10/100 Mbit Ethernet connectivity
For the purposes of this article, I will be comparing the Model B+ to the Model B only.
Same Pi, different (and better) stuff!
New Onboard Power Supply
If you search online about the Raspberry Pi, you’re bound to come across several forum posts of people complaining about not getting some device to work with their Pi. Ultimately, the issue was traced either to a bad power supply or a USB device drawing too much power. Thankfully in the B+ design, the engineers ditched the linear regulator and the huge SMD capacitor for the +5V USB power supply and replaced it with an onboard switch-mode regulator. This lowers the Pi’s power consumption while also ensuring that the incoming power is conditioned. Brownout protection in the new design helps to iron out the bumps from attaching and removing USB devices that usually tends to cause the Pi to restart.
More GPIOs and Backwards compatible
The GPIO header was expanded to 40 pins instead of 26 with some additional features added for more capability. To ensure that backwards compatibility was not an issue, the first 26 pins were kept to the same pinout to ensure that devices and addon boards that were purchased for the Raspberry Pi B model would countinue to work on the B+.
More USB ports
With the addition of a better and more efficient power supply, the Raspberry Pi Model B+ now offers four USB ports. While some contention still exists as to whether or not the Pi will be up to snuff with regards to power, the fact remains that now you can connect a keyboard and mouse to the Pi and still have a couple of USB ports left over in case you need to attach a keydrive or other peripherial.
Changes to the platform
MicroSD cardslot
One of the things I noticed right off the bat was that the SD Card slot on the bottom of the Pi has been changed into a MicroSD card slot. This is a win for two reasons; 1) You no longer have the concern of the SD card slot jutting out of the side of the Raspberry Pi making the whole device appear cleaner and 2) The micro SD cards are generally cheaper (even if only by a few bucks, this makes a difference when dealing in quantity.)
Sound and Video (Composite)
The composite video and the stereo sound connectors had to be moved due to the increase in the GPIO headers. This resulted in the two connectors for sound and video getting condensed into one connector. This looks like a standard stereo headphone jack, but now carries video in a standard (Tip-Ring-Ring-Sleeve) connector. This three connector cable is commonly found with portable DVD players and can be scored reasonably cheaply if you don’t have one available.
Ethernet Status Lights
The small collection of status lights next to the USB ports on the Model B have been moved. The red power LED and the green “OK” (drive status) LED have been moved to between the SD card slot and the GPIO header on the opposite end of the board. The Link and the Activity lights are now on the Ethernet jack itself and the Full Duplex (FDX) light has been put out to pasture. (I haven’t seen anyone not using a ethernet switch of some sort, so the FDX light won’t be missed here.)
Cases
Unfortunately, moving all the connectors and lights around the Pi’s tiny footprint also means that the case has to change too. This has the issue of the new cases not being available and as I write this article, the RasPi B+ is sitting barebones on top of the box it came in. It will ultimately be placed in a case, but not for the time being because everyone’s sold out.
Software
The good news is that since all three Pis are centered around the same BCM2708 SOC, you won’t have to worry about cross compatibility. If you need to migrate an installation from a B to a B+, all you need to do is perform an apt-get update && apt-get upgrade to ensure you have the firmware for the B+. The kernels did change between B and B+ versions, however all of the repositories already had the updated version available at the time of this writing. I would expect that new images with the updated firmware to be released shortly.
Pictures!
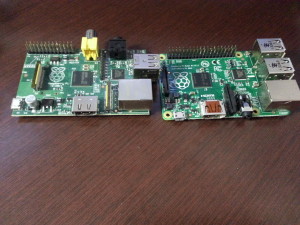
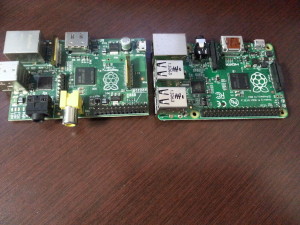
The top view shows the significant differences in the port placement. The USB power port is now on the same side of the board as the HDMI connector, the USB connectors are moved back a bit, and the RCA Video connector has been eliminated.
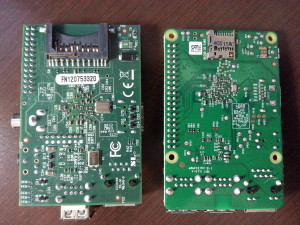
Here is a picture of the bottom of both devices. The B+ is on the right, with the micro SD cardslot prominently displayed in the top. You can see that with the exception of the audio/video jack, all the other jacks are nearly flush with the edge of the PCB.

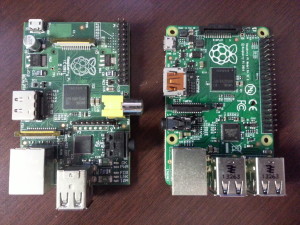
Here we can see the movement of the existing USB ports to make room for the additional USB ports and the lights in the Ethernet jack. Unlike the model A on the left, both sets of USB ports and the Ethernet jack are now very close if not flush with the edge of the PCB.
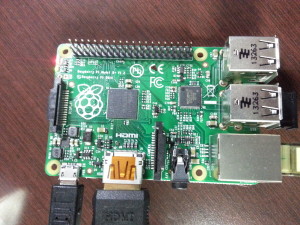
This photo shows the side of the Raspberry Pi where the HDMI connector resides. The USB power port is now on the same side as the HDMI connection and the Audio/Video jack has been moved to this side as well. The Camera ribbon connector has been moved to in between the A/V jack and the HDMI port.
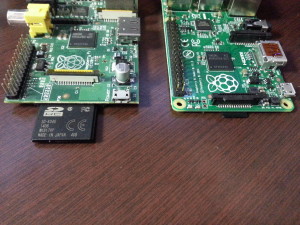
Here you can see the significant difference between the Raspberry Pi B model and the B+ Model. The SD card slot connector makes a significant lack of presence in the B+ when compared to the B model. The green and red LEDs on the B+ are between the GPIO header and the display ribbon connector.
The space on the GPIO side of the Raspberry Pi is predominantly taken up by the GPIO headers which run almost to the back of the USB ports. There are four small holes in the Raspberry Pi B+ PCB which will make mounting the device a lot easier to deal with.
Your Thoughts?
It’s very nice to see that the Raspberry Pi Foundation was able to improve what is already an awesome device and I’m looking forward to using my Pi for something equally awesome. What are you going to use yours for?