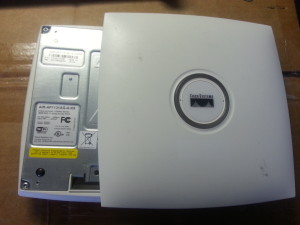
Everyone knows that I love a bargain. That love for bargains is intensified any time networking gear is involved. Imagine my excitement when I found a bunch of the above pictured Cisco access points on Ebay for around $8 a pop because the lid won’t stay on. Unfortunately, my excitement was tempered a bit when I found out that these were designed to work with a controller and weren’t stand alone units. Undeterred by this disappointment, I researched and found a way to get these things to operate on their own as standalone units and freed them from the hive mind! In this article, we will cover converting the Cisco AIR-AP1131AG-A-K9 from “Lightweight”(controller-based) to “Autonomous”(standalone) and will even cover how to put them back in “Lightweight” mode if you want later on.
Mission Briefing
Cisco devices are pretty well known as the defacto go-to for many a large company that wants to have a good network. You can look in just about any server closet and see something Cisco-based staring right back at you. I even own several Cisco switches and swear by them. There’s one thing though, setting up all this crap is a pain in the rear end. This fact was not lost on Cisco, who sought to make deployment easier and created two different versions of their wireless access points. There is the “Autonomous” version that requires logging in either via serial console or ssh/telnet and manually setting up the configuration options, and there is the “Lightweight” version which requires no special configuration on the AP side, but does require a dedicated “controller” to keep configurations up to date.
For large scale deployments with many APs, the “Lightweight” method makes sense as you make the change once and all APs get the updated configs immediately, but for small deployments (one or two APs), the added cost of the wireless controller is excessive and unnecessary. In my case, I found that the access points loaded with the “lightweight” software were much cheaper than their “autonomous” counterparts.
When the AP1131 is in autonomous mode, you have access to the full commandline configuration options and the Web-based UI options from the access point. When in “lightweight” mode, neither of these options are available as the AP expects to boot from the stored firmware, then sync up with the controller. There are no user commands on the AP, which effectively cripples the device as it is only intended to communicate with the controller in “Lightweight” mode.
A bit about the hardware
The Cisco AP1131 is a 802.11 b/g wireless access point. It doesn’t support N standards, but since my Internet is slower than 54mbit (the maximum speed of Wireless G), this won’t be a problem. The access point features a console port, a 10/100 Ethernet port that supports PoE, two WiFi radios, a power port (48VDC, positive tip) and a mode button. The device also features two status LEDs under the front cover and a single bright LED to light up the translucent circle in the lid. The circle LED provides status information so you can look at the AP and know what’s going on with it.
Although the unit is already configured for a wall mount, there are some sellers that have the entire kit which includes a bracket for mounting the AP to a drop-ceiling grid. The ability of the AP to support Cisco’s 48V PoE standard (either via a Cisco PoE switch or via a power injector) make this an attractive option to the home DIYer. While I was fortunate to get a good score off Ebay for $8 a unit, these devices generally go anywhere from $20 – $45 a unit, and depending on which addons you get and what firmware is installed on the hardware, may be a bit more expensive.
When the AP is put into recovery mode (we’ll do that in a bit), it will assign the IP 10.0.0.1 with a netmask of 255.255.255.0 to the Ethernet interface, and will then try to fetch a pre-determined firmware file from a TFTP server. What no one tells you in all the research I’ve found is that it does a TFTP broadcast to try and find that file. Documented below is the necessary steps to ensure that your TFTP server (which we’ll install along the way) is configured to answer that broadcast.
Requirements
In order to convert a “Lightweight” access point to “Autonomous” or vice versa, you will need the following items:
- A Debian or Ubuntu Linux computer (can be a VM as long as you’re bridged properly).
- Switch and network cables to connect the Debian machine to the access point.
- A power source for the AP (if not using a PoE capable switch)
- A Cisco.com Login (everyone should have one for getting firmware)
- A Cisco console cable and USB-Serial adapter (or serial port)
- Beer
Getting the Firmware
First off, let’s start with getting the firmware. Head over to Cisco’s Download Navigator
- In the middle section, select “Wireless” at the bottom of the list.
- In the right section, select “Access Points”.
- In the right section, select “Aironet 1130AG Series”.
- In the right section (again), select “Aironet 1130 AG Access Point”
For Autonomous mode:
- Select “Autonomous AP IOS Software”
- Now comes the tricky part. Cisco wants everyone, even hobbyists to have a service contract just to download the current version of software. They make available a non-contract version of software available that just requires a Cisco.com login.
- On the left hand sidebar, click on 12.3.8-JEA3(LD)
- Click Download.
- You’ll be prompted to login, go ahead and do so, then click that you accept the EULA.
- Once the download completes, you should have a file named “c1130-k9w7-tar.123-8.JEA3.tar”
For Lightweight mode: (covered later on)
- Select “Lightweight AP IOS Software”
- On the left hand sidebar, click on 12.4.25e-JAP4(ED)
- Click Download
- You’ll be prompted to login, go ahead and do so, then click that you accept the EULA.
- Once the download completes, you should have a file named “c1130-k9w8-tar.124-25e.JAP4.tar”
Install and configure TFTP
- Start your Debian machine and ensure that you are able to reach it from your network.
- Copy the firmware file we downloaded earlier into a directory on the Debian machine. (I use /root).
- As root, run apt-get install tftpd-hpa
- As root, edit /etc/default/tftpd-hpa and perform the following steps:
- Add RUN_DAEMON=”yes” if not already present.
- Edit TFTP_OPTIONS to include -a 255.255.255.255
- This is going to sound unusual, but trust me. This will be required to allow the AP to pick up the software from your TFTP server.
- Save and exit the file
- Don’t start the TFTP server just yet, we still need to do a couple of things.
Reconfigure networking on the Debian machine
For ease of documentation, I am assuming that eth0 is the Debian box’s interface. You will need to substitute as appropriate for your installation. Also, for some reason, the font renders the numeral 0 as a lowercase o. Please ensure you’re specifying eth0 (eth-Zero) and not etho (eth-Oh).
- First, we need to kill off dhclient. You can do so using pkill dhclient
- Force the ethernet interface down using ifconfig eth0 down
- Force a manual configuration of the eth0 interface using ifconfig eth0 10.0.0.2 netmask 255.255.255.0
- It is important to use the IP and netmask above, the AP will automatically assume a 10.0.0.0/24 network. If you have a device at 10.0.0.1 already, you may need to ensure that the AP and the Debian machine are on an isolated network.
- Bring up the ethernet interface using ifconfig eth0 up
- Start the TFTP server with /etc/init.d/tftpd-hpa start
Lightweight Mode Reflash
This is for converting an existing “Autonomous” AP to Lightweight mode only. If the AP is already in Lightweight mode, you need the next set of instructions.
Get the firmware in the right place
- Copy the Lightweight firmware file you downloaded into /srv/tftp
- Rename the file to c1130-k9w7-tar.default
Time to flash!
Now that we’ve got the server prepared for use, we need to connect to the AP and force it into recovery mode. If this is an AP that was bought used or you don’t know the password for it, you should be able to get around that using the recovery mode of the AP.
- Remove power from the AP.
- Connect the Cisco console cable up to the AP and ensure your terminal program is running.
- Hold down the MODE button with a paperclip and keep it held down as you apply power to the AP.
- Keep the mode button held down until the AP’s center LED lights up pink.
- Continue to hold down the MODE button until you get a message “button is pressed, wait for button to be released” in your console.
- Count to 10, then release the MODE button.
- You should get the following messages before it grabs the firmware and starts updating:
- process_config_recovery: set IP address and config to default 10.0.0.1
- process_config_recovery: image recovery
- image_recovery: Download default IOS tar image tftp://255.255.255.255/c1130-k9w7-tar.default
- It will take about five minutes to download the image and decompress it.
- When complete, the AP will reboot again.
- You should start seeing the AP search for the config server (LWAPP)
That’s it! Your AP is now in “Lightweight” mode and should be looking for your controller.
Autonomous Mode Reflash
This is for converting an existing “Lightweight” AP to Autonomous mode only. If the AP is already in Autonomous mode, you need the previous set of instructions.
- Copy the firmware file you downloaded into /srv/tftp
- Rename the file to c1130-k9w7-tar.default
Time to flash!
Now that we’ve got the server prepared for use, we need to connect to the AP and force it into recovery mode. If this is an AP that was bought used or you don’t know the password for it, you should be able to get around that using the recovery mode of the AP.
- Remove power from the AP.
- Connect the Cisco console cable up to the AP and ensure your terminal program is running.
- Hold down the MODE button with a paperclip and keep it held down as you apply power to the AP.
- Keep the mode button held down until the AP’s center LED lights up pink.
- Continue to hold down the MODE button until you get a message “button is pressed, wait for button to be released” in your console.
- Count to 10, then release the MODE button.
- You should get the following messages before it grabs the firmware and starts updating:
- process_config_recovery: set IP address and config to default 10.0.0.1
- process_config_recovery: image recovery
- image_recovery: Download default IOS tar image tftp://255.255.255.255/c1130-k9w7-tar.default
- It will take about five minutes to download the image and decompress it.
- When complete, the AP will reboot again.
- Once rebooted, you should get a message that says “Press Return to get started!”
- Hit Enter, and you should be greeted by some log messages and finally an ap> prompt.
Now you’re all set with an independent access point.
Troubleshooting
If the AP can’t find your TFTP server:
- Check /etc/default/tftpd-hpa and make sure that -a 255.255.255.255 is listed in the options
- Check that tftpd is running by using netstat -an | grep 69
- Check the firmware file is named correctly in /srv/tftp The AP will tell you if it can’t find it.
- Check that the permissions on the file is at least 644 (world readable)
- Check that your Debian machine has the correct IP (10.0.0.x) and netmask (255.255.255.0)
- You may need to redownload the firmware as it may have been corrupted.
Resources
Cisco Aironet 1130AG Access Point Install Guide – http://www.cisco.com/c/en/us/td/docs/wireless/access_point/1130/installation/guide/1130-TD-Book-Wrapper/113h_c3.html
Have fun and happy hacking!