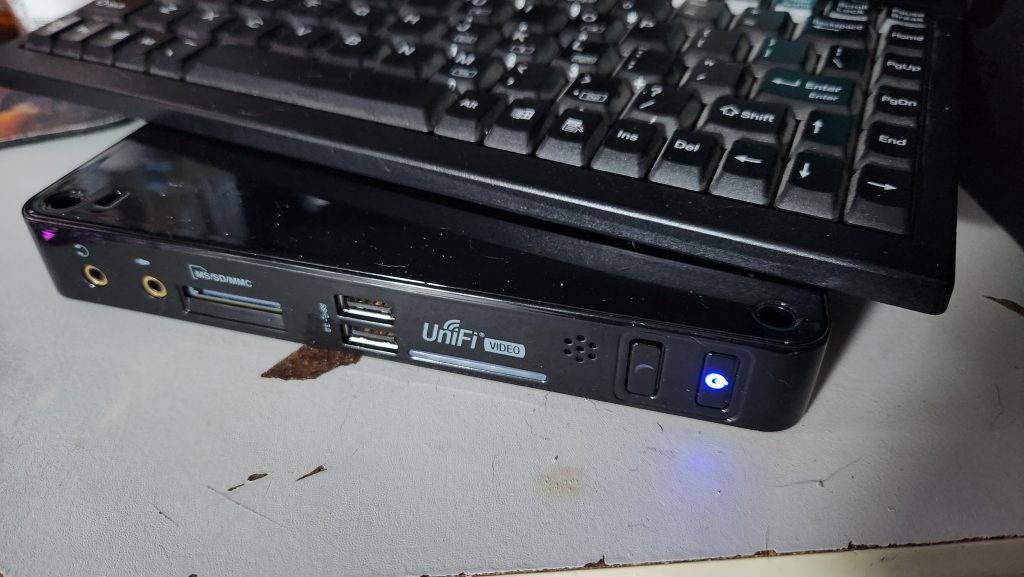
Tag: Linux

Quick Hack: Smartctl tests in a nutshell

by on Nov.19, 2019, under Hardware, Miscellaneous, Quick Hacks

This quick hack is a quick “need to know” list of Linux’s smartctl commands for hard drive diagnosis. I highly recommend using a USB drive dock for analyzing suspect drives. These commands are OS agnostic provided you’re running the vendor provided smartctl for either Linux or BSD.

For the purposes of this article, /dev/sdb is the drive under test. Make sure you know which /dev entry corresponds with the desired drive.

smartctl -a /dev/sdb Shows all smart attributes of /dev/sdb including test results, and drive make, model, and serial number.

smartctl -t short /dev/sdb Performs a “short” online test of /dev/sdb. Does not print test results. Does not test disk surface readability.

smartctl -t long /dev/sdb Performs a “long” offline test of /dev/sdb. Does not print test results. Tests the entire disk surface for readability and reallocates bad sectors. If your system is under a lot of disk I/O to the disk under test, this will cause the test to take longer to complete (hence running it in a USB dock or other non-system location)

smartctl -c /dev/sdb Estimates how long the disk check will take in minutes (Usually is wrong though, I wouldn’t set my watch by it.)

smartctl -l selftest /dev/sdb Shows the SMART test results table (instead of smartctl -a which shows EVERYTHING).

smartctl -X /dev/sdb Cancels a test in progress.

NOTES: Re-running smartctl -t against a drive already testing will show an error message which includes how long the test will take to complete (unlike smartctl -l, this time is actually more closer to reality).

In some installations that support it, hdparm -S 0 /dev/sdb will prevent a disk from going to sleep, however in theory, the disk should never sleep if it’s under an active test. This will not stop an ACPI sleep or hibernate event from shutting down the disk.

Happy hacking!
FIRESTORM_v1

Comments Off on Quick Hack: Smartctl tests in a nutshell :, more...

CVS Netbook Revisited

by on Jul.25, 2011, under Embedded devices, Hardware, How-To's, Linux, Software

A few months ago, I posted a hardware teardown of the CVS Sylvania Netbook pictured above. After working with it and performing a lot of research on it, I promised a follow up article, and here it is.  To sum it all up, with a bit of modification to the software, a spare SD card and a lot of patience, you can actually turn this thing into a somewhat useful Linux device.  There’s also some improvements and suggestions to be had for improving the Windows CE side of things should you decide to continue using it in its default state.

(continue reading…)

63 Comments :, , , , more...

Building Snort and Nessus – Ubuntu IDS Part 3

by on May.20, 2011, under Hardware, How-To's, Linux, Security, Software


In this final article in the three part Ubuntu IDS series, we will go over installing, compiling and configuring Snort and Nessus on our new IDS device.  We will use Snort to analyze traffic as seen by the IDS and we will use Nessus to perform vulnerability testing on the network. The process for installing Snort will also cover installing SnortReport provided by Symmetrix Technologies so we can translate Snort’s cryptic messages into a more readable format that we can take action on.  Read on as we wrap up the installation and finish our IDS device.

(continue reading…)

4 Comments :, , , more...

Setting up bonding networking -Ubuntu IDS Part 2

by on May.04, 2011, under Hardware, How-To's, Linux, Security, Software

In an earlier article, I demonstrated how you can build a passive monitoring device for an Ethernet network as the first part to a three part project to build a home IDS device.  In this article, the second in the series, I will describe how to set up the networking for an IDS using the passive tap that I built earlier.This setup will involve using a technique called bonding to take two physical interfaces and bond them together, creating a logical interface that we can use for Snort.  This article will also explain where is the best location to place the tap and what you can expect to see once the networking is set up using common Linux utilities like tcpdump.

(continue reading…)

2 Comments :, , , more...

Build a Passive Ethernet Tap – Ubuntu IDS Part 1

by on Apr.06, 2011, under Hardware, How-To's, Linux, Security, Software

Image courtesy of forums.overclockers.co.uk

One of the things that the GCIA study has taught me is that being able to monitor the network your computer is on is a critical necessity to maintaining a secure network. Corporate environments can set up IDS devices to monitor traffic however monitoring doesn’t work unless you have proper connectivity to what you want to monitor. Unfortunately, most of us don’t have central wiring in our house and expensive managed switches that can set up span sessions with which to monitor traffic in transit.  In this HOWTO, I will cover how to build your own monitoring connection that you can use on your own network to monitor traffic without breaking the bank. This article is first in a three part series on how to build your own home IDS for monitoring your network traffic. Look for the other two sections soon!
(continue reading…)

13 Comments :, , , more...

Installing Minecraft Server in Ubuntu Server

by on Jan.09, 2011, under How-To's, Linux, Software

Minecraft and Ubuntu logosOk, I’ll admit it.  I’ve been caught by the Minecraft bug.  It bit me hard and of course I learned rather quickly that there is a problem with using two laptops to play Minecraft on and that is that it’s a pain in the posterior to move your save games around.  In this article, I will be covering how to install Minecraft Server on a new installation of Ubuntu 9.04LTS.  These instructions will work for all current versions of Ubuntu, so if you’re using something newer or something older, these instructions should get you up and running in no time. (continue reading…)

41 Comments :, , , , more...

Hardware Pr0n: Sylvania “netbook” from CVS

by on Jan.08, 2011, under Embedded devices, Hardware, Hardware Pr0n, Investigative Dissassembly, Windows

cvs logo

Well, the annual gift-giving season has drawn to a close and now we are left with retailers trying to get rid of all that extra stuff that thy have left over in their inventories.  Of course as a hardware geek, I’m always on the look out for another great hack. While at my CVS I came across a Sylvania netbook device for under $100. Even better, I got mine as an open box for only $30 making it an awesome find.  Read further to discover what this little beastie’s hiding under its hood. (continue reading…)

72 Comments :, , , , more...

Dead Dockstar Resurrected with JTAG!

by on Sep.08, 2010, under Embedded devices, Hardware, How-To's, Linux

Hey, I never said I was a graphics designer.  This was created in MS Paint after 15 minutes searching for a zombie icon and a JTAG icon or an angel I could slap JTAG over.

The reason I haven’t written any more about my fun with the Dockstar was that due to an unfortunate set of circumstances I was left with a bricked dockstar. (read: I did something stupid.)  After performing a lot of research and thanks to a bunch of people over at the PlugApps.com Forum site who helped me, I was able to get it running.  Read more for a complete list of what you will need including how to build an adapter and where to get the needed JTAG kit. (continue reading…)

28 Comments :, , , , , , more...

Seagate Dockstar: Add an accessible serial port

by on Jul.21, 2010, under Embedded devices, Hardware, How-To's

Ok, so not long after I published the article on  the hardware teardown of the Seagate Dockstar, I couldn’t help myself  so I started working on things to do with this device.  I did a lot of research in regards to the capabilities of the Dockstar, including being able to push a customized Linux OS on the device.  Once I saw the article at Hackaday that covers exactly how to replace the OS, I knew I had to do it for myself.  There are two ways to perform this upgrade however in order to capture syslog output and to be able to get to the bootloader, a serial port is required.  Just about all of the sites will describe the pins needed to make the connection, however none of them detail how to do it very clearly and none of them address the issue of aesthetics.  Read on for my method of adding a serial port to the Dockstar without affecting the look of the device.

(continue reading…)

43 Comments :, , , , , more...

Hardware Porn: Seagate Dockstar teardown

by on Jul.14, 2010, under Embedded devices, Hardware Pr0n, Linux

Seagate LogoI was given a very interesting product by a friend of mine that happened to catch a good deal on woot.com a few days ago.  Apparently Seagate has made a network fileserver device for their Freeagent Go line of portable USB drives called the Freeagent DockStar. (I can only think that this is a play on Battlestar Galactica’s Baystar – a cylon “aircraft-carrier” of sorts.)  When I went to look for pictures online of the hardware, I was dismayed to find nothing about the inside of the little thing.  So here they are in all their exposed glory, the innards of the Seagate Dockstar.

(continue reading…)

13 Comments :, , , , , , more...